Lower Disassembly
NOTE: This pump is easiest to repair when left in the Part No. 218742 accessory pump stand and disassem- bled as instructed. For repair at a remote location, have another pump stand available.
NOTE: Seal kits are available for each lower size. See page 22. Kit parts are marked with an asterisk in the text and drawings, for example (3*).
NOTE: Throat packing kits are available. See page 22. Kit parts are marked with a symbol, for example (30†). For best results, install the TSL Pump Repair Kit 24F618 each time the throat packings are changed.
NOTE: Tool Kit 24F494 is available as an accessory. The kit includes two wrenches for use with the
NOTE: Complete pump repair kits are also available. The kits include all seal kit parts, throat packing kit parts, and TSL pump repair kit parts. See page 22.
1.Flush the pump, if possible.
2.Stop the pump at the middle of its stroke.
3.Relieve the pressure. See your separate pump manual.
4.Remove the lower from the motor as described in your separate pump manual.
NOTE: See FIG. 5 for an exploded view of the entire lower. See FIG. 6 for a cutaway view of the lower and an exploded view of the throat packings.
5.Remove the collar (41) and screws (56), cap (40), and manifold and bottle assembly (53).
NOTE: To replace the check valves in the TSL bottle, order Check Valve Repair Kit 24F404. Kit parts are marked with a symbol, for example (53b‡). To replace the bottle only, order Bottle Replacement Kit 24F405. Kit parts are marked with a symbol, for example (48e). The kit includes 5 bottles and 5 labels. See FIG. 1, FIG. 5, and FIG. 6.
Repair
6.Use a 13 mm socket wrench to loosen and remove the twelve capscrews (9) and lockwashers (8) on the outlet manifold (1).
7.Lift the manifold (1) off the outlet valve housing (2) and remove the ball guides (16), balls (18), seats (13) and seals (17). Remove the
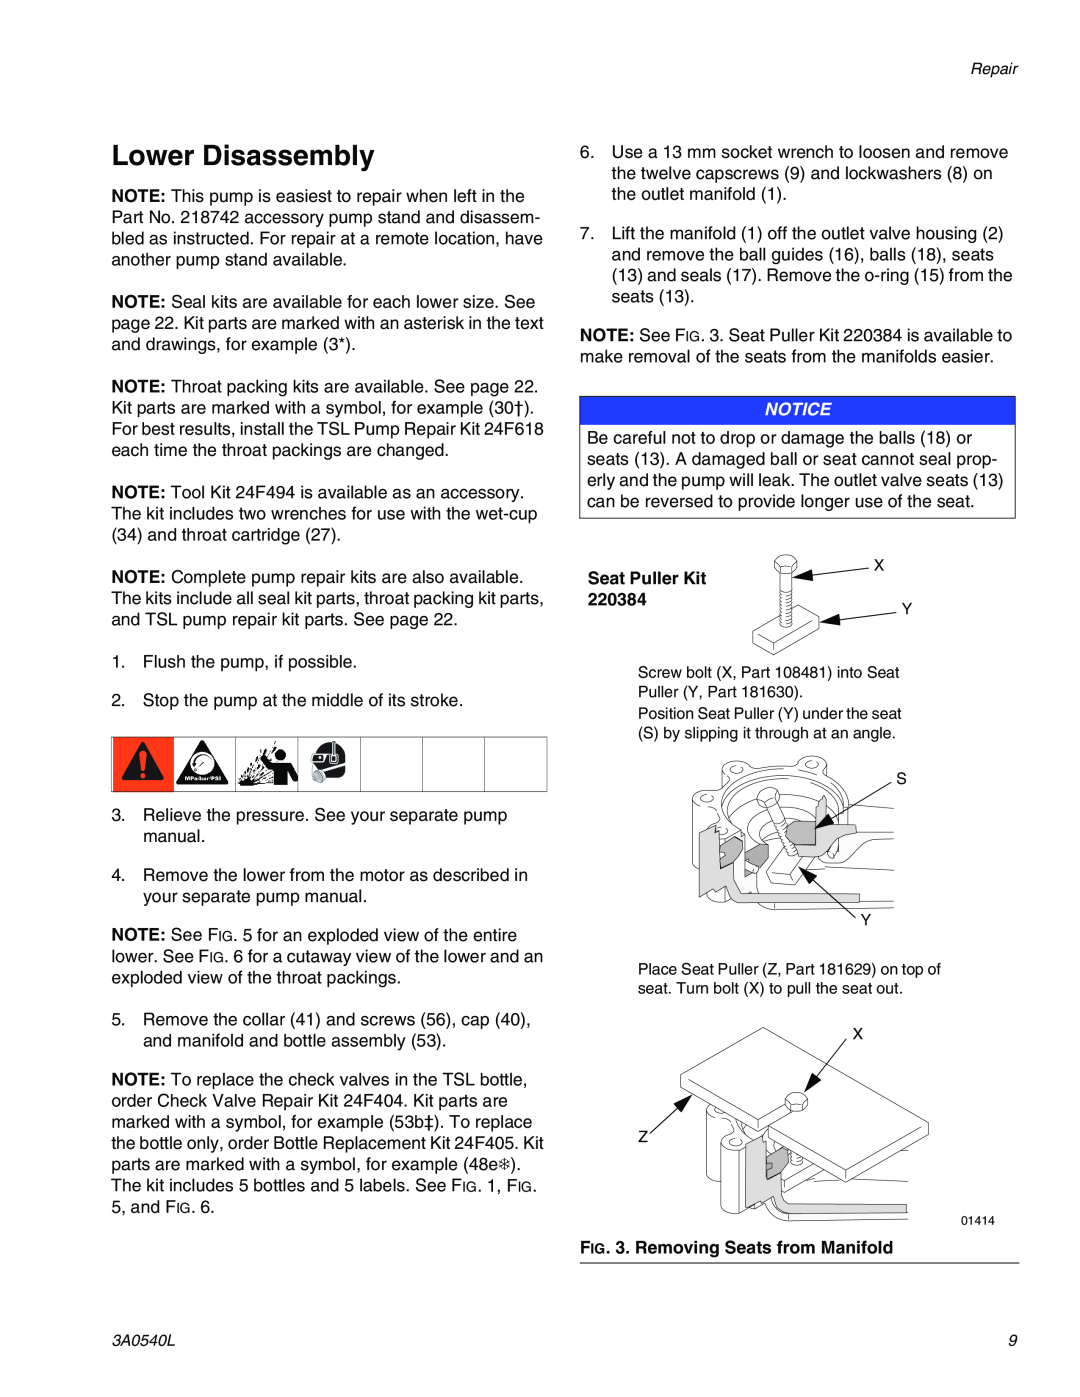
NOTE: See FIG. 3. Seat Puller Kit 220384 is available to make removal of the seats from the manifolds easier.
NOTICE
Be careful not to drop or damage the balls (18) or seats (13). A damaged ball or seat cannot seal prop- erly and the pump will leak. The outlet valve seats (13) can be reversed to provide longer use of the seat.
X
Seat Puller Kit |
|
220384 | Y |
|
Screw bolt (X, Part 108481) into Seat Puller (Y, Part 181630).
Position Seat Puller (Y) under the seat
(S) by slipping it through at an angle.
![]() S
S
![]() Y
Y
Place Seat Puller (Z, Part 181629) on top of seat. Turn bolt (X) to pull the seat out.
![]() X
X
Z![]()
01414
FIG. 3. Removing Seats from Manifold
3A0540L | 9 |