Operation

NOTICE

To prevent damage to pump, do not operate pump without it being securely mounted to a drum cover or support.

COMPONENT RUPTURE HAZARD

Overpressurizing any component can result in serious injury or property damage as a result of rupture, fire, and/or explosion.The maximum working pressure of each component in the system may not be the same. To reduce the risk of overpressurizing any component in the system:

Be sure you know the maximum working pressure of each component.

Never exceed the maximum working pressure of the lowest rated component in the system.

Do not exceed the maximum pump cycle rate.

The pump has a rated ratio of 10:1. However, it is capable of reaching stall pressures equal to 12.5 times the hydraulic input pressure. To calculate the fluid output pressure, multiply the hydraulic pressure shown on the hydraulic control module gauge by 12.5.

For example:

600 psi hydraulic x 12.5 = 7500 psi fluid output

4.14MPa hydraulic x 12.5 = 51.8 MPa fluid output

41.4bar hydraulic x 12.5 = 5.18 bar fluid output

Regulate hydraulic pressure to the pump so that no fluid line component or accessory is overpressurized.

Before Starting Pump

Check hydraulic fluid level in hydraulic power supply before each use. Add fluid as necessary to fill the lines.

Flush pump before using it for the first time to remove the light oil that was left in after factory test- ing to protect pump from corrosion. Be sure solvent used is compatible with the fluid to be pumped and the pump’s wetted parts. See Technical Data, page 26. Flush until clean solvent comes out of hose.

Operation

Starting Pump

For the following instructions, see FIG. 2.

1.Turn on hydraulic power supply.

2.Open return line shut-off valve (H) first, then slowly open the hydraulic supply shut-off valve (L).

3.Adjust flow control valve (Q) to limit the hydraulic flow to no more than 3 gpm (11 lpm), which is approximately 60 cycles per minute.

4.Adjust pressure reducing valve (N) to increase hydraulic inlet pressure from 50 to 600 psi (0.34 to 4.1 MPa, 3.4 to 41 bar).

Increasing inlet pressure, increases outlet pres- sure.

Decreasing inlet pressure, decreases outlet pressure.

5.Open drain valve while priming pump.

6.When pump is primed, close drain valve.

NOTICE

Always use lowest pressure possible to obtain desired results. This reduces pump wear.

Maximum Working Pressures

To reduce the risk of serious injury, including fluid injection and splashing in the eyes or on the skin, which may be caused if a component ruptures:

Never exceed 600 psi (4.1 MPa, 41 bar) Maximum Hydraulic Pressure to the reciprocator.

Never exceed 7500 psi (51 MPa, 517 bar) Maximum Outlet Pressure from the displacement pump.

Accessories added to the pump fluid outlet side should have at least a 7500 psi (51 MPa, 517 bar) Maximum Working Pressure.

Read and understand COMPONENT RUPTURE HAZARD instructions, page 7.

Shutdown

Relieve pressure, page 5, whenever you shutdown.

312350K

7

Page 7
Image 7
Graco 312350K important safety instructions Operation, Before Starting Pump, Shutdown

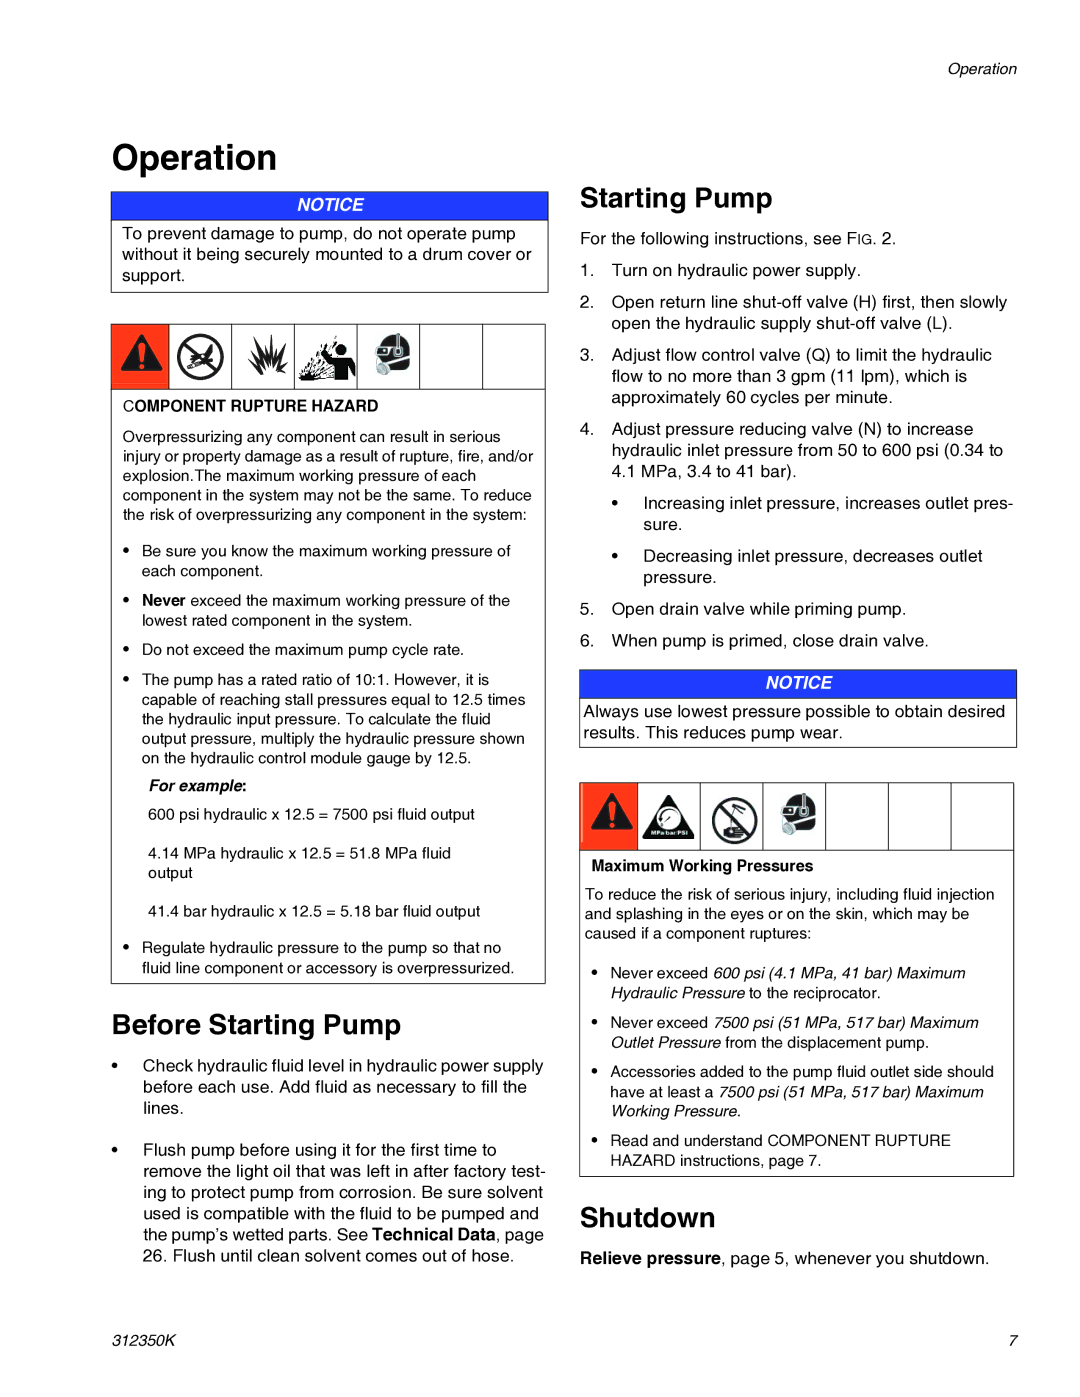
312350K specifications

The Graco 312350K is an advanced paint sprayer designed to cater to both DIY enthusiasts and professional users. Known for its impeccable performance and versatile applications, the Graco 312350K stands out in the world of paint equipment. One of its primary features is its Airless technology, which allows for a smooth finish with minimal overspray, making it ideal for a variety of projects, including indoor and outdoor painting tasks.

The sprayer is equipped with a powerful motor that ensures a consistent flow of paint, providing reliable coverage across surfaces. Its adjustable pressure control feature allows users to easily customize the flow rate according to the type of paint being used and the surface being covered. This versatility is crucial for achieving the best results, whether you are working with stains, primers, or topcoats.

Another notable characteristic of the Graco 312350K is its lightweight design, which enhances portability and ease of use. The integrated cart design allows for easy maneuverability around job sites, making it simple to transport from one area to another without hassle. Additionally, the sprayer comes with a premier RAC X tip, which is specifically designed for quicker and easier spraying while ensuring an even application.

In terms of maintenance, the Graco 312350K is designed for convenience. It features a quick-change filter that helps keep the paint running smoothly, reducing clogs and interruptions during the job. This means that users can focus more on their work and less on upkeep and troubleshooting.

The sprayer also accommodates a variety of paint types, including latex, oil-based paints, and stains, showcasing its flexibility for different projects. With a high painting capacity, the Graco 312350K is particularly suited for larger areas, saving time while still delivering a professional-quality finish.

Overall, the Graco 312350K is an exceptional tool that combines advanced technology with user-friendly features, making it an excellent choice for anyone looking to achieve a flawless paint job. Whether for home improvement projects or professional applications, the Graco 312350K delivers reliability, efficiency, and quality.