PUMP SERVICE

WARNING

To reduce the risk of serious bodily injury, including fluid injection, splashing in the eyes or on the skin, or injury from moving parts, always follow the Pressure Relief Procedure Warning before proceeding.

NOTE: The following metric wrenches are needed: M10, M13 and M30. Repair kits are available. Refer to the individual repair sections and the pump parts page for more details. For the best results, use all parts in the kits.

NOTE: There are two different tool kits to aid in servicing the pump. P/N 800±298 is used to ease installation of packings. P/N 800±271 includes the items in 800±298 and tools to aid in the removal of packing retainers.

Valves

NOTE: For a set of six valves, order P/N 801±472.

1.Remove the hex plug from the manifold using an M30 wrench.

2.Examine the o±ring under the hex plug and replace it if it is cut or distorted.

3.Remove the valve assembly from the cavity; the assembly may come apart.

4.Install the new valve. Install the o±ring and hex plug; torque to 75 ft±lb (103 Nm).

NOTE: Retorque the plug after 5 hours of operation.

Pumping Section

1.Remove the eight capscrews and lockwashers from the manifold using an M13 wrench.

2.Carefully separate the manifold from the crankcase.

NOTE: It may be necessary to tap the manifold lightly with a soft mallet to loosen.

CAUTION

Keep the manifold properly aligned with the ceramic plungers when removing to avoid damage to the plunger or seals.

3.Carefully examine each plunger for any scoring or cracking and replace as necessary.

Servicing the Plungers

NOTE: Plunger repair kit, P/N 801±474 or 803±510 is available to replace retainers, o±rings, washers and backup rings for three cylinders.

1.Loosen the plunger retaining screw five to six turns, using an M10 wrench. Push the plunger towards the crankcase to separate the plunger and retaining screw.

2.Remove the screw from the plunger and examine the o±ring, backup ring and copper bearing/gasket washer. Replace these parts, if necessary, using kit 801±474 or 803±510.

3.Remove the plunger and flinger from the plunger shaft. Clean, examine and replace parts as necessary.

4.Inspect the plunger shaft for oil leakage from the crankcase. If leaking is obvious, replace the oil seals. Otherwise, DO NOT remove these seals as they cannot be reused. An oil seal kit is available to replace the seals.

5.Lightly grease the flinger and oil seal, if it is being replaced and replace them on the plunger shaft. Then install the plunger.

6.Lightly grease the retaining screw and the outer end of the plunger. Place the washer, o±ring and backup ring around the screw and install the screw through the plunger. Torque to 14.4 ft±lb (19.5 Nm).

NOTE: If you plan to replace the packings, refer to Servicing the V±Packings.

7.Lubricate the outside of each plunger. Slide the manifold onto the crankcase, being careful not to damage the seals.

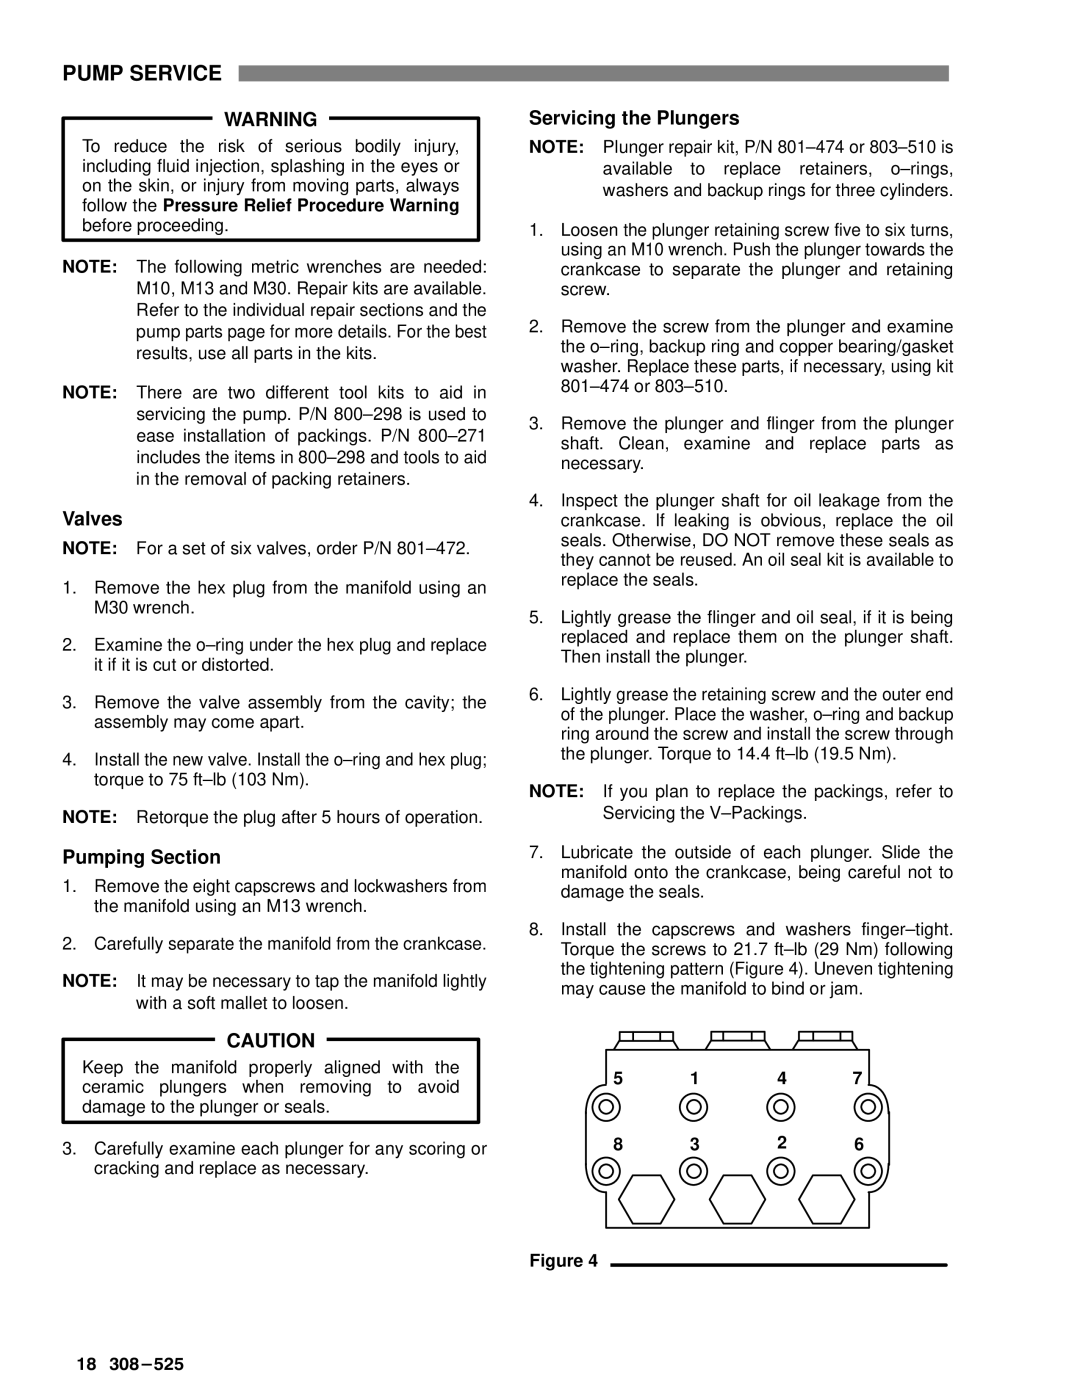
8.Install the capscrews and washers finger±tight. Torque the screws to 21.7 ft±lb (29 Nm) following the tightening pattern (Figure 4). Uneven tightening may cause the manifold to bind or jam.

5

1

4

7

8

3

2

6

Figure 4

18 3￿8￿525

Page 18
Image 18
Graco Inc 800-681, 308-525, 800-636, 800-635, 800-637, 3540, 3050 Pump Service, Valves, Pumping Section, Servicing the Plungers

3540, 800-637, 308-525, 800-635, 3050 specifications

Graco Inc. is a leading manufacturer of fluid handling equipment, primarily focused on innovative spray technology and equipment for various industrial applications. Among their extensive product lineup, Graco offers several models, including the 800-636, 800-681, 3050, 800-635, and 308-525, each designed to meet specific needs in the painting and coating industry.

The Graco 800-636 is known for its portability and versatility. This airless paint sprayer is designed for both small and medium-sized jobs. It features a robust pump that delivers consistent pressure, ensuring a smooth and even spray finish. One of its main technologies includes the ProControl feature, which allows users to adjust the pressure settings for optimal control when spraying different materials.

The 800-681 model takes efficiency to another level with its advanced fluid delivery system. This model is suitable for larger projects, as it is capable of handling a diverse range of coatings, including high-viscosity materials. With its SmartControl technology, the device provides users with the ability to monitor and manage spray patterns effectively, minimizing overspray and maximizing coverage.

Next in line is the Graco 3050, characterized by its heavy-duty construction designed for rugged environments. This model is particularly suited for industrial applications where reliability is critical. It features Graco's exclusive Endurance pump, ensuring longer lifespan and reduced maintenance. The 3050 also incorporates an ergonomic design, making it easier for operators to handle during extended usage.

The Graco 800-635 is another excellent option for professionals seeking a reliable solution for their painting needs. This model is equipped with a lightweight frame, making it easy to transport. It is designed with a focus on user-friendliness, featuring a one-touch setup and easy-to-use controls. Additionally, it includes a high-efficiency airless spray tip that enhances performance, especially when working with thicker materials.

Lastly, the 308-525 model stands out for its precision and durability. Known for its ability to deliver fine finishes, this sprayer is ideal for detailed work. The 308-525 integrates advanced filter technology that minimizes blockages, allowing for uninterrupted spraying. It is designed to work seamlessly with Graco's range of accessories, further expanding its versatility.

In summary, Graco Inc.'s 800-636, 800-681, 3050, 800-635, and 308-525 models boast a variety of features that cater to different applications in the painting and coating industry. With advanced technologies that enhance efficiency, control, and durability, Graco continues to be a trusted name for professionals looking for high-quality fluid handling equipment.