Plenum Service Clearances and Access Locations

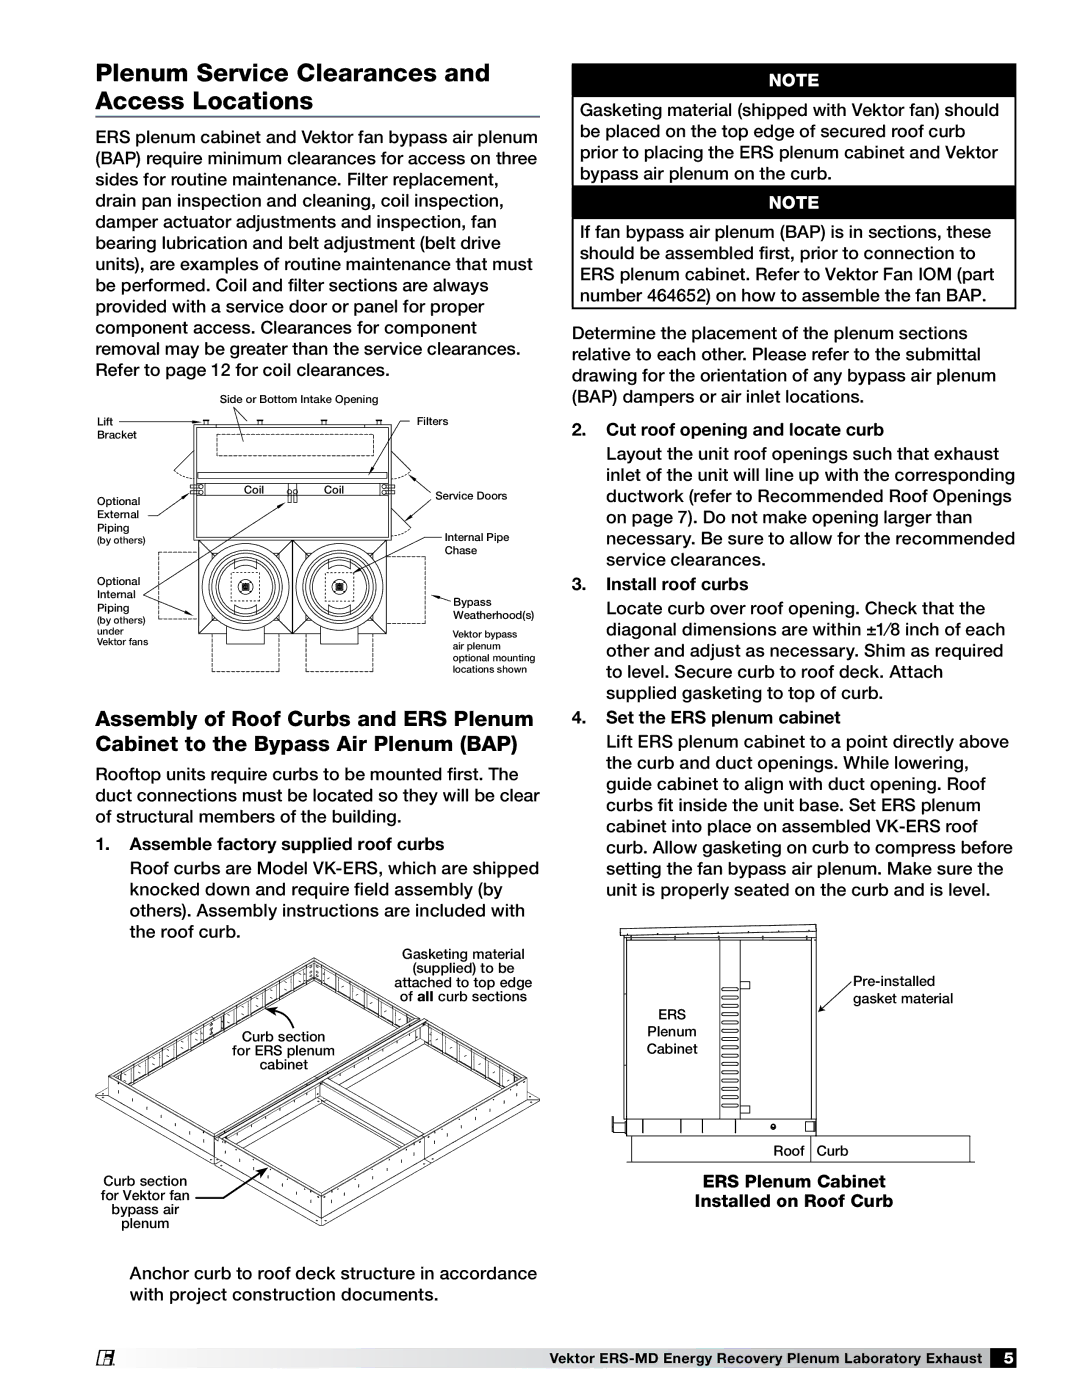
ERS plenum cabinet and Vektor fan bypass air plenum (BAP) require minimum clearances for access on three sides for routine maintenance. Filter replacement, drain pan inspection and cleaning, coil inspection, damper actuator adjustments and inspection, fan bearing lubrication and belt adjustment (belt drive units), are examples of routine maintenance that must be performed. Coil and filter sections are always provided with a service door or panel for proper component access. Clearances for component removal may be greater than the service clearances. Refer to page 12 for coil clearances.

NOTE

Gasketing material (shipped with Vektor fan) should be placed on the top edge of secured roof curb prior to placing the ERS plenum cabinet and Vektor bypass air plenum on the curb.

NOTE

If fan bypass air plenum (BAP) is in sections, these should be assembled first, prior to connection to ERS plenum cabinet. Refer to Vektor Fan IOM (part number 464652) on how to assemble the fan BAP.

Determine the placement of the plenum sections relative to each other. Please refer to the submittal drawing for the orientation of any bypass air plenum

Lift Bracket

Optional

External

Piping

(by others)

Optional

Internal

Piping

(by others) under Vektor fans

Side or Bottom Intake Opening

Coil

Coil

Filters

Service Doors

Internal Pipe

Chase

Bypass

Weatherhood(s)

Vektor bypass air plenum optional mounting locations shown

(BAP) dampers or air inlet locations.

2. Cut roof opening and locate curb

Layout the unit roof openings such that exhaust

inlet of the unit will line up with the corresponding

ductwork (refer to Recommended Roof Openings

on page 7). Do not make opening larger than

necessary. Be sure to allow for the recommended

service clearances.

3. Install roof curbs

Locate curb over roof opening. Check that the

diagonal dimensions are within ±1⁄8 inch of each

other and adjust as necessary. Shim as required

to level. Secure curb to roof deck. Attach

supplied gasketing to top of curb.

Assembly of Roof Curbs and ERS Plenum Cabinet to the Bypass Air Plenum (BAP)

Rooftop units require curbs to be mounted first. The duct connections must be located so they will be clear of structural members of the building.

1.Assemble factory supplied roof curbs

Roof curbs are Model VK-ERS, which are shipped knocked down and require field assembly (by others). Assembly instructions are included with the roof curb.

Gasketing material

(supplied) to be

attached to top edge of all curb sections

Curb section

for ERS plenum cabinet

Curb section for Vektor fan bypass air plenum

4. Set the ERS plenum cabinet

Lift ERS plenum cabinet to a point directly above

the curb and duct openings. While lowering,

guide cabinet to align with duct opening. Roof

curbs fit inside the unit base. Set ERS plenum

cabinet into place on assembled VK-ERS roof

curb. Allow gasketing on curb to compress before

setting the fan bypass air plenum. Make sure the

unit is properly seated on the curb and is level.

Pre-installed

gasket material

ERS

Plenum

Cabinet

Roof Curb

ERS Plenum Cabinet

Installed on Roof Curb

Anchor curb to roof deck structure in accordance with project construction documents.

Vektor ERS-MD Energy Recovery Plenum Laboratory Exhaust 5

Page 5
Image 5
Greenheck Fan 474118 installation manual Plenum Service Clearances and Access Locations

474118 specifications

The Greenheck Fan 474118 is a robust ventilation solution designed for a wide range of applications in commercial and industrial environments. Known for its efficiency and durability, the Greenheck 474118 stands out as a reliable choice for building professionals.

One of the primary features of the Greenheck Fan 474118 is its high-performance EC motor technology. This advanced motor type is designed to provide exceptional energy savings while delivering optimum airflow performance. By utilizing an electronically commutated motor, the 474118 ensures that users benefit from lower operational costs without compromising on effectiveness.

The fan is engineered with a heavy-gauge steel construction, offering significant durability. This robust design not only withstands the rigors of demanding environments but also ensures long-term reliability. Furthermore, the fan's corrosion-resistant finish adds another layer of protection, making it suitable for installations in various climates and conditions.

Noise reduction is another critical aspect of the Greenheck 474118. Equipped with a specially designed fan blade, it operates smoothly, minimizing operational noise. This characteristic makes it a perfect choice for applications where ambient noise levels must be kept to a minimum, such as offices, schools, and hospitals.

An important feature of the Greenheck 474118 is its versatility in airflow applications. It is available in multiple sizes and configurations, allowing it to meet diverse ventilation needs. Whether it's for exhaust, supply, or make-up air, this model can accommodate various installation requirements, providing flexibility for architects and engineers.

Additionally, the Greenheck 474118 integrates smart technology for enhanced control and monitoring. With options for building automation integration, users can effectively manage airflow, improving overall system efficiency. The control options extend to variable speed operation, ensuring that the fan can be adjusted as per the specific demands of the application.

In terms of installation, the Greenheck 474118 is designed for easy access and maintenance. Its user-friendly design allows service personnel to perform routine checks and repairs with minimal disruption.

In summary, the Greenheck Fan 474118 is a high-efficiency, versatile, and durable ventilation solution. With its advanced motor technology, noise reduction features, and ease of maintenance, it is an excellent investment for anyone looking to enhance their indoor environment's air quality and energy efficiency. Its ability to adapt to various systems makes it a preferred choice in the HVAC industry.