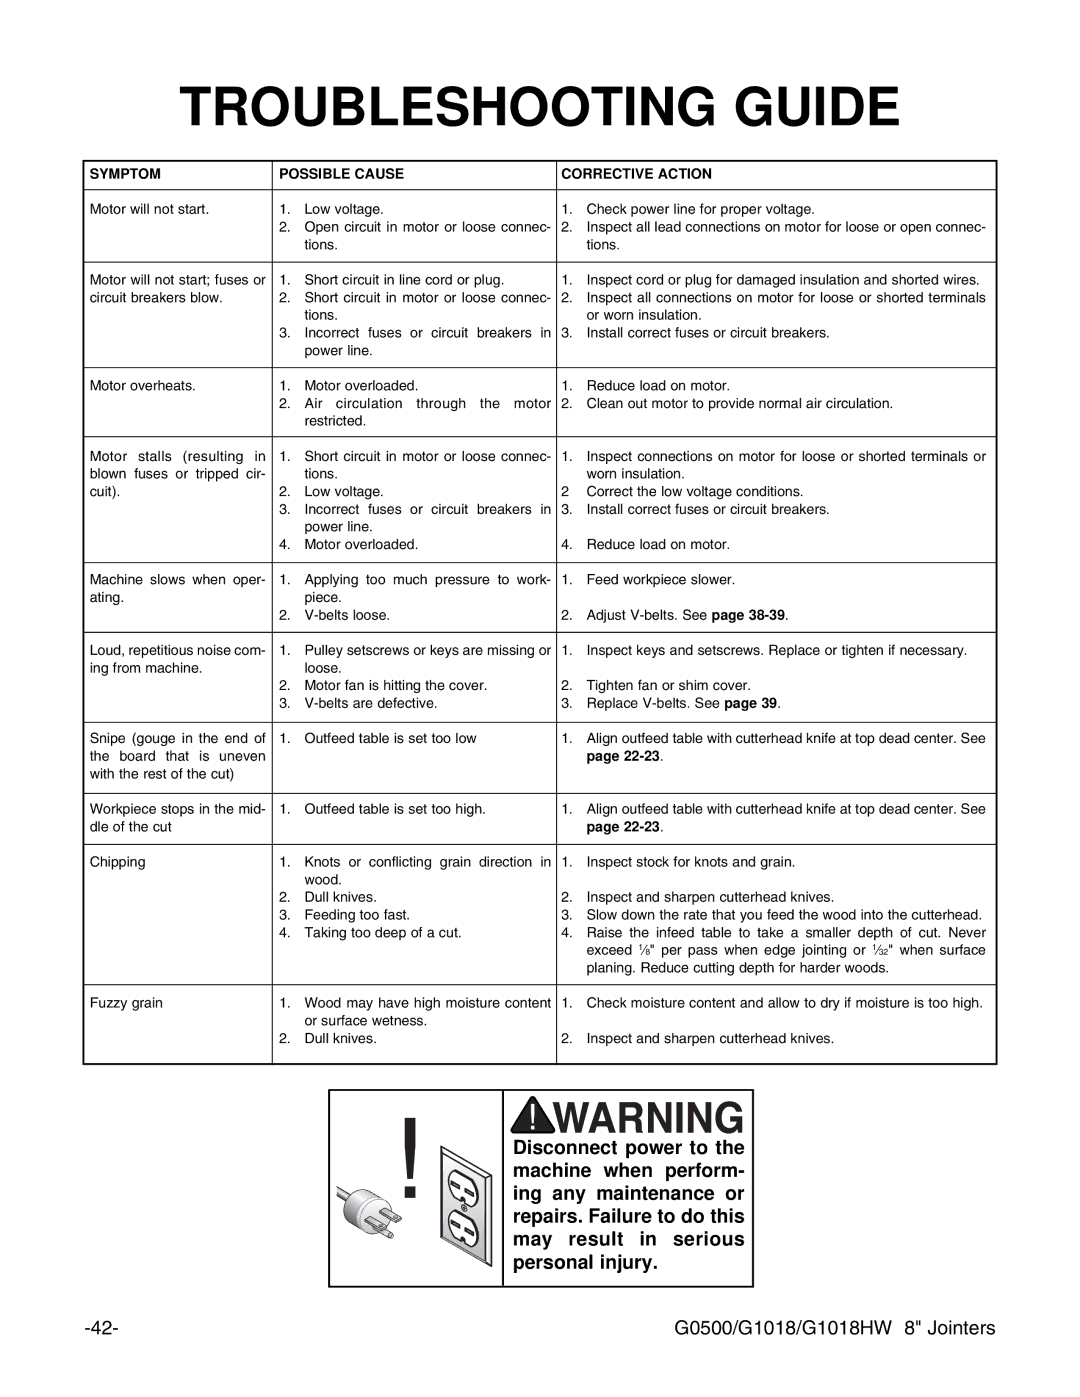
TROUBLESHOOTING GUIDE

SYMPTOM

POSSIBLE CAUSE

CORRECTIVE ACTION


Motor will not start.

1.

Low voltage.

1.

Check power line for proper voltage.


2.

Open circuit in motor or loose connec-

2.

Inspect all lead connections on motor for loose or open connec-


tions.


tions.


Motor will not start; fuses or

1.

Short circuit in line cord or plug.

1.

Inspect cord or plug for damaged insulation and shorted wires.

circuit breakers blow.

2.

Short circuit in motor or loose connec-

2.

Inspect all connections on motor for loose or shorted terminals


tions.


or worn insulation.


3.

Incorrect fuses or circuit breakers in

3.

Install correct fuses or circuit breakers.


power line.


Motor overheats.

1.

Motor overloaded.

1.

Reduce load on motor.


2.

Air circulation through the motor

2.

Clean out motor to provide normal air circulation.


restricted.


Motor stalls (resulting in

1.

Short circuit in motor or loose connec-

1.

Inspect connections on motor for loose or shorted terminals or

blown fuses or tripped cir-


tions.


worn insulation.

cuit).

2.

Low voltage.

2

Correct the low voltage conditions.


3.

Incorrect fuses or circuit breakers in

3.

Install correct fuses or circuit breakers.


power line.


4.

Motor overloaded.

4.

Reduce load on motor.


Machine slows when oper-

1.

Applying too much pressure to work-

1.

Feed workpiece slower.

ating.


piece.


2.

V-belts loose.

2.

Adjust V-belts. See page 38-39.


Loud, repetitious noise com-

1.

Pulley setscrews or keys are missing or

1.

Inspect keys and setscrews. Replace or tighten if necessary.

ing from machine.


loose.


2.

Motor fan is hitting the cover.

2.

Tighten fan or shim cover.


3.

V-belts are defective.

3.

Replace V-belts. See page 39.


Snipe (gouge in the end of

1.

Outfeed table is set too low

1.

Align outfeed table with cutterhead knife at top dead center. See

the board that is uneven


page 22-23.

with the rest of the cut)


Workpiece stops in the mid-

1.

Outfeed table is set too high.

1.

Align outfeed table with cutterhead knife at top dead center. See

dle of the cut


page 22-23.


Chipping

1.

Knots or conflicting grain direction in

1.

Inspect stock for knots and grain.


wood.


2.

Dull knives.

2.

Inspect and sharpen cutterhead knives.


3.

Feeding too fast.

3.

Slow down the rate that you feed the wood into the cutterhead.


4.

Taking too deep of a cut.

4.

Raise the infeed table to take a smaller depth of cut. Never


exceed 18" per pass when edge jointing or 132" when surface


planing. Reduce cutting depth for harder woods.


Fuzzy grain

1.

Wood may have high moisture content

1.

Check moisture content and allow to dry if moisture is too high.


or surface wetness.


2.

Dull knives.

2.

Inspect and sharpen cutterhead knives.


Disconnect power to the machine when perform- ing any maintenance or repairs. Failure to do this may result in serious personal injury.

-42-

G0500/G1018/G1018HW 8" Jointers

Page 44
Image 44
Grizzly G1018HW instruction manual Troubleshooting Guide, Symptom Possible Cause Corrective Action

G1018, G1018HW specifications

The Grizzly G1018HW and G1018 are compact, versatile woodworking machines designed for hobbyists and professionals alike. Known for their robust construction and user-friendly design, these models offer a multitude of features that cater to various woodworking needs.

At the heart of both models is a powerful motor that delivers consistent performance. The G1018HW, being the heavier variant, is built with enhanced durability in mind, making it ideal for users who demand a bit more from their machinery. It boasts an increased weight capacity, ensuring stability during operation, which is particularly beneficial for larger workpieces.

Both models come with an effective dust collection system, crucial for maintaining a clean and safe workspace. The integrated dust port connects easily to standard dust collection hoses, minimizing dust and debris during operation. This feature not only improves visibility but also contributes to overall health safety by reducing airborne particles.

The G1018 and G1018HW are equipped with precision-machined components, ensuring accuracy and reliability in cuts. The adjustable table height and tilt features provide versatility, allowing users to perform a range of operations, from jointing to planing. The intuitive controls and clear scale markings make it easy to set desired measurements without hassle.

Additionally, the machines are designed with portability in mind. Despite their solid build, they come with mobility features such as built-in wheels and handles, making it convenient to move them around the workshop or transport them to different job sites. The compact design fits well into smaller spaces without compromising on function.

Another notable characteristic is the availability of aftermarket accessories, which can enhance functionality further. Users can customize their G1018 models with additional attachments that increase their versatility, allowing them to tackle more complex tasks.

In summary, the Grizzly G1018HW and G1018 are exceptional additions to any woodworking setup. Their powerful motors, effective dust control systems, precision-engineered components, and user-friendly design set them apart in the realm of woodworking machines. Whether for a hobbyist or a seasoned professional, these models provide the practicality and reliability needed to produce high-quality results.