SMART Inter@ctive TV AND HOME NETWORK-
Wireless network settings
There are two ways of making the wireless net- work settings.
AAutomatic connection,
»Apart from Access Point Selection, all data regarding the connection settings (»IP Ad- dress«, »Netmask«, »Gateway« and »DNS«) are obtained from modem automatically.
BManual connection,
all connection settings (»IP Address«, »Netmask«, »Gateway« and »DNS«) must be configured manually.
Automatic connection
Most of the home networks are Dynamic. If you have a dynamic network, you must use a DSL modem that supports DHCP. Modems and IP sharers that support DHCP obtain the »DNS« values that are required for »IP Address«, »Netmask«, »Gateway« and internet access automatically, and thus you are not required to enter those values manually.
1Open the menu with »MENU«.
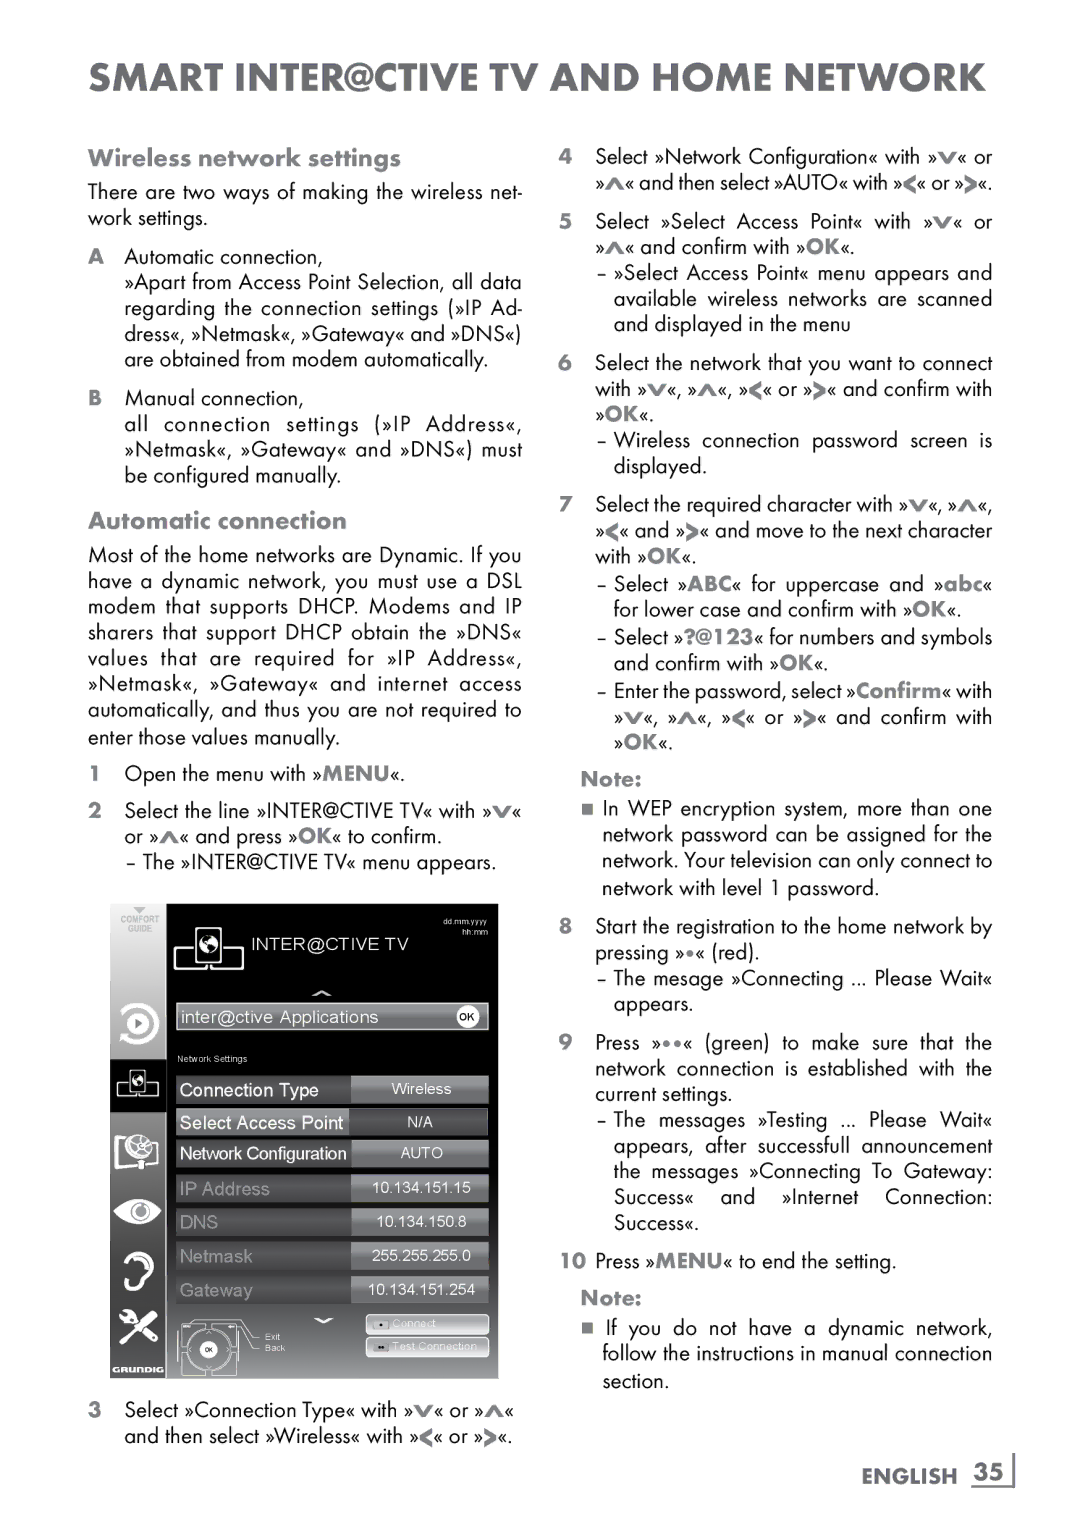
2Select the line »INTER@CTIVE TV« with »V« or »Λ« and press »OK« to confirm.
– The »INTER@CTIVE TV« menu appears.
|
| dd.mm.yyyy | |
INTER@CTIVE TV | hh:mm | ||
| |||
inter@ctive Applications |
| OK | |
Network Settings |
|
|
|
Connection Type |
| Wireless |
|
Select Access Point |
| N/A |
|
Network Configuration |
| AUTO |
|
IP Address | 10.134.151.15 | ||
DNS | 10.134.150.8 | ||
Netmask | 255.255.255.0 | ||
Gateway | 10.134.151.254 | ||
|
| Connect |
|
Exit |
| Test Connection | |
Back |
| ||
3Select »Connection Type« with »V« or »Λ« and then select »Wireless« with »<« or »>«.
4Select »Network Configuration« with »V« or »Λ« and then select »AUTO« with »<« or »>«.
5Select »Select Access Point« with »V« or »Λ« and confirm with »OK«.
–»Select Access Point« menu appears and available wireless networks are scanned and displayed in the menu
6Select the network that you want to connect with »V«, »Λ«, »<« or »>« and confirm with »OK«.
–Wireless connection password screen is displayed.
7Select the required character with »V«, »Λ«, »<« and »>« and move to the next character with »OK«.
–Select »ABC« for uppercase and »abc« for lower case and confirm with »OK«.
–Select »?@123« for numbers and symbols and confirm with »OK«.
–Enter the password, select »Confirm« with »V«, »Λ«, »<« or »>« and confirm with »OK«.
Note:
7In WEP encryption system, more than one network password can be assigned for the network. Your television can only connect to network with level 1 password.
8Start the registration to the home network by pressing »« (red).
–The mesage »Connecting ... Please Wait« appears.
9Press »« (green) to make sure that the network connection is established with the current settings.
–The messages »Testing ... Please Wait« appears, after successfull announcement the messages »Connecting To Gateway: Success« and »Internet Connection: Success«.
10Press »MENU« to end the setting.
Note:
7If you do not have a dynamic network, follow the instructions in manual connection section.
