The original pipeline of the water heater is an organic part of "Safe Care". Do not remove it by yourself.
Otherwise we will not take responsibility for the injure and loss caused by the safety trouble occurred therefrom.
3
 AttentionsBefore Usagein Installation
During installation, adequate space must be reserved for future maintenance and repair. If the water heater is installed within decoration boards, the right board shall be removable to
facilitate removing the plastic cover during maintenance.
City water inlet pressure shall not be less than 0.05MPa, Maximum pressure can not exceed
0.75MPa.
Electric water heater shall be installed indoors with ambient temperature above 0°C. The pipes shall be collectively laid. Hot water outlet shall not be too far from use points. In case farer
than 8m, hot water pipe shall have a thermal insulation to minimize heat loss.
 The mounting wall shall be firm and reliable to support four times the weight of water heater full of water. Non-load bearing walls or air brick walls must have corresponding protective measures like additional support, wall-through screws or back boards.
Electric water heater shall be located in a place easy for use, maintenance and with a floor drainer. In case the tank or pipes leak, nearby or lower facilities shall not be damaged. The installation location shall avoid being above toilet bowl, bathtub, washbasin or doorframe, which will cause a suppressed or unsafe feeling to users.
 Power for water heater shall be in a dry place free of water splash. (splash-proof box is preferred).
 Do not confuse inlet and outlet water pipes. Safety valve shall be installed at designated position with no random modification.
All water pipes should be installed by qualified water pipe installation workers. The pipelines should comply with the national standards and regulations on the prohibition of prevention tools todraw water to water source pipelines by way of inverse siphon, as well as local building codes.
The pipelines must be installed by qualified tap water pipe installation personnel. The pipelines must comply with applicable national standard that specifies preventing of non-drinking water in the appliances from being siphoned back to the water source as well as local construction regulations.
 OperationBefore UsageInstructions
 For the first use after installation, due to the dryness of the tank, first the city water inlet valve
from the showerhead or other outlets (the tank is full). Check connections are free of water leakage, and connect power.
Turn the knob to set your desired water heating temperature, which can be stepless changed between cold water inlet temperature and 75°C. In heating mode, heating lamp is lighted on. Normally the knob shall be positioned at highest temperature. This machine has a thermostat
setting value, and switch on again when water temperature decreases to certain value.
City water pressure ≥ 0.80MPa will cause much water fiowing out from safety valve presuure relief vent. This is due to too high water pressure. Please ask after-sales service for correction.
 AttentionsBefore Usagein Operation
1 To avoid causing machine troubles, do not connect power before tank is full of water.
2 Adjust a suitable temperature before use, for water temperature above 50°C may burn your skin. 3 This product is closed water heater, which can supply hot water through pipe connection to
several points like bathroom (bathtub, washbasin, showerhead) and kitchen.
5
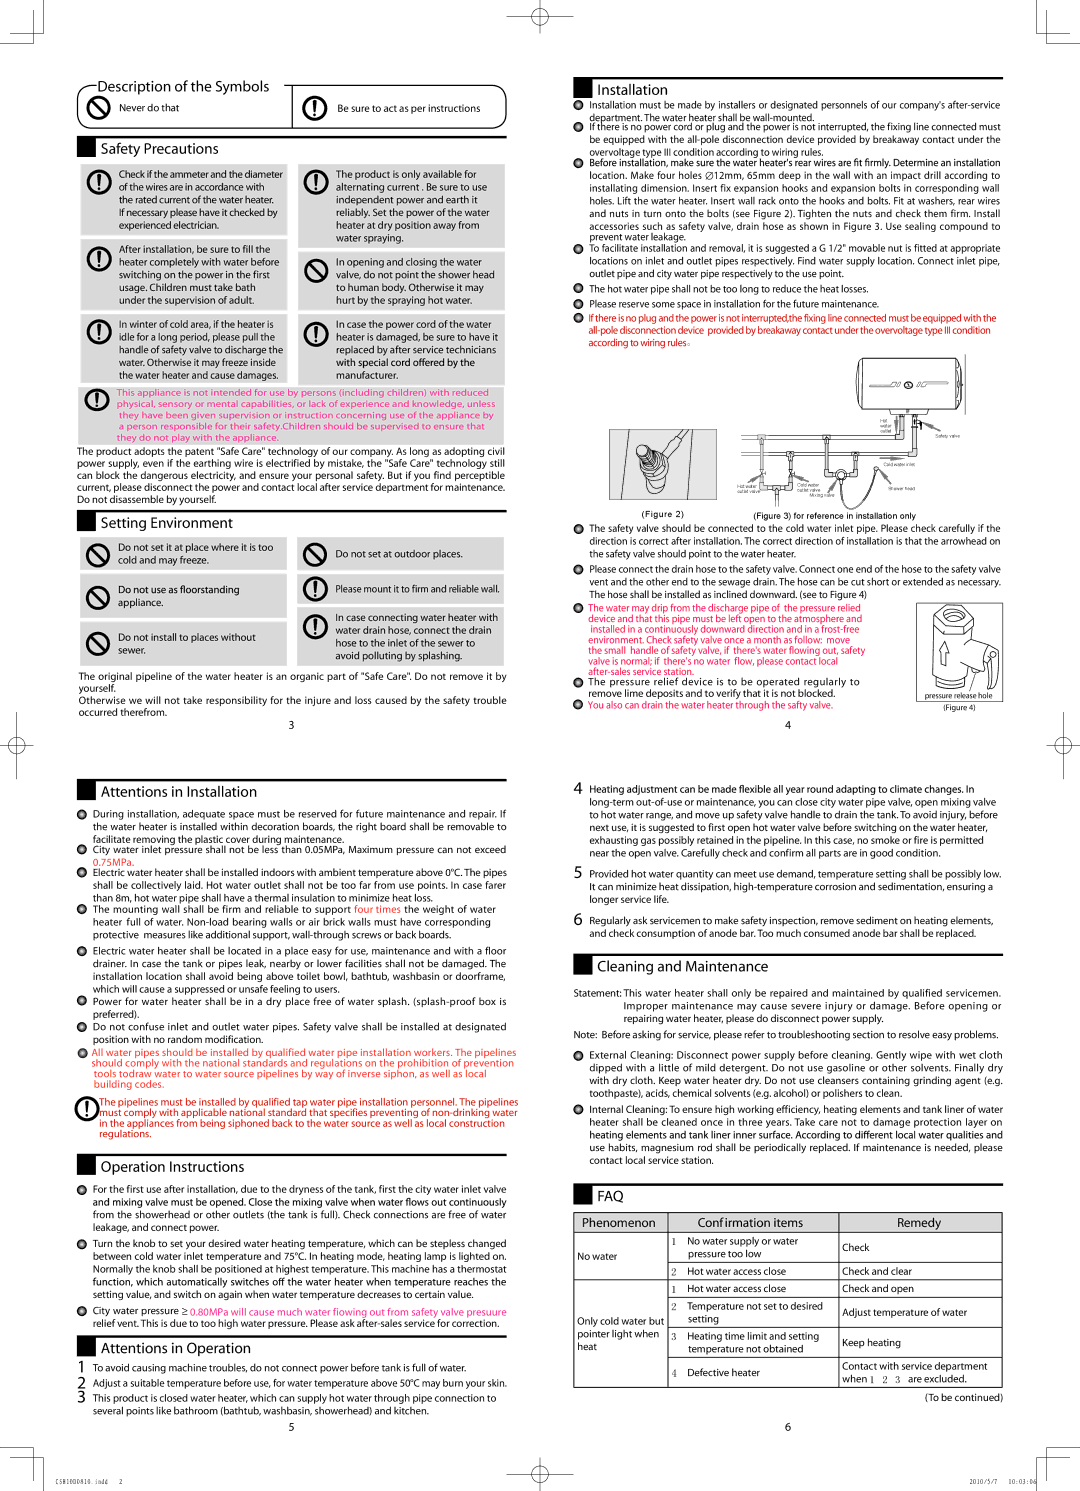
The pressure relief device is to be operated regularly to | |
remove lime deposits and to verify that it is not blocked. | pressure release hole |
You also can drain the water heater through the safty valve. | (Figure 4) |
4
4
long-term out-of-use or maintenance, you can close city water pipe valve, open mixing valve to hot water range, and move up safety valve handle to drain the tank. To avoid injury, before next use, it is suggested to first open hot water valve before switching on the water heater, exhausting gas possibly retained in the pipeline. In this case, no smoke or fire is permitted near the open valve. Carefully check and confirm all parts are in good condition.
5 Provided hot water quantity can meet use demand, temperature setting shall be possibly low. It can minimize heat dissipation, high-temperature corrosion and sedimentation, ensuring a longer service life.
6 Regularly ask servicemen to make safety inspection, remove sediment on heating elements, and check consumption of anode bar. Too much consumed anode bar shall be replaced.
 CleaningBefore Usageand Maintenance
Statement: This water heater shall only be repaired and maintained by qualified servicemen. Improper maintenance may cause severe injury or damage. Before opening or repairing water heater, please do disconnect power supply.
Note: Before asking for service, please refer to troubleshooting section to resolve easy problems.
External Cleaning: Disconnect power supply before cleaning. Gently wipe with wet cloth dipped with a little of mild detergent. Do not use gasoline or other solvents. Finally dry with dry cloth. Keep water heater dry. Do not use cleansers containing grinding agent (e.g. toothpaste), acids, chemical solvents (e.g. alcohol) or polishers to clean.
 Internal Cleaning: To ensure high working efficiency, heating elements and tank liner of water heater shall be cleaned once in three years. Take care not to damage protection layer on
use habits, magnesium rod shall be periodically replaced. If maintenance is needed, please contact local service station.
| FAQ | | |
| Before Usage | |
Phenomenon | | Confirmation items | Remedy |
| | | |
| 1 | No water supply or water | Check |
No water | | pressure too low |
| |
| 2 | Hot water access close | Check and clear |
| | | |
| 1 | Hot water access close | Check and open |
| | | |
| 2 | Temperature not set to desired | Adjust temperature of water |
Only cold water but | | setting |
| |
pointer light when | 3 | Heating time limit and setting | Keep heating |
heat | | temperature not obtained |
| |
| | | | |
| | 4 | Defective heater | Contact with service department |
| when 1 2 3 are excluded. |
| | | |
| | | | |
| | | | (To be continued) |
6