Harbor Freight Tools 
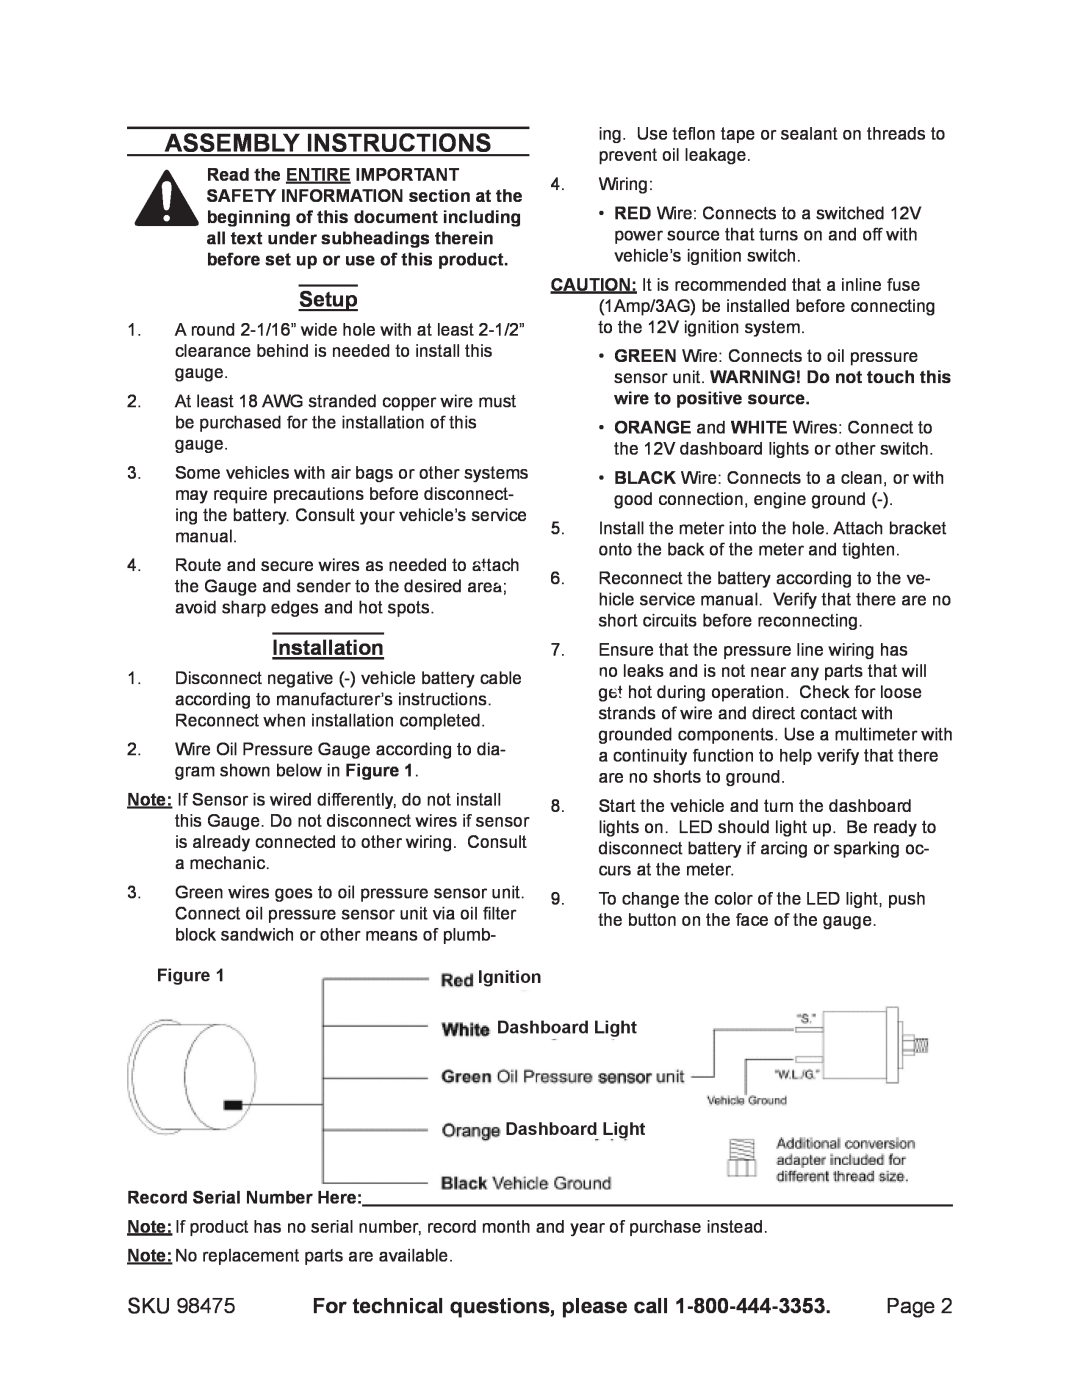
98475 Assembly Instructions, Setup, Installation, Ignition, Dashboard Light

Models: 98475

1 2
Download 2 pages 56.3 Kb
Page 2
Image 2
Assembly Instructions

Assembly Instructions

Read the entire Important Safety Information section at the beginning of this document including all text under subheadings therein before set up or use of this product.

Setup

1.A round 2-1/16” wide hole with at least 2-1/2” clearance behind is needed to install this gauge.

2.At least 18 AWG stranded copper wire must be purchased for the installation of this gauge.

3.Some vehicles with air bags or other systems may require precautions before disconnect- ing the battery. Consult your vehicle’s service manual.

4.Route and secure wires as needed to attach the Gauge and sender to the desired area; avoid sharp edges and hot spots.

Installation

1.Disconnect negative (-) vehicle battery cable according to manufacturer’s instructions. Reconnect when installation completed.

2.Wire Oil Pressure Gauge according to dia- gram shown below in Figure 1.

Note: If Sensor is wired differently, do not install this Gauge. Do not disconnect wires if sensor is already connected to other wiring. Consult

a mechanic.

3.Green wires goes to oil pressure sensor unit.

Connect oil pressure sensor unit via oil filter block sandwich or other means of plumb-

ing. Use teflon tape or sealant on threads to prevent oil leakage.

4.Wiring:

RED Wire: Connects to a switched 12V power source that turns on and off with vehicle’s ignition switch.

CAUTION: It is recommended that a inline fuse (1Amp/3AG) be installed before connecting to the 12V ignition system.

GREEN Wire: Connects to oil pressure sensor unit. WARNING! Do not touch this wire to positive source.

ORANGE and WHITE Wires: Connect to the 12V dashboard lights or other switch.

BLACK Wire: Connects to a clean, or with good connection, engine ground (-).

5.Install the meter into the hole. Attach bracket onto the back of the meter and tighten.

6.Reconnect the battery according to the ve- hicle service manual. Verify that there are no short circuits before reconnecting.

7.Ensure that the pressure line wiring has no leaks and is not near any parts that will get hot during operation. Check for loose strands of wire and direct contact with grounded components. Use a multimeter with a continuity function to help verify that there are no shorts to ground.

8.Start the vehicle and turn the dashboard lights on. LED should light up. Be ready to disconnect battery if arcing or sparking oc- curs at the meter.

9.To change the color of the LED light, push the button on the face of the gauge.

Figure 1

Ignition


Dashboard Light

Dashboard Light

Record Serial Number Here:

Note: If product has no serial number, record month and year of purchase instead.

Note: No replacement parts are available.

SKU 98475

For technical questions, please call 1-800-444-3353.

Page 2

Page 2
Image 2
Harbor Freight Tools 98475 Assembly Instructions, Setup, Installation, For technical questions, please call, Ignition