HOW TO USE YOUR REAL MEAL OVEN

For best results, oven must be level. Do not lift or tilt oven during use. Note: Oven timer requires batteries. (See "OVEN TIMER BATTERY INSTALLATION.")

Preheating Oven

Setting/Resetting Timer

Inserting Pan

ARROW

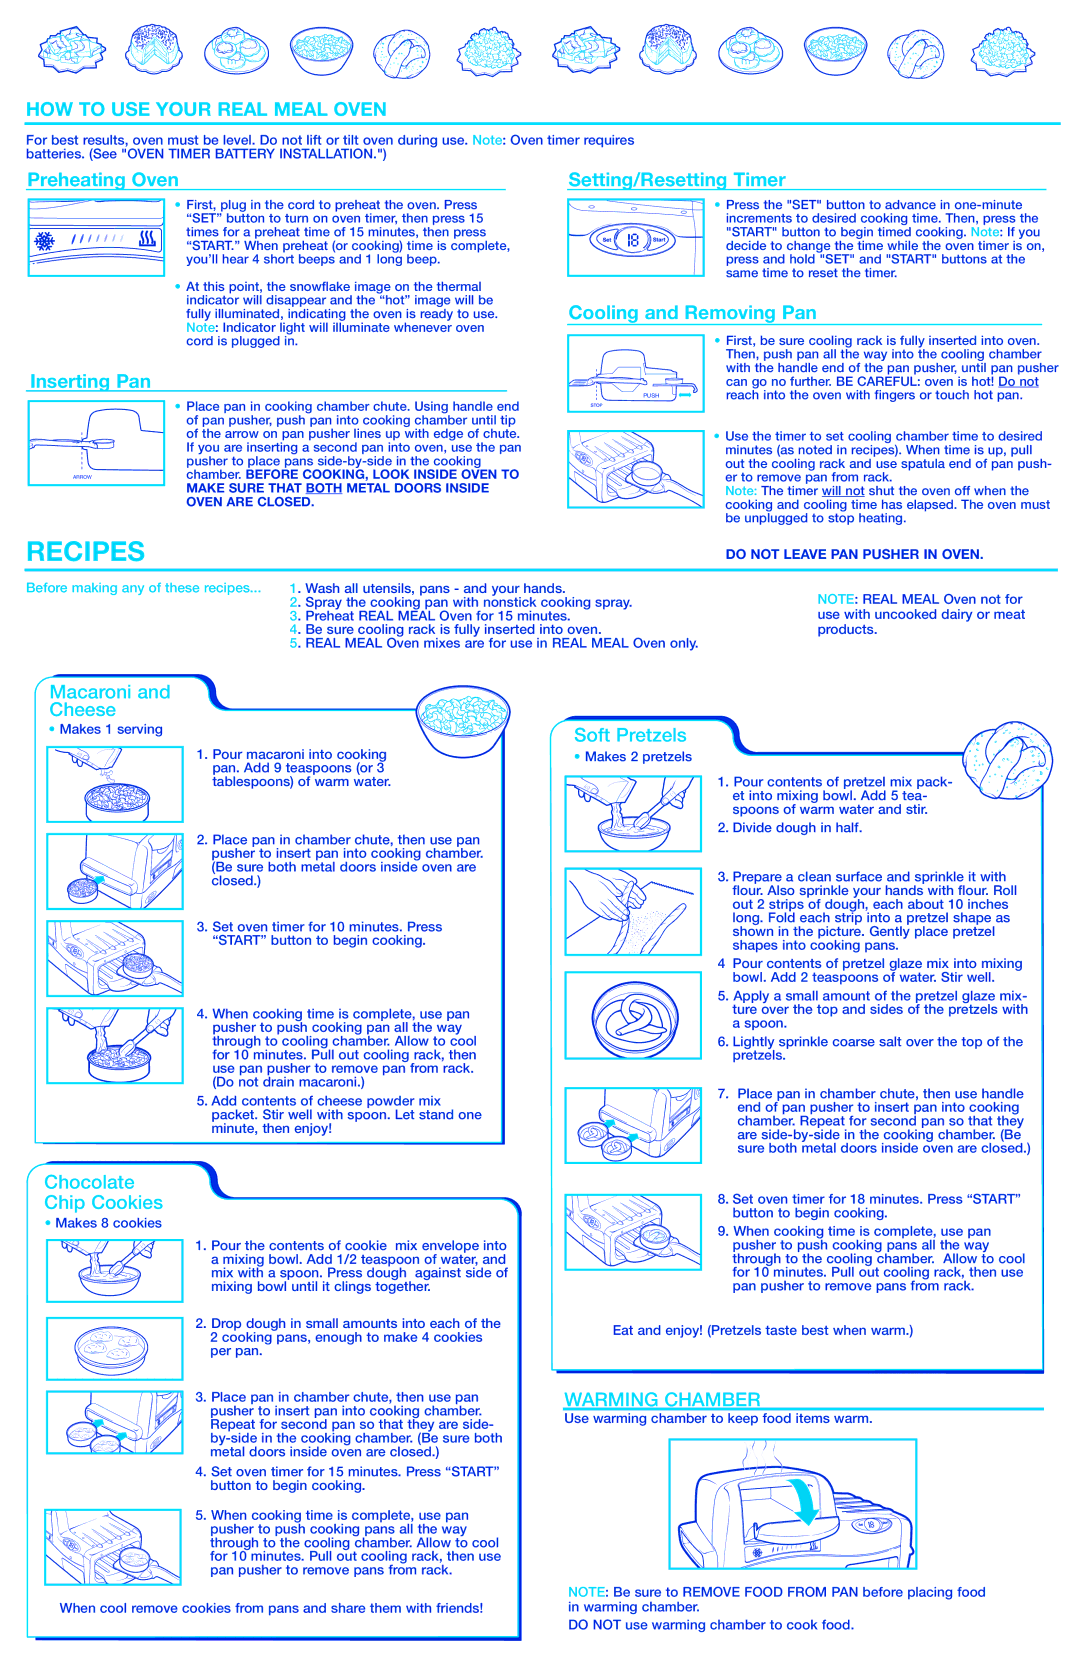
First, plug in the cord to preheat the oven. Press “SET” button to turn on oven timer, then press 15 times for a preheat time of 15 minutes, then press “START.” When preheat (or cooking) time is complete, you’ll hear 4 short beeps and 1 long beep.

At this point, the snowflake image on the thermal indicator will disappear and the “hot” image will be fully illuminated, indicating the oven is ready to use. Note: Indicator light will illuminate whenever oven cord is plugged in.

Place pan in cooking chamber chute. Using handle end of pan pusher, push pan into cooking chamber until tip of the arrow on pan pusher lines up with edge of chute. If you are inserting a second pan into oven, use the pan pusher to place pans side-by-side in the cooking chamber. BEFORE COOKING, LOOK INSIDE OVEN TO

MAKE SURE THAT BOTH METAL DOORS INSIDE OVEN ARE CLOSED.

Press the "SET" button to advance in one-minute increments to desired cooking time. Then, press the

"START" button to begin timed cooking. Note: If you decide to change the time while the oven timer is on, press and hold "SET" and "START" buttons at the same time to reset the timer.

Cooling and Removing Pan

First, be sure cooling rack is fully inserted into oven. Then, push pan all the way into the cooling chamber


with the handle end of the pan pusher, until pan pusher


can go no further. BE CAREFUL: oven is hot! Do not

PUSH

reach into the oven with fingers or touch hot pan.

Use the timer to set cooling chamber time to desired minutes (as noted in recipes). When time is up, pull out the cooling rack and use spatula end of pan push- er to remove pan from rack.

Note: The timer will not shut the oven off when the cooking and cooling time has elapsed. The oven must be unplugged to stop heating.

RECIPES

DO NOT LEAVE PAN PUSHER IN OVEN.

Before making any of these recipes...

1. Wash all utensils, pans - and your hands.


2. Spray the cooking pan with nonstick cooking spray.


3. Preheat REAL MEAL Oven for 15 minutes.


4. Be sure cooling rack is fully inserted into oven.


5. REAL MEAL Oven mixes are for use in REAL MEAL Oven only.

NOTE: REAL MEAL Oven not for use with uncooked dairy or meat products.

Macaroni and

Cheese

Makes 1 serving

1. Pour macaroni into cooking pan. Add 9 teaspoons (or 3 tablespoons) of warm water.

2. Place pan in chamber chute, then use pan pusher to insert pan into cooking chamber. (Be sure both metal doors inside oven are closed.)

3. Set oven timer for 10 minutes. Press

“START” button to begin cooking.

4. When cooking time is complete, use pan pusher to push cooking pan all the way through to cooling chamber. Allow to cool for 10 minutes. Pull out cooling rack, then use pan pusher to remove pan from rack. (Do not drain macaroni.)

5.Add contents of cheese powder mix packet. Stir well with spoon. Let stand one minute, then enjoy!

Chocolate

Chip Cookies

Makes 8 cookies

1. Pour the contents of cookie mix envelope into a mixing bowl. Add 1/2 teaspoon of water, and mix with a spoon. Press dough against side of mixing bowl until it clings together.

2. Drop dough in small amounts into each of the 2 cooking pans, enough to make 4 cookies per pan.

3. Place pan in chamber chute, then use pan pusher to insert pan into cooking chamber. Repeat for second pan so that they are side- by-side in the cooking chamber. (Be sure both metal doors inside oven are closed.)

4.Set oven timer for 15 minutes. Press “START” button to begin cooking.

5. When cooking time is complete, use pan pusher to push cooking pans all the way through to the cooling chamber. Allow to cool for 10 minutes. Pull out cooling rack, then use pan pusher to remove pans from rack.

When cool remove cookies from pans and share them with friends!

Soft Pretzels

Makes 2 pretzels

1. Pour contents of pretzel mix pack- et into mixing bowl. Add 5 tea- spoons of warm water and stir.

2. Divide dough in half.

3. Prepare a clean surface and sprinkle it with flour. Also sprinkle your hands with flour. Roll out 2 strips of dough, each about 10 inches long. Fold each strip into a pretzel shape as shown in the picture. Gently place pretzel shapes into cooking pans.

4Pour contents of pretzel glaze mix into mixing bowl. Add 2 teaspoons of water. Stir well.

5. Apply a small amount of the pretzel glaze mix- ture over the top and sides of the pretzels with a spoon.

6.Lightly sprinkle coarse salt over the top of the pretzels.

7. Place pan in chamber chute, then use handle end of pan pusher to insert pan into cooking chamber. Repeat for second pan so that they are side-by-side in the cooking chamber. (Be sure both metal doors inside oven are closed.)

8. Set oven timer for 18 minutes. Press “START” button to begin cooking.

9. When cooking time is complete, use pan pusher to push cooking pans all the way through to the cooling chamber. Allow to cool for 10 minutes. Pull out cooling rack, then use pan pusher to remove pans from rack.

Eat and enjoy! (Pretzels taste best when warm.)

WARMING CHAMBER

Use warming chamber to keep food items warm.

NOTE: Be sure to REMOVE FOOD FROM PAN before placing food in warming chamber.

DO NOT use warming chamber to cook food.

Page 3
Image 3
Hasbro 65759 manual HOW to USE Your Real Meal Oven, Macaroni Cheese, Chocolate Chip Cookies, Soft Pretzels

65759 specifications

Hasbro 65759 refers to a specific model of a collectible toy that has captured the interest of both children and collectors alike. This toy, produced by the renowned toy company Hasbro, combines innovative features with high-quality craftsmanship to provide an engaging play experience.

One of the main features of Hasbro 65759 is its intricate design and attention to detail. The toy is designed to represent a popular character from a beloved franchise, showcasing vibrant colors and articulated parts that allow for dynamic play. The figure boasts a variety of poses, making it ideal for imaginative storytelling or display in a collection.

The technology embedded in Hasbro 65759 enhances the interactivity of the toy. Some versions of this collectible may incorporate sound effects or light features that activate upon certain movements or gestures. This technological integration not only adds a layer of excitement but also encourages children to explore creativity and engage in role-playing scenarios.

Another characteristic of Hasbro 65759 is its durability. Constructed from high-quality materials, the toy is designed to withstand rough play, ensuring it remains a treasured item for years. Its compact design makes it easy for children to carry around, ideal for playdates or trips. Furthermore, Hasbro prioritizes safety, ensuring that all materials used in the construction of the toy are non-toxic and suitable for various age groups.

In addition to its physical attributes, Hasbro 65759 is part of a broader ecosystem of toys and merchandise. Collectors often seek out various figures or accessories related to the franchise, creating a community surrounding the toy that fosters connections among fans.

As a collectible, Hasbro 65759 also serves to remind both young and old of the timeless joy that toys can bring. Whether it is used for imaginative play, collecting, or display, this toy offers a multifaceted experience that appeals to a wide audience. Overall, Hasbro 65759 represents the innovative spirit and commitment to quality that has made Hasbro a leading name in the toy industry.