DooAll
12
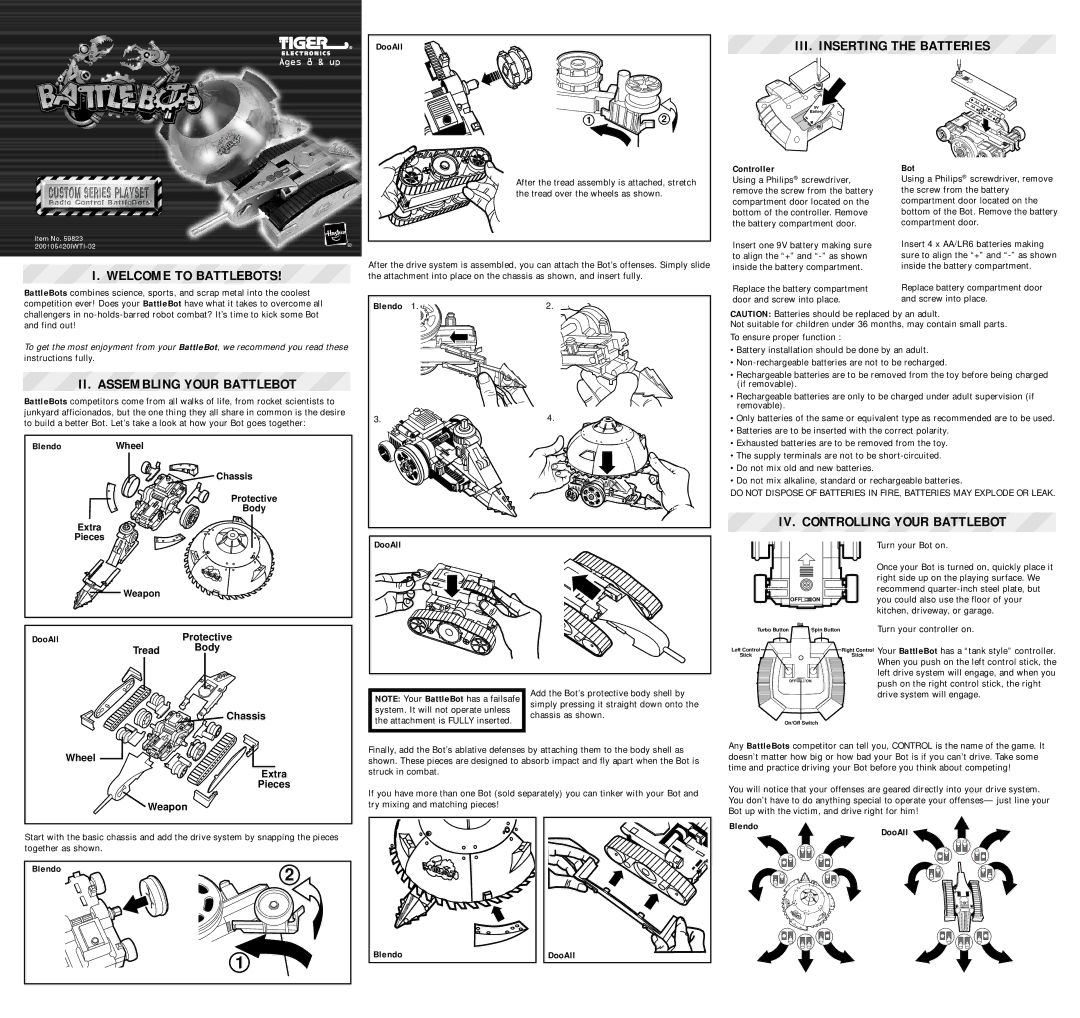
III. INSERTING THE BATTERIES
| AA |
9V | AA |
Battery | AA |
| AA |
I. WELCOME TO BATTLEBOTS!
BattleBots combines science, sports, and scrap metal into the coolest competition ever! Does your BattleBot have what it takes to overcome all
After the tread assembly is attached, stretch the tread over the wheels as shown.
After the drive system is assembled, you can attach the Bot’s offenses. Simply slide the attachment into place on the chassis as shown, and insert fully.
Blendo | 1. | 2. |
Controller
Using a Philips® screwdriver, remove the screw from the battery compartment door located on the bottom of the controller. Remove the battery compartment door.
Insert one 9V battery making sure to align the “+” and
Replace the battery compartment door and screw into place.
Bot
Using a Philips® screwdriver, remove the screw from the battery compartment door located on the bottom of the Bot. Remove the battery compartment door.
Insert 4 x AA/LR6 batteries making sure to align the “+” and
Replace battery compartment door and screw into place.
challengers in
To get the most enjoyment from your BattleBot, we recommend you read these instructions fully.
II. ASSEMBLING YOUR BATTLEBOT
BattleBots competitors come from all walks of life, from rocket scientists to junkyard afficionados, but the one thing they all share in common is the desire to build a better Bot. Let’s take a look at how your Bot goes together:
BlendoWheel
Chassis
Protective
Body
Extra
Pieces
| Weapon |
|
DooAll |
| Protective |
| Tread | Body |
|
|
Chassis
Wheel
Extra
3. | 4. |
DooAll |
|
NOTE: Your BattleBot has a failsafe | Add the Bot’s protective body shell by | |
simply pressing it straight down onto the | ||
system. It will not operate unless | ||
chassis as shown. | ||
the attachment is FULLY inserted. | ||
| ||
|
|
Finally, add the Bot’s ablative defenses by attaching them to the body shell as shown. These pieces are designed to absorb impact and fly apart when the Bot is struck in combat.
CAUTION: Batteries should be replaced by an adult.
Not suitable for children under 36 months, may contain small parts. To ensure proper function :
•Battery installation should be done by an adult.
•
•Rechargeable batteries are to be removed from the toy before being charged (if removable).
•Rechargeable batteries are only to be charged under adult supervision (if removable).
•Only batteries of the same or equivalent type as recommended are to be used.
•Batteries are to be inserted with the correct polarity.
•Exhausted batteries are to be removed from the toy.
•The supply terminals are not to be
•Do not mix old and new batteries.
•Do not mix alkaline, standard or rechargeable batteries.
DO NOT DISPOSE OF BATTERIES IN FIRE, BATTERIES MAY EXPLODE OR LEAK.
IV. CONTROLLING YOUR BATTLEBOT
Turn your Bot on.
Once your Bot is turned on, quickly place it right side up on the playing surface. We recommend
OFF ONyou could also use the floor of your kitchen, driveway, or garage.
Turbo Button | Spin Button | Turn your controller on. |
Left Control |
| Right Control Your BattleBot has a “tank style” controller. |
Stick |
| Stick |
|
| When you push on the left control stick, the |
|
| left drive system will engage, and when you |
OFF | ON | push on the right control stick, the right |
|
| drive system will engage. |
On/Off Switch
Any BattleBots competitor can tell you, CONTROL is the name of the game. It doesn’t matter how big or how bad your Bot is if you can’t drive. Take some time and practice driving your Bot before you think about competing!
Pieces
Weapon
If you have more than one Bot (sold separately) you can tinker with your Bot and | You will notice that your offenses are geared directly into your drive system. | |
You don’t have to do anything special to operate your offenses— just line your | ||
try mixing and matching pieces! | ||
Bot up with the victim, and drive right for him! | ||
|
Start with the basic chassis and add the drive system by snapping the pieces together as shown.
Blendo | 2 |
|
1
Blendo |
Blendo | DooAll |
| |
DooAll |
|