SCREWDRIVER AND SCREWS (SMALL AND LARGE)
Actually use the SCREWDRIVER to screw the SMALL and LARGE SCREWS the required number of times when Bob asks for screwdriver help in BUILD mode or simply screw the screws of your choice to hear Bob identify them in the IDENTIFY mode.
INSTRUCTION
Ages 2 and up
Item No. 59403
MESSAGE TO PARENTS
INSERTING THE BATTERIES
Important Note: Battery installation should be done by an adult.
1.BOB’S LEARNING WORKSHOP requires 3 x 1.5V “AA” or LR6” batteries.
2.The battery compartment is located on the bottom of the unit.
3.Open the battery compartment door on the individual unit by unfastening screw with a universal Philips® screwdriver (ILLUSTRATION 1).
4.Remove discharged batteries if necessary and insert new batteries according to the diagram provided in the battery compartment (ILLUSTRATION 2).
5.Close the battery compartment door.
Note: These instructions are also stamped onto the back of the product for future reference.
ILLUSTRATION 1
| + |
+ | + |
Battery door
ILLUSTRATION 2
Thank you for bringing home BOB’S LEARNING WORKSHOP. This is a wonderful educational product for your child. It’s exciting to build and learn with Bob!
Bob will help your child to learn about numbers and counting while they help Bob build! These are fundamental skills combined to form the building blocks for future development.
Please read the instructions carefully and learn about the many different features of BOB’S LEARNING WORKSHOP. This will allow you to easily explain them to your child in a way that is easy for them to understand.
Please note: BOB’S LEARNING WORKSHOP will not understand a response from your child if it is made while the unit is talking or making a sound. Please be sure not to answer any questions while the unit is talking or making a sound or it may not understand your response.
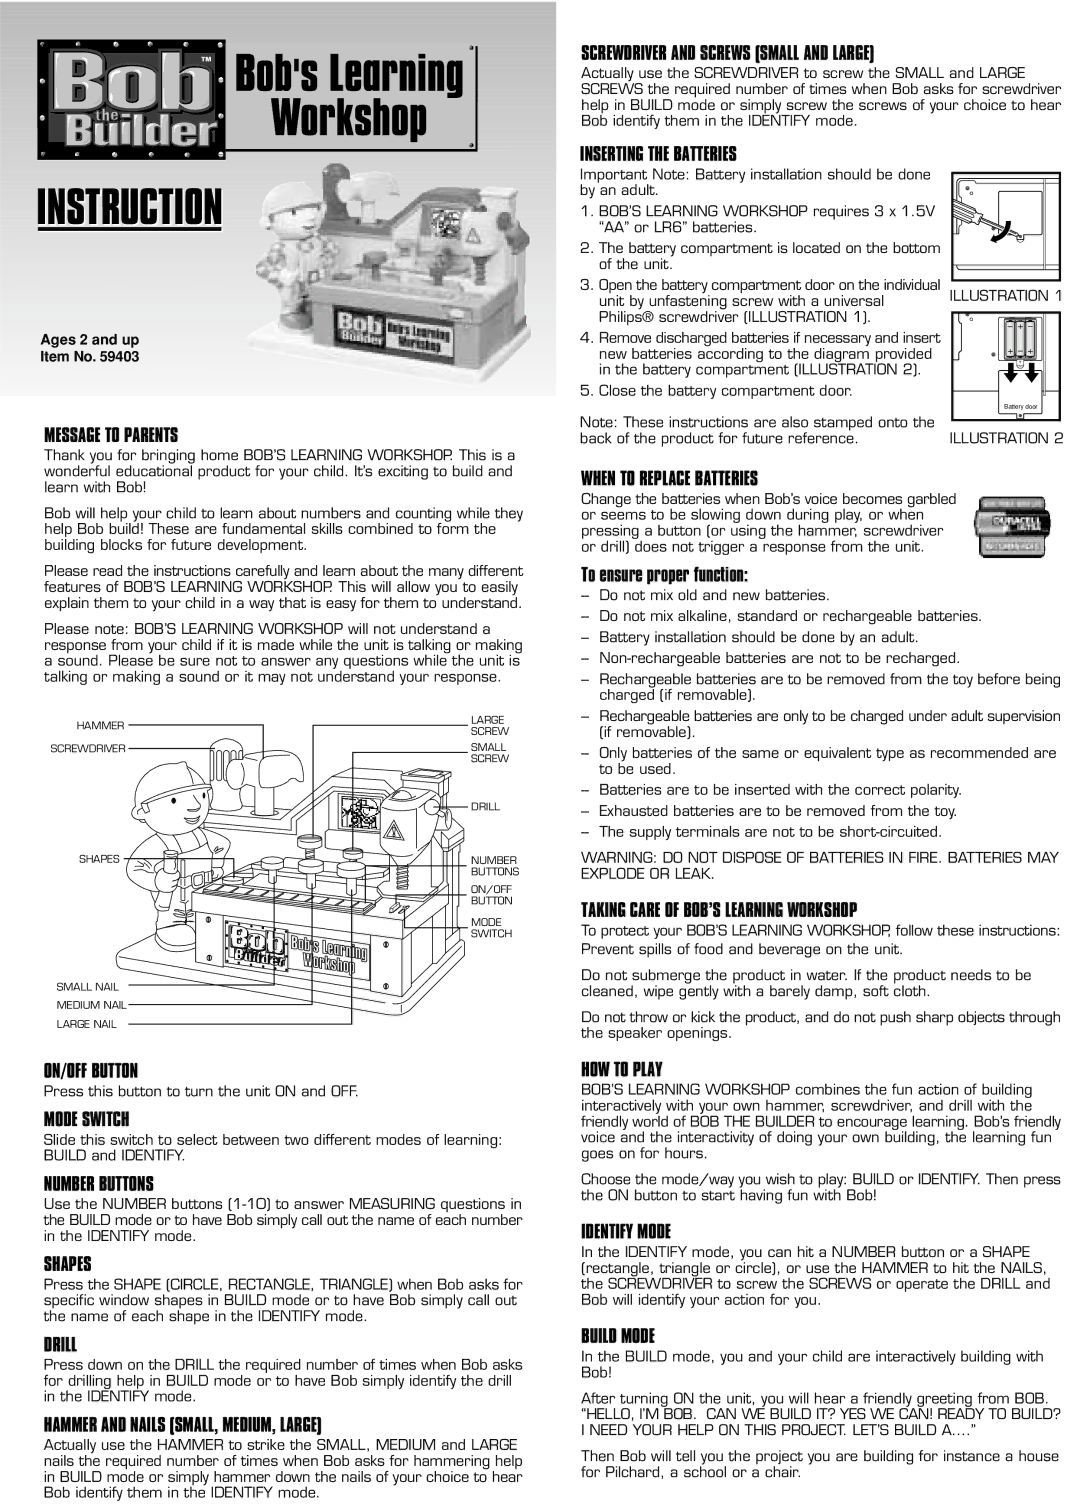
HAMMER | LARGE | |
SCREW | ||
| ||
SCREWDRIVER | SMALL | |
| SCREW | |
| DRILL | |
SHAPES | NUMBER | |
| BUTTONS | |
| ON/OFF | |
| BUTTON | |
| MODE | |
| SWITCH | |
SMALL NAIL |
| |
MEDIUM NAIL |
| |
LARGE NAIL |
|
ON/OFF BUTTON
Press this button to turn the unit ON and OFF.
MODE SWITCH
Slide this switch to select between two different modes of learning: BUILD and IDENTIFY.
NUMBER BUTTONS
Use the NUMBER buttons
SHAPES
Press the SHAPE (CIRCLE, RECTANGLE, TRIANGLE) when Bob asks for specific window shapes in BUILD mode or to have Bob simply call out the name of each shape in the IDENTIFY mode.
DRILL
Press down on the DRILL the required number of times when Bob asks for drilling help in BUILD mode or to have Bob simply identify the drill in the IDENTIFY mode.
HAMMER AND NAILS (SMALL, MEDIUM, LARGE)
Actually use the HAMMER to strike the SMALL, MEDIUM and LARGE nails the required number of times when Bob asks for hammering help in BUILD mode or simply hammer down the nails of your choice to hear Bob identify them in the IDENTIFY mode.
WHEN TO REPLACE BATTERIES
Change the batteries when Bob’s voice becomes garbled or seems to be slowing down during play, or when pressing a button (or using the hammer, screwdriver or drill) does not trigger a response from the unit.
To ensure proper function:
--Do not mix old and new batteries.
--Do not mix alkaline, standard or rechargeable batteries.
--Battery installation should be done by an adult.
--
--Rechargeable batteries are to be removed from the toy before being charged (if removable).
--Rechargeable batteries are only to be charged under adult supervision (if removable).
--Only batteries of the same or equivalent type as recommended are to be used.
--Batteries are to be inserted with the correct polarity.
--Exhausted batteries are to be removed from the toy.
--The supply terminals are not to be
WARNING: DO NOT DISPOSE OF BATTERIES IN FIRE. BATTERIES MAY EXPLODE OR LEAK.
TAKING CARE OF BOB’S LEARNING WORKSHOP
To protect your BOB’S LEARNING WORKSHOP, follow these instructions: Prevent spills of food and beverage on the unit.
Do not submerge the product in water. If the product needs to be cleaned, wipe gently with a barely damp, soft cloth.
Do not throw or kick the product, and do not push sharp objects through the speaker openings.
HOW TO PLAY
BOB’S LEARNING WORKSHOP combines the fun action of building interactively with your own hammer, screwdriver, and drill with the friendly world of BOB THE BUILDER to encourage learning. Bob’s friendly voice and the interactivity of doing your own building, the learning fun goes on for hours.
Choose the mode/way you wish to play: BUILD or IDENTIFY. Then press the ON button to start having fun with Bob!
IDENTIFY MODE
In the IDENTIFY mode, you can hit a NUMBER button or a SHAPE (rectangle, triangle or circle), or use the HAMMER to hit the NAILS, the SCREWDRIVER to screw the SCREWS or operate the DRILL and Bob will identify your action for you.
BUILD MODE
In the BUILD mode, you and your child are interactively building with Bob!
After turning ON the unit, you will hear a friendly greeting from BOB.
“HELLO, I’M BOB. CAN WE BUILD IT? YES WE CAN! READY TO BUILD? I NEED YOUR HELP ON THIS PROJECT. LET’S BUILD A….”
Then Bob will tell you the project you are building for instance a house for Pilchard, a school or a chair.