USB-Live2
Quick Installation Guide for Windows 7, Vista and Windows XP (all versions)
Hauppauge Computer Works, Inc. | Telephone: | |
91 Cabot Court | Fax: | |
Hauppauge, NY 11788 | Tech Support: | |
| techsupport@hauppauge.com | |
1.Contents of the USB-Live2 package
●
●WinTV v7 Installation
●ULead DVD MovieFactory for making CD’s and DVD’s from your video recordings
2.How the USB-Live2 works
Included with
WinTV v7, which is used for displaying live video on your PC screen and to create video recordings,
DVD MovieFactory, which can be used to burn your USB- Live2 recordings to DVD or CD.
When recording live video with the WinTV v7 application, USB- Live2 creates a .TS (transport stream) file. Using options in the WinTV v7 application, you can also create .MPEG files.
DVD MovieFactory can burn .TS files to DVD or CD. Therefore, you can use WinTV v7 to record videos, and then immediately use DVD MovieFactory to burn those recordings to DVD or CD disk.
3.Installing the USB-Live2 device
Locate a free USB 2.0 port (normally located at the side or back on the laptop or desktop). Plug
Note: we do not recommend connecting via a USB Hub.
Indicator LEDs
The blue LED will be lit when
Connecting an A/V source
Plug the A/V input cable into the connector on the side of the
The A/V connector can be removed from
4.Installing the USB-Live2 software
For Windows XP installations:
After you install your WinTV device and boot Windows, a 'Found New Hardware' wizard will appear.
Please cancel it and allow windows to load fully before proceeding. You might see this message two or three times. Please click ‘Cancel’ each time you see the New Hardware Wizard.
For Windows 7:
Insert the WinTV Installation
ROM drive. You will see an
AutoPlay message.
Click Run Setup.exe
For all versions of Windows:
Insert the WinTV Installation
The “Hauppauge WinTV Installation
appear on the screen.
Install the WinTV driver
Click the button labeled Step 1: Install drivers.
A blue screen will open and begin installing the drivers for your WinTV.
Once the drivers have installed, click on the Finish bar to exit.
Install the WinTV applications
Click the button labeled Step 2: Install WinTV
The setup application will then open and begin automattically installing the WinTV application components.
Once complete, click OK then Exit.
N ote: the latest driver updates are
available at: www.hauppauge.com
5. Running WinTV v7 for the first time
To run the WinTV v7 application for displaying live video, recording videos and playing them back on your PC, double click on the WinTV icon on your Windows desk top.
When you run WinTV for the first time, the
WinTV Device Setup Wizard appears. Select
External Inputs and click Next.
You will be presented with the option to add a Composite and an
If you wish to connect a source not normally designed for operation in your country, you can configure the Video Format manually from the drop down list. Change the value from “AUTO”.
Note: Pal is the commonly used format in Europe. NTSC is the broadcast format used in North America.
Using the WinTV v7 application
To video, click the Watch TV button.
Options menu
The Options menu is the main menu where you can select channels, turn on close captions, open the TV Scheduler, show
|
|
|
| Close WinTV |
|
|
|
|
|
|
| ||
|
|
|
|
|
|
|
|
|
|
|
| ||
|
|
|
|
|
|
|
|
|
|
|
|
|
|
|
|
|
| Channel list display | |||||||||
|
|
|
| always on |
|
|
|
|
|
|
| ||
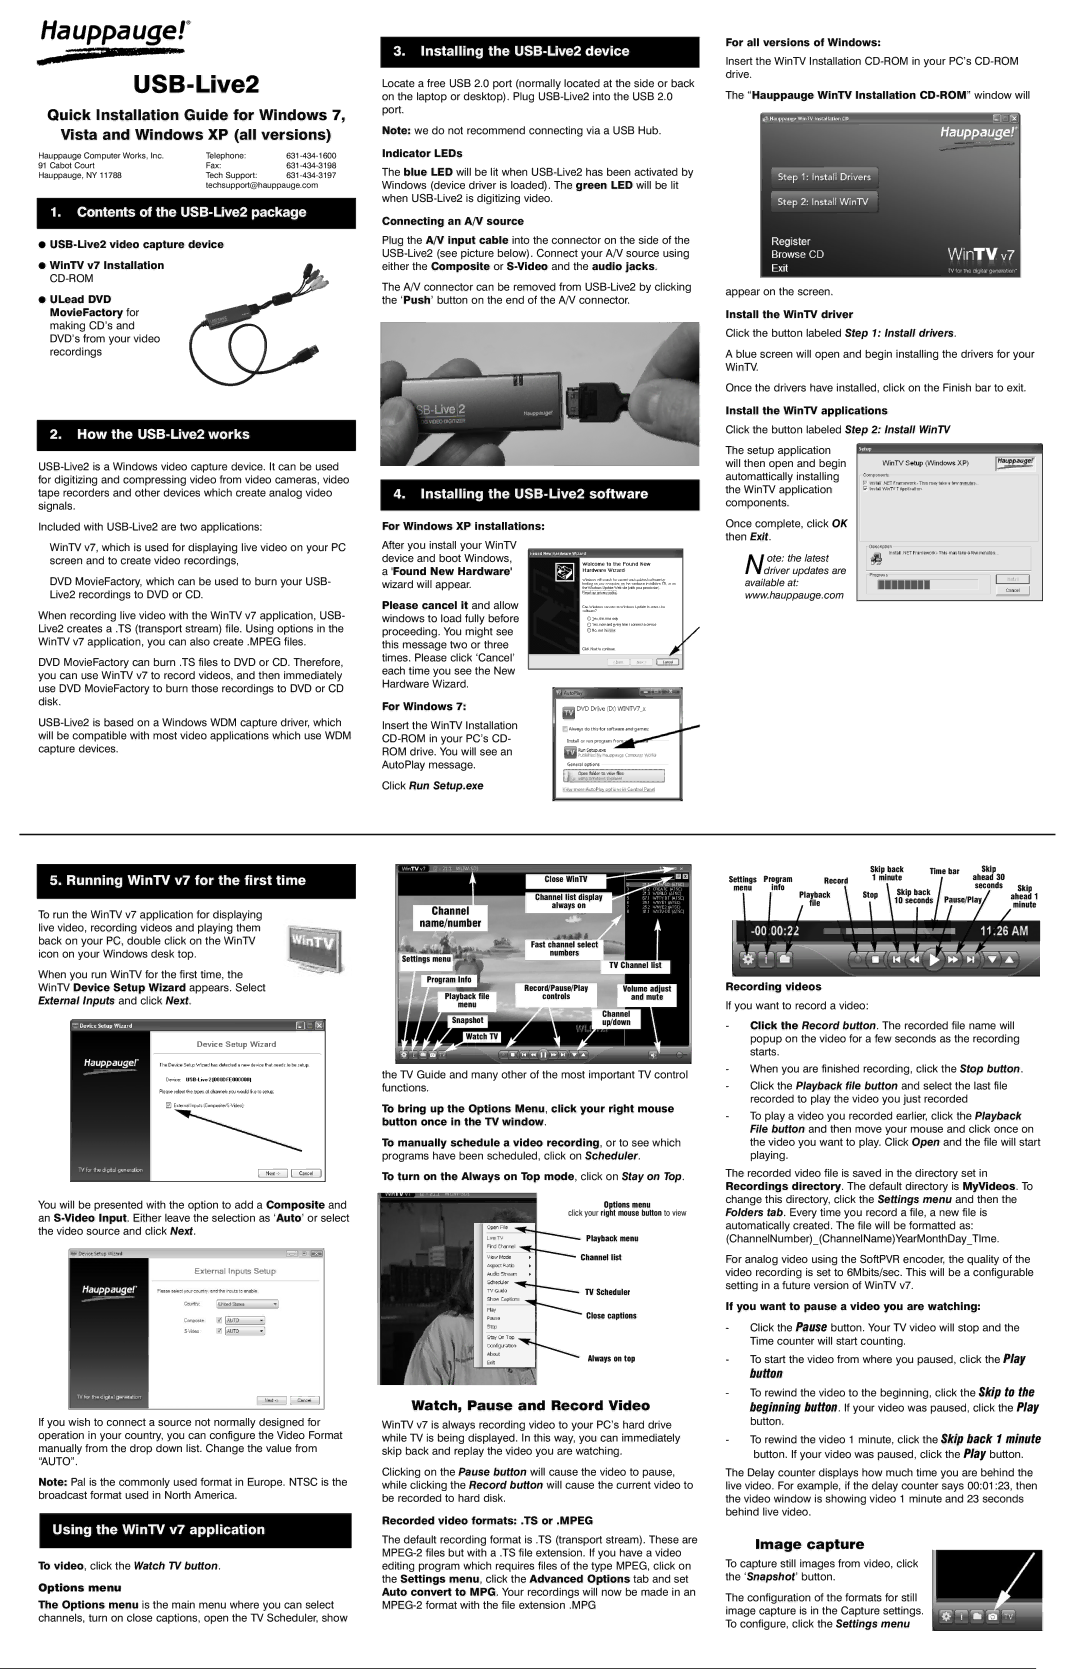
| Channel |
|
|
|
|
|
|
|
| ||||
|
|
|
|
|
|
|
|
|
|
|
|
| |
|
|
|
|
|
|
|
|
|
|
|
|
| |
| name/number |
|
|
|
|
|
|
|
|
|
|
|
|
|
|
|
|
|
|
|
|
|
|
|
|
|
|
|
|
|
|
|
|
|
|
|
|
|
| ||
|
|
|
| Fast channel select |
|
|
|
|
|
|
| ||
Settings menu |
| numbers |
|
|
|
|
|
|
| ||||
|
|
|
|
|
|
|
|
|
|
| |||
|
|
|
|
|
| TV Channel list |
| ||||||
|
|
|
|
|
|
|
|
|
| ||||
| Program Info |
|
|
|
|
|
|
|
|
|
|
| |
|
|
|
|
|
|
|
|
|
|
|
| ||
|
|
| Record/Pause/Play |
|
|
|
|
| Volume adjust | ||||
| Playback file |
| controls |
|
|
|
|
| and mute | ||||
| menu |
|
|
|
|
|
|
|
|
|
|
| |
|
|
|
|
|
|
|
|
|
|
| |||
| Snapshot |
|
|
|
| Channel | |||||||
|
|
|
|
| up/down |
| |||||||
| Watch TV |
|
|
|
|
|
|
|
|
|
|
| |
the TV Guide and many other of the most important TV control functions.
To bring up the Options Menu, click your right mouse button once in the TV window.
To manually schedule a video recording, or to see which programs have been scheduled, click on Scheduler.
To turn on the Always on Top mode, click on Stay on Top.
Options menu
click your right mouse button to view
Playback menu
![]() Channel list
Channel list
TV Scheduler
![]() Close captions
Close captions
Always on top
Watch, Pause and Record Video
WinTV v7 is always recording video to your PC’s hard drive while TV is being displayed. In this way, you can immediately skip back and replay the video you are watching.
Clicking on the Pause button will cause the video to pause, while clicking the Record button will cause the current video to be recorded to hard disk.
Recorded video formats: .TS or .MPEG
The default recording format is .TS (transport stream). These are
|
|
| Skip back | Time bar | Skip |
| ||
Settings | Program | Record | 1 minute |
|
| ahead 30 | Skip | |
menu | info | Playback | Stop | Skip back |
| seconds | ||
|
| Pause/Play | ahead 1 | |||||
|
| 10 seconds | ||||||
|
| file |
| minute | ||||
|
|
|
|
|
|
| ||
Recording videos
If you want to record a video:
-Click the Record button. The recorded file name will popup on the video for a few seconds as the recording starts.
-When you are finished recording, click the Stop button.
-Click the Playback file button and select the last file recorded to play the video you just recorded
-To play a video you recorded earlier, click the Playback File button and then move your mouse and click once on the video you want to play. Click Open and the file will start playing.
The recorded video file is saved in the directory set in Recordings directory. The default directory is MyVideos. To change this directory, click the Settings menu and then the Folders tab. Every time you record a file, a new file is automatically created. The file will be formatted as: (ChannelNumber)_(ChannelName)YearMonthDay_TIme.
For analog video using the SoftPVR encoder, the quality of the video recording is set to 6Mbits/sec. This will be a configurable setting in a future version of WinTV v7.
If you want to pause a video you are watching:
-Click the Pause button. Your TV video will stop and the Time counter will start counting.
-To start the video from where you paused, click the Play button
-To rewind the video to the beginning, click the Skip to the beginning button. If your video was paused, click the Play button.
-To rewind the video 1 minute, click the Skip back 1 minute button. If your video was paused, click the Play button.
The Delay counter displays how much time you are behind the live video. For example, if the delay counter says 00:01:23, then the video window is showing video 1 minute and 23 seconds behind live video.
Image capture
To capture still images from video, click the ‘Snapshot’ button.
The configuration of the formats for still image capture is in the Capture settings. To configure, click the Settings menu