Model
High Pressure Sodium Dusk-
Installation Instructions
READ ALL INSTRUCTIONS CAREFULLY BEFORE BEGINNING INSTALLATION.
NOTE: All wiring must be run in accordance with the National Electrical Code (Canadian Electrical Code in Canada) through conduit or another acceptable means. Contact a qualified electrician if there is any question as to the suitability of the system.
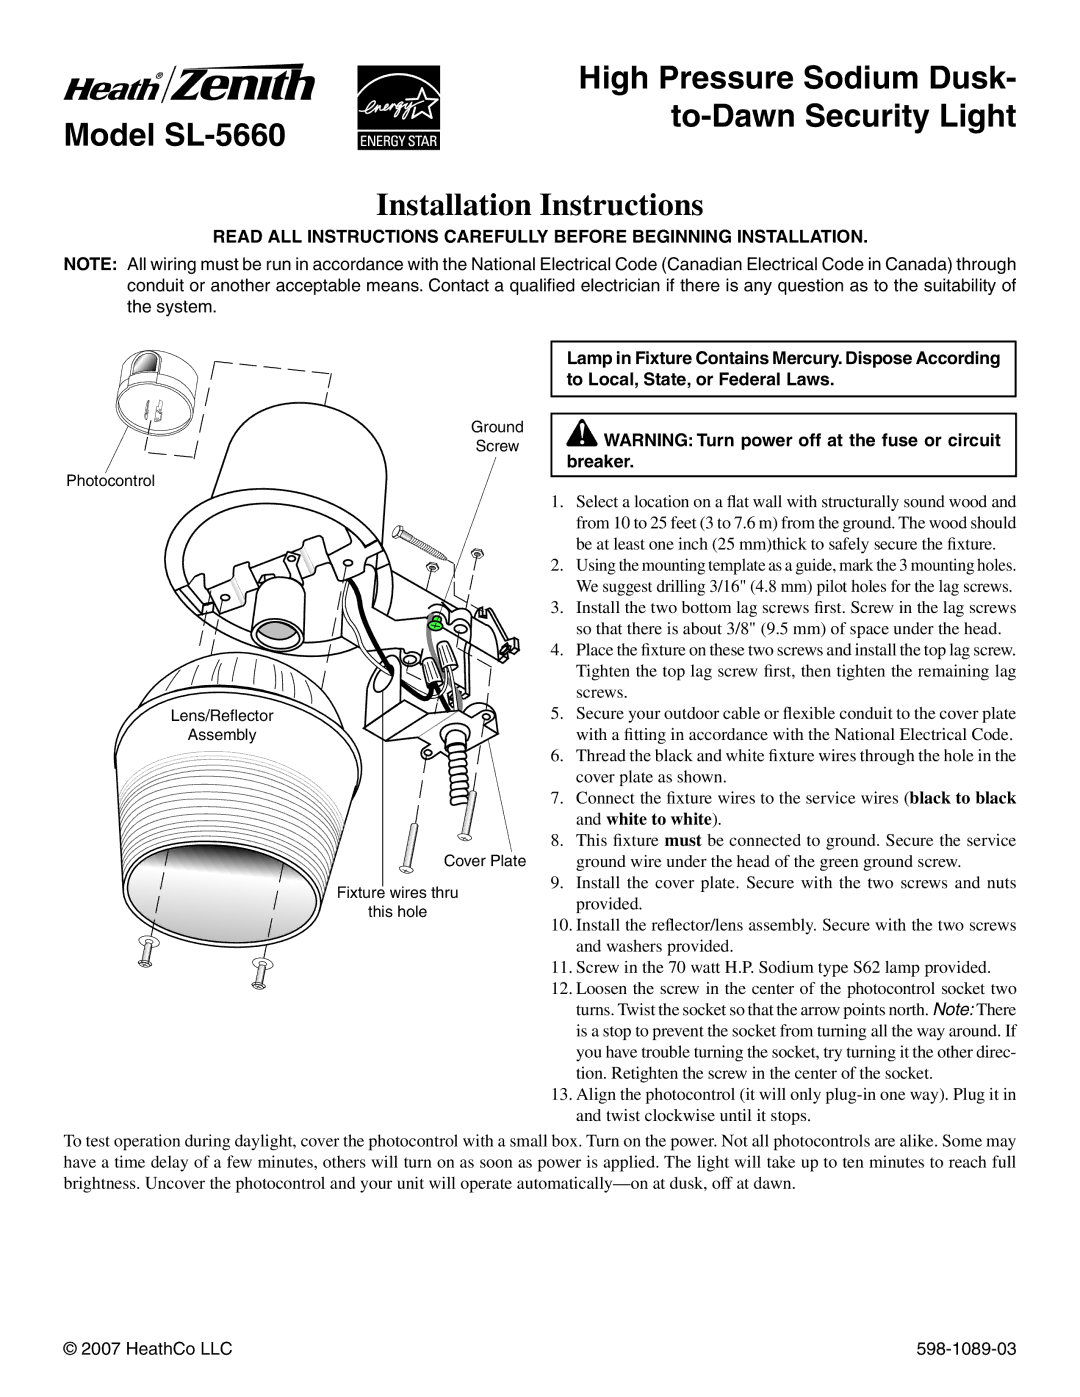
Photocontrol
Lens/Reflector
Assembly
Ground
Screw
Cover Plate
Fixture wires thru
this hole
Lamp in Fixture Contains Mercury. Dispose According to Local, State, or Federal Laws.
![]() WARNING: Turn power off at the fuse or circuit breaker.
WARNING: Turn power off at the fuse or circuit breaker.
1.Select a location on a flat wall with structurally sound wood and from 10 to 25 feet (3 to 7.6 m) from the ground. The wood should be at least one inch (25 mm)thick to safely secure the fixture.
2.Using the mounting template as a guide, mark the 3 mounting holes. We suggest drilling 3/16" (4.8 mm) pilot holes for the lag screws.
3.Install the two bottom lag screws first. Screw in the lag screws so that there is about 3/8" (9.5 mm) of space under the head.
4.Place the fixture on these two screws and install the top lag screw. Tighten the top lag screw first, then tighten the remaining lag screws.
5.Secure your outdoor cable or flexible conduit to the cover plate with a fitting in accordance with the National Electrical Code.
6.Thread the black and white fixture wires through the hole in the cover plate as shown.
7.Connect the fixture wires to the service wires (black to black and white to white).
8.This fixture must be connected to ground. Secure the service ground wire under the head of the green ground screw.
9.Install the cover plate. Secure with the two screws and nuts provided.
10.Install the reflector/lens assembly. Secure with the two screws and washers provided.
11.Screw in the 70 watt H.P. Sodium type S62 lamp provided.
12.Loosen the screw in the center of the photocontrol socket two turns. Twist the socket so that the arrow points north. Note: There is a stop to prevent the socket from turning all the way around. If you have trouble turning the socket, try turning it the other direc- tion. Retighten the screw in the center of the socket.
13.Align the photocontrol (it will only
To test operation during daylight, cover the photocontrol with a small box. Turn on the power. Not all photocontrols are alike. Some may have a time delay of a few minutes, others will turn on as soon as power is applied. The light will take up to ten minutes to reach full brightness. Uncover the photocontrol and your unit will operate
© 2007 HeathCo LLC |