SETUP

Set The Inputs

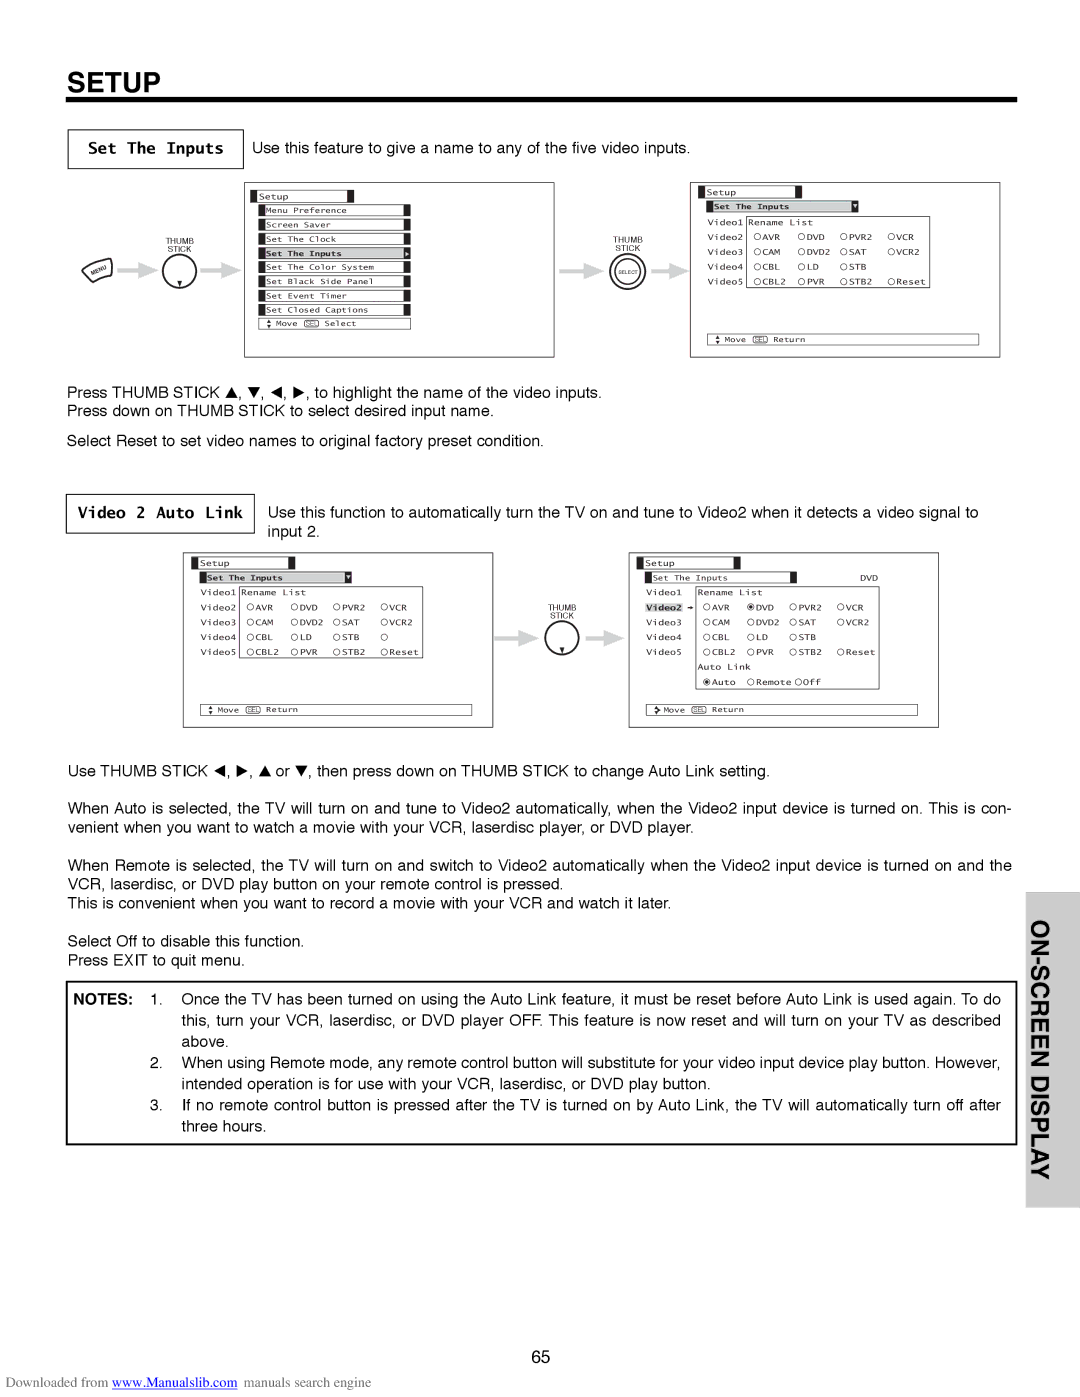
Use this feature to give a name to any of the five video inputs.

THUMB

STICK

Setup

Menu Preference

Screen Saver

Set The Clock

Set The Inputs

Set The Color System

Set Black Side Panel

Set Event Timer Set Closed Captions

Move SEL Select

THUMB

STICK

SELECT

Setup


Set The Inputs


Video1 Rename List


Video2

AVR

DVD

PVR2

VCR

Video3

CAM

DVD2

SAT

VCR2

Video4

CBL

LD

STB


Video5

CBL2

PVR

STB2

Reset

Move

SEL Return


Press THUMB STICK , , , , to highlight the name of the video inputs.

Press down on THUMB STICK to select desired input name.

Select Reset to set video names to original factory preset condition.

Video 2 Auto Link Use this function to automatically turn the TV on and tune to Video2 when it detects a video signal to input 2.

Setup


Set The Inputs


Video1 Rename List


Video2

AVR

DVD

PVR2

VCR

Video3

CAM

DVD2

SAT

VCR2

Video4

CBL

LD

STB


Video5

CBL2

PVR

STB2

Reset

Move

SEL Return


THUMB

STICK

Setup


Set The Inputs


DVD

Video1

Rename List


Video2


AVR

DVD

PVR2

VCR

Video3


CAM

DVD2

SAT

VCR2

Video4


CBL

LD

STB


Video5


CBL2

PVR

STB2

Reset


Auto Link


Auto

Remote

Off


Move

SEL

Return


Use THUMB STICK , , or , then press down on THUMB STICK to change Auto Link setting.

When Auto is selected, the TV will turn on and tune to Video2 automatically, when the Video2 input device is turned on. This is con- venient when you want to watch a movie with your VCR, laserdisc player, or DVD player.

When Remote is selected, the TV will turn on and switch to Video2 automatically when the Video2 input device is turned on and the VCR, laserdisc, or DVD play button on your remote control is pressed.

This is convenient when you want to record a movie with your VCR and watch it later.

Select Off to disable this function.

Press EXIT to quit menu.

NOTES: 1. Once the TV has been turned on using the Auto Link feature, it must be reset before Auto Link is used again. To do this, turn your VCR, laserdisc, or DVD player OFF. This feature is now reset and will turn on your TV as described above.

2.When using Remote mode, any remote control button will substitute for your video input device play button. However, intended operation is for use with your VCR, laserdisc, or DVD play button.

3.If no remote control button is pressed after the TV is turned on by Auto Link, the TV will automatically turn off after three hours.

65

ON-SCREEN DISPLAY

Downloaded from www.Manualslib.com manuals search engine

Page 65
Image 65
Hitachi 50V500G, 50V500E, 50V500A, 60V500E, 60V500A important safety instructions Set The Inputs

50V500E, 50V500A, 50V500G, 60V500A, 60V500E specifications

The Hitachi 60V500E, 60V500A, 50V500G, 50V500A, and 50V500E projectors are part of the renowned Hitachi series known for their advanced technology and high performance in various settings. Designed to cater to diverse needs, these models have proven to be highly versatile, making them ideal for educational institutions, corporate environments, and large-scale events.

One of the standout features of these projectors is their high brightness levels, with the 60V500E and 60V500A offering an impressive 6,000 lumens. This high lumen output ensures that presentations remain vivid and clear even in well-lit rooms. The 50V500G, 50V500A, and 50V500E, while slightly lower in brightness at 5,000 lumens, still deliver exceptional image clarity suitable for most environments.

The projectors utilize advanced DLP and LCD technologies to produce sharp, vibrant images with accurate color reproduction. Hitachi incorporates innovative lens shift technology, allowing users to easily adjust the projection angle without sacrificing image quality. Additionally, the models support multiple resolution options, including Full HD, giving users flexibility depending on their specific needs.

Connectivity is another area where the Hitachi projectors excel. They come equipped with various ports such as HDMI, USB, and VGA, ensuring seamless connectivity with a wide range of devices. This is complemented by wireless capabilities, which allow for easy sharing of content without the hassle of cables.

The integrated speakers provide balanced audio quality, making these projectors suitable for multimedia presentations. Moreover, they feature an eco-friendly mode that helps reduce power consumption, extending the lifespan of the lamp while maintaining optimal performance.

User convenience is prioritized in these models, with an intuitive interface and remote control functionality. The projectors also include various preset modes tailored for different presentation scenarios, enhancing user experience.

In summary, the Hitachi 60V500E, 60V500A, 50V500G, 50V500A, and 50V500E projectors stand out for their exceptional brightness, advanced imaging technologies, extensive connectivity options, and user-friendly design. With their robust features and reliable performance, they are well-suited for a variety of applications, making them a valuable asset for any professional or educational setting.