Anschluß an die Steuersignalbuchse (Fortsetzung)

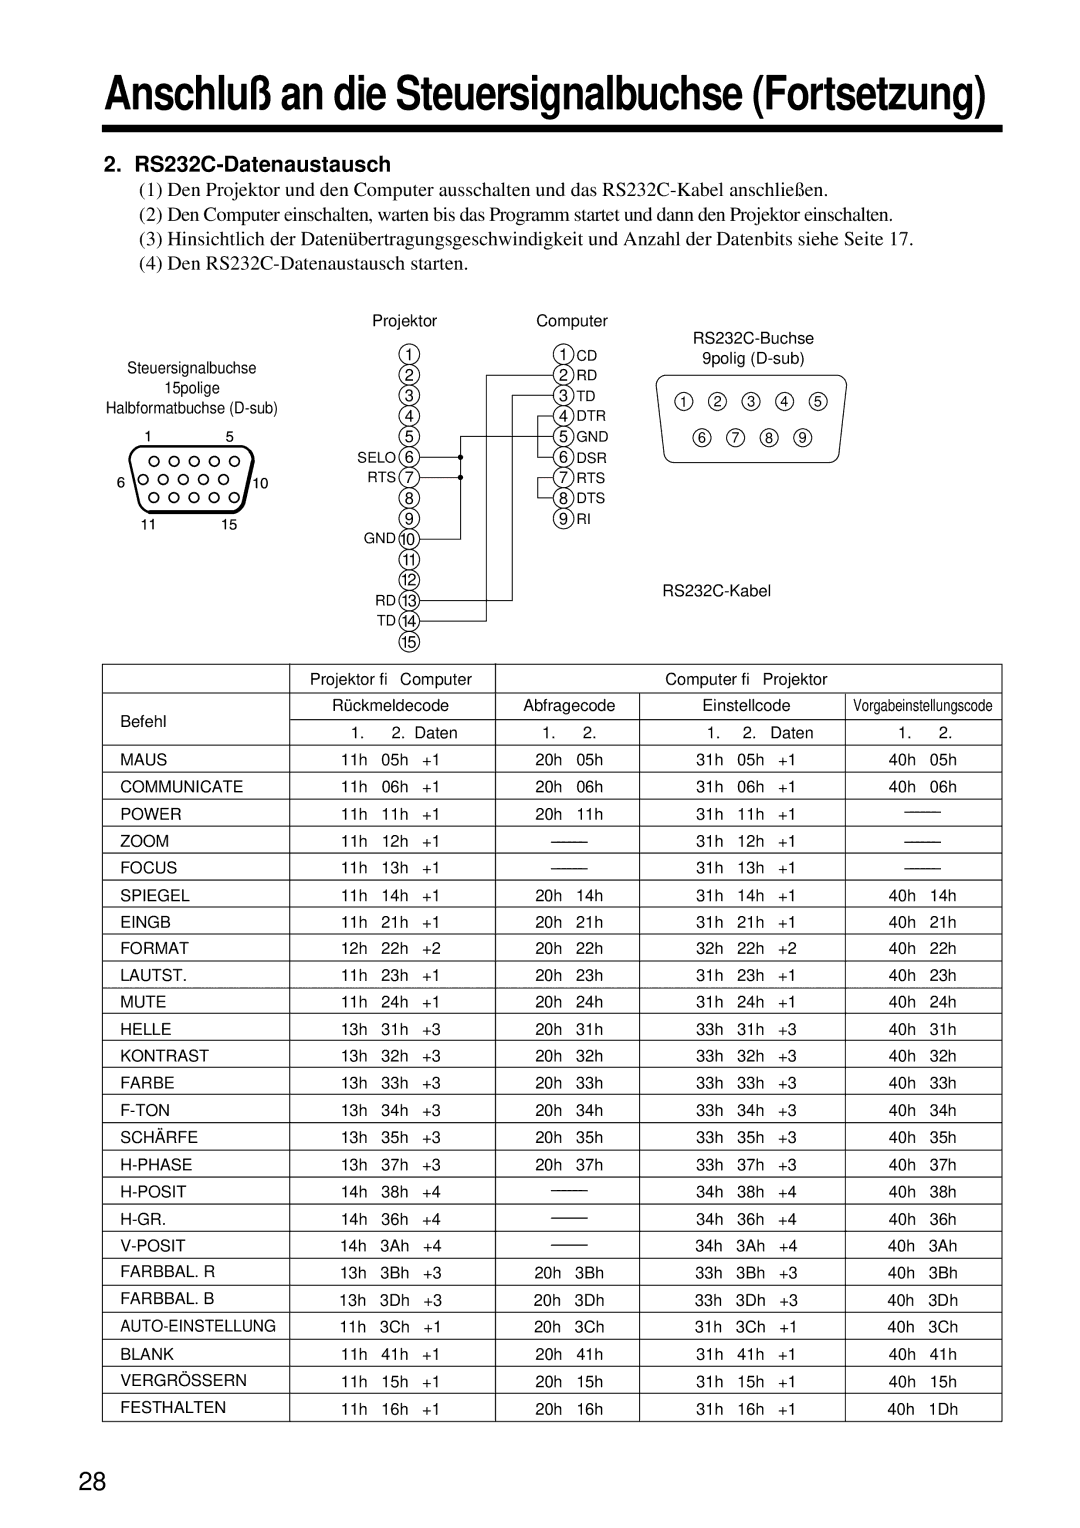
2.RS232C-Datenaustausch

(1)Den Projektor und den Computer ausschalten und das RS232C-Kabel anschließen.

(2)Den Computer einschalten, warten bis das Programm startet und dann den Projektor einschalten.

(3)Hinsichtlich der Datenübertragungsgeschwindigkeit und Anzahl der Datenbits siehe Seite 17.

(4)Den RS232C-Datenaustausch starten.


Projektor

Computer


RS232C-Buchse


1


1 CD


Steuersignalbuchse


9polig (D-sub)


2


2 RD


15polige


3


3

TD

1

2

3


4

5


Halbformatbuchse (D-sub)


4


4 DTR


5


5 GND


6

7

8

9


SELO 6


6 DSR


RTS 7


7 RTS


8


8 DTS


9


9 RI


GND 10


11


12


RS232C-Kabel


RD 13


TD 14


15


Projektor Computer


Computer Projektor


Befehl

Rückmeldecode


Abfragecode


Einstellcode


Vorgabeinstellungscode


1.

2.

Daten


1.

2.


1.

2.

Daten


1.

2.


MAUS

11h

05h

+1


20h

05h


31h

05h


+1


40h

05h


COMMUNICATE

11h

06h

+1


20h

06h


31h

06h


+1


40h

06h


POWER

11h

11h

+1


20h

11h


31h

11h


+1


––––––


ZOOM

11h

12h

+1


––––––


31h

12h


+1


––––––


FOCUS

11h

13h

+1


––––––


31h

13h


+1


––––––


SPIEGEL

11h

14h

+1


20h

14h


31h

14h


+1


40h

14h

EINGB

11h

21h

+1


20h

21h


31h

21h


+1


40h

21h

FORMAT

12h

22h

+2


20h

22h


32h

22h


+2


40h

22h


LAUTST.

11h

23h

+1


20h

23h


31h

23h


+1


40h

23h


MUTE

11h

24h

+1


20h

24h


31h

24h


+1


40h

24h

HELLE

13h

31h

+3


20h

31h


33h

31h


+3


40h

31h

KONTRAST

13h

32h

+3


20h

32h


33h

32h


+3


40h

32h

FARBE

13h

33h

+3


20h

33h


33h

33h


+3


40h

33h

F-TON

13h

34h

+3


20h

34h


33h

34h


+3


40h

34h


SCHÄRFE

13h

35h

+3


20h

35h


33h

35h


+3


40h

35h


H-PHASE

13h

37h

+3


20h

37h


33h

37h


+3


40h

37h


H-POSIT

14h

38h

+4


––––––


34h

38h


+4


40h

38h


H-GR.

14h

36h

+4


––––––


34h

36h


+4


40h

36h


V-POSIT

14h

3Ah

+4


––––––


34h

3Ah

+4


40h

3Ah


FARBBAL. R

13h

3Bh

+3


20h

3Bh


33h

3Bh

+3


40h

3Bh


FARBBAL. B

13h

3Dh

+3


20h

3Dh


33h

3Dh

+3


40h

3Dh


AUTO-EINSTELLUNG

11h

3Ch

+1


20h

3Ch


31h

3Ch

+1


40h

3Ch


BLANK

11h

41h

+1


20h

41h


31h

41h


+1


40h

41h


VERGRÖSSERN

11h

15h

+1


20h

15h


31h

15h


+1


40h

15h

FESTHALTEN

11h

16h

+1


20h

16h


31h

16h


+1


40h

1Dh


28

Page 64
Image 64
Hitachi CP-S860W user manual Anschluß an die Steuersignalbuchse Fortsetzung, RS232C-Datenaustausch

CP-S860W specifications

The Hitachi CP-S860W is a high-performance projector designed to deliver exceptional image quality, making it an ideal choice for a variety of settings, including classrooms, corporate environments, and large venues. With its advanced features and cutting-edge technologies, the CP-S860W stands out as a reliable and versatile projection solution.

One of the key features of the Hitachi CP-S860W is its high brightness output, providing up to 6,500 lumens. This brightness capability ensures that images remain clear and vibrant even in well-lit environments, making it suitable for presentations and lectures where ambient light cannot be fully controlled. The projector's native WXGA resolution (1280 x 800 pixels) enhances image clarity, allowing for detailed visuals that are essential for displaying graphs, charts, and other data-heavy content.

The CP-S860W incorporates advanced image processing technologies, such as a built-in scaler and various color enhancement features. These technologies enable the projector to deliver a rich color palette and sharp detail, ensuring that images maintain fidelity and color accuracy. Additionally, it supports multiple resolutions, allowing users to project content from various devices without loss in quality.

Another notable characteristic of the CP-S860W is its versatile connectivity options. The projector is equipped with multiple HDMI ports, RGB inputs, and composite video connections, making it compatible with a wide range of devices, including laptops, DVD players, and gaming consoles. Its compatibility with wireless presentation systems also allows for hassle-free connections, enabling users to present without being tethered by cables.

The projector features a long lamp life of up to 5,000 hours in standard mode and up to 10,000 hours in eco mode. This longevity minimizes maintenance needs and reduces total cost of ownership, making it a cost-effective investment. Moreover, its eco-friendly features, including energy-saving modes, contribute to lower power consumption, aligning with sustainable practices.

With a weight of approximately 11.5 pounds, the Hitachi CP-S860W is portable enough for easy transportation between locations, while robust enough for permanent installation. Its user-friendly interface and intuitive remote control facilitate seamless operation, ensuring an efficient setup process for any presentation.

In summary, the Hitachi CP-S860W projector combines high brightness, versatile connectivity, and advanced image processing technologies, making it a powerful tool for delivering engaging and impactful visual presentations in any environment.