OPERATIONS (continued)
Input Menu
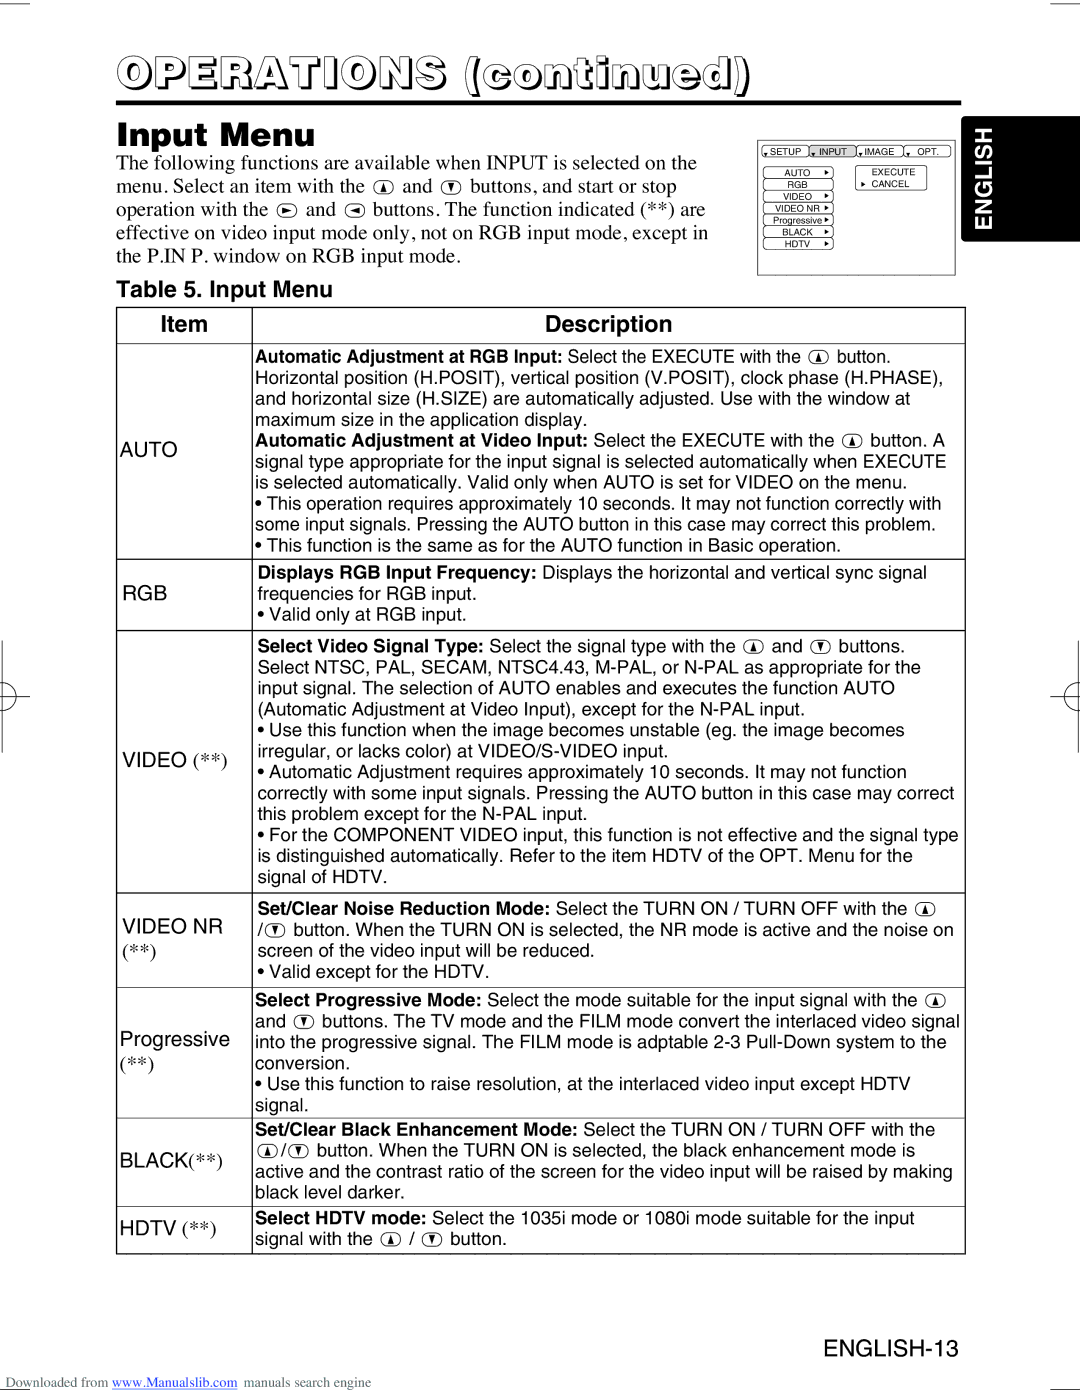
The following functions are available when INPUT is selected on the menu. Select an item with the ![]() and
and ![]() buttons, and start or stop operation with the
buttons, and start or stop operation with the ![]() and
and ![]() buttons. The function indicated (**) are effective on video input mode only, not on RGB input mode, except in the P.IN P. window on RGB input mode.
buttons. The function indicated (**) are effective on video input mode only, not on RGB input mode, except in the P.IN P. window on RGB input mode.
SETUP | INPUT | IMAGE | OPT. | ENGLISH |
AUTO |
| EXECUTE |
| |
RGB |
| CANCEL |
| |
VIDEO |
|
|
| |
VIDEO NR |
|
| ||
Progressive |
|
| ||
BLACK |
|
|
| |
|
|
|
| |
HDTV |
|
|
|
|
Table 5. Input Menu
Item | Description |
| |
|
|
| |
| Automatic Adjustment at RGB Input: Select the EXECUTE with the | button. | |
| Horizontal position (H.POSIT), vertical position (V.POSIT), clock phase (H.PHASE), | ||
| and horizontal size (H.SIZE) are automatically adjusted. Use with the window at | ||
| maximum size in the application display. |
| |
AUTO | Automatic Adjustment at Video Input: Select the EXECUTE with the | button. A | |
signal type appropriate for the input signal is selected automatically when EXECUTE | |||
| |||
| is selected automatically. Valid only when AUTO is set for VIDEO on the menu. | ||
| • This operation requires approximately 10 seconds. It may not function correctly with | ||
| some input signals. Pressing the AUTO button in this case may correct this problem. | ||
| • This function is the same as for the AUTO function in Basic operation. | ||
|
|
| |
Displays RGB Input Frequency: Displays the horizontal and vertical sync signal
RGB | frequencies for RGB input. |
|
| |
| • Valid only at RGB input. |
|
| |
|
|
|
| |
| Select Video Signal Type: Select the signal type with the | and | buttons. | |
| Select NTSC, PAL, SECAM, NTSC4.43, | |||
| input signal. The selection of AUTO enables and executes the function AUTO | |||
| (Automatic Adjustment at Video Input), except for the |
| ||
| • Use this function when the image becomes unstable (eg. the image becomes | |||
VIDEO (**) | irregular, or lacks color) at |
|
| |
• Automatic Adjustment requires approximately 10 seconds. It may not function | ||||
| ||||
| correctly with some input signals. Pressing the AUTO button in this case may correct | |||
| this problem except for the |
|
| |
| • For the COMPONENT VIDEO input, this function is not effective and the signal type | |||
| is distinguished automatically. Refer to the item HDTV of the OPT. Menu for the | |||
| signal of HDTV. |
|
| |
|
| |||
VIDEO NR | Set/Clear Noise Reduction Mode: Select the TURN ON / TURN OFF with the | |||
/ button. When the TURN ON is selected, the NR mode is active and the noise on | ||||
(**) | screen of the video input will be reduced. |
|
| |
| • Valid except for the HDTV. |
|
| |
|
|
|
| |
| Select Progressive Mode: Select the mode suitable for the input signal with the | |
Progressive | and | buttons. The TV mode and the FILM mode convert the interlaced video signal |
into the progressive signal. The FILM mode is adptable | ||
(**) | conversion. | |
•Use this function to raise resolution, at the interlaced video input except HDTV signal.
| Set/Clear Black Enhancement Mode: Select the TURN ON / TURN OFF with the | |
BLACK(**) | / button. When the TURN ON is selected, the black enhancement mode is | |
active and the contrast ratio of the screen for the video input will be raised by making | ||
| ||
| black level darker. | |
|
| |
HDTV (**) | Select HDTV mode: Select the 1035i mode or 1080i mode suitable for the input | |
signal with the / button. | ||
| ||
|
|
Downloaded from www.Manualslib.com manuals search engine
