When using electrical appliances, basic safety precautions should always be followed to reduce the risk of fire, electric shock, and injury to persons, including the following:
1. | Read all instructions before using the appliance. |
2. | To avoid fire or shock hazard, plug the appliance directly into a |
| 120V AC electrical outlet. |
3. | Keep the cord out of heavy traffic areas. To avoid fire hazard, |
| NEVER put the cord under rugs or near heat registers. |
4. | DO NOT place humidifier near heat sources such as stoves, |
16.This humidifier requires daily and weekly maintenance to operate |
appropriately. Refer to daily and weekly cleaning procedures. Use |
only cleaners and additives recommended by the manufacturer. |
17.NEVER use detergents, gasoline, glass cleaner, furniture polish, |
paint thinner, or other household solvents to clean any part of the |
humidifier. |
18.Excessive humidity in a room can cause water condensation on |
windows and some furniture. If this happens, turn the humidifier |
OFF. |
HOW WARM MIST WORKS
Your Holmes Warm Mist humidifier is designed to allow the proper amount of water to flow out of the tank. Air is drawn in through the grill openings located in the back of the unit and mixed with steam in the misting chamber. The warm mist is then dispersed out of the top of the misting chamber through the outlet grill and into the room.
NOTE: A humidity level below 20% can be unhealthy and uncomfortable. The recommended humidity level is between 40%-50%.
RESET PROCEDURE
NOTE: When the water tank is empty and the water in the Heating chamber is almost empty, the Automatic Shut Off will activate. The RESET Light will illuminate and the unit will not operate again until you refill the water tank and reset the humidifier.
1. | Unplug the unit |
2. | Remove and refill the water tank, being sure to follow the Daily |
| Maintenance Instructions. Replace the tank onto the base. |
3. | Wait 5 minutes for the Automatic Shut-Off to reset. |
AccuSet Plus™ REMOTE INSTRUCTIONS (For HM8305RC-U only)
1.Insert 2 AAA batteries into back of remote control.
2.Press the Mode/Off button on remote to begin operation.
3.Use the remote to control the same features as the base unit.
NOTE: The timer function can only be activated on the base unit. It cannot be activated via the remote control.
NOTE: Do not mix new and old batteries. Do not mix alkaline, standard (carbon-zine), or rechargeable (nickel-cadmium) batteries.
2.Clean the base by partially filling the base with one 8-oz cups of undiluted white vinegar, or by using CleanseClean® (Model S1710) by the manufacturer. Leave this solution in the base for 20 minutes, while cleaning the all interior surfaces with a soft brush. Remove base scale by wiping the base with a cloth dampened with undiluted white vinegar.
3.Rinse with clean warm water to remove the cleaning solution before disinfecting the tank.
radiators, and heaters. DO locate your humidifier on an inside wall |
near an electrical outlet. The humidifier should be at least 4” away |
from the wall for best results. |
5. NEVER place humidifier in an area where it is accessible to children. |
NEVER use humidifier in a closed room, particularly where a child |
may be sleeping, resting, or playing (a closed room may result in |
excessive humidity). |
6. WARNING: Do not attempt to refill humidifier without first |
unplugging the unit from its electrical outlet. Failure to heed this |
warning may cause personal injury. Be sure to unplug the unit by |
pulling on the plug and not the cord. |
7. Never place anything over moisture outlet when the unit is running. |
8. NEVER drop or insert any object into any openings. |
9. DO NOT operate any appliance with a damaged cord or plug, after |
the appliance malfunctions, or if it has been dropped or damaged |
in any manner. Return appliance to manufacturer for examination, |
electrical or mechanical adjustment, or repair. |
10.Use appliance only for intended household use as described in this |
manual. Any other use not recommended by the manufacturer |
may cause fire, electric shock, or injury to persons. The use of |
attachments not recommended or sold by the manufacturer may |
cause hazards. |
11.DO NOT use outdoors. |
12.Always place humidifier on a firm, flat, level surface. A waterproof |
mat or pad is recommended for use under the humidifier. NEVER |
place it on a rug or carpet, or on a finished floor that may be |
damaged by exposure to water or moisture. |
13.DO NOT allow the Moisture Outlet to directly face the wall. Moisture |
could cause damage, particularly to wall paper. |
14.Humidifier should be unplugged when not in use. |
15.NEVER tilt, move, or attempt to empty unit while it is operating. |
Shut off and unplug before removing the water tank and moving |
the unit. |
THIS PRODUCT IS EQUIPPED WITH A POLARIZED AC (Alternating Current) PLUG (a plug having one blade wider than the other). This plug will fit into the power outlet only one way. If the plug does not fit fully into the outlet, reverse the plug. If it still does not fit, contact qualified personnel to install the proper outlet.
DO NOT DEFEAT THE SAFETY PURPOSE OF THIS
POLARIZED PLUG IN ANY WAY
19.Do not use humidifier in an area where humidity level is in excess |
of 50%. Use a hygrometer, available at your local retailer or |
through the manufacturer, to measure the humidity. |
20.DO NOT attempt to repair or adjust any electrical or mechanical |
functions on this unit. Doing so will void your warranty. The inside |
of the unit contains no user serviceable parts. All servicing should |
be performed by qualified personnel only. |
21.Never place housing under water flow or immerse in liquids. |
22.Do not plug in the cord with wet hands: electric shock could result. |
23.Do not pour water in any openings other than the water tank. |
24.To prevent damage to surfaces, do not place humidifier under |
overhanging surfaces. |
25.NEVER operate unit without water in the tank. |
26.Do not move unit after it has been used until unit cools completely. |
27.Use both hands when carrying full tank of water. |
PLEASE READ AND SAVE
THESE IMPORTANT
SAFETY INSTRUCTIONS
Consumer Safety Information
NOTE: This is an electrical appliance and requires attention when in use.
NOTE: If moisture forms on the walls or windows of the room, turn off the humidifier. The room already has plenty of humidity and additional moisture may cause damage.
NOTE: DO NOT block air inlet or outlet.
Cord and Plug Installation Safety Instructions
The length of cord used on this appliance was selected to reduce the hazards of becoming tangled in, or tripping over a longer cord. If a longer cord is necessary an approved extension cord may be used. The electrical rating of the extension cord must be equal to or greater than the rating of the humidifier. Care must be taken to arrange the extension cord so that it will not drape over the countertop or tabletop where it can be pulled on by children or accidentally tripped over.
.
PRE-OPERATING INSTRUCTIONS
1.Be sure the humidifier is switched to OFF and the unit is disconnected from the electrical outlet.
2.Select a location for your humidifier, on a flat surface, about 4” away from the wall. DO NOT place the humidifier on a finished floor or near furniture, which can be damaged by moisture or water. Place on a moisture-resistant surface.
FILLING THE WATER TANK
1.Remove the tank from the base of the humidifier and bring to the faucet. Turn the tank upside down and twist off the tank cap by turning counter clockwise. Fill tank with cool, fresh tap water. DO
NOT fill with warm water as this may cause leaking. Replace the cap on tank FIRMLY.
2.When full, carry tank to the humidifier and place onto the base. This humidifier holds 1.7 gallons of water in the tank and humidifier base. The tank will immediately begin to empty into base.
3.Plug the power cord into a 120V AC electrical outlet.
OPERATING INSTRUCTIONS
Your humidifier is equipped with a technologically advanced AccuSet Plus™ DIGITAL Humidistat. You can set the humidifier to run continuously in manual mode or set the AccuSet Plus™ DIGITAL Humidistat to your desired humidity setting. The AccuSet Plus™ DIGITAL Humidistat will automatically turn the humidifier ON or OFF, depending on the preset comfort level. The comfort level ranges between 30% and 65% relative humidity.
Manual Mode Instructions:
1.Plug the humidifier into a 120V AC electrical outlet.
2.The display will show the current room humidity.
3.To start the unit, push the MODE/OFF button once for the LOW (LO) manual setting.
4.Press the button again for the HIGH setting (HI). After the selection is made, the display will return to show the current room humidity.
5.To stop the humidifier, keep pressing the button until the display reads OF.
6.The Medicine Cup is located on the top of the misting chamber. To use, pour designated humidifier medication into the cup. DO NOT add medication to the water tank. DO NOT add medication to the medicine cup when the unit is already operating.
4. After the 5 minutes, plug in the unit and turn the unit on to HIGH |
(HI). The RESET light should now be off (if not repeat steps 1 through |
3). In about 2-3 minutes, the humidifier will begin to produce |
moisture. |
AccuSet Plus™ HUMIDISTAT INSTRUCTIONS
To take advantage of the AccuSet Plus™ Digital Humidistat, press the MODE/OFF button until you reach the Auto HIGH (AH) or Auto LOW (AL) setting. Then adjust the set humidity by using the up and down buttons. Humidity will increase in increments of 5%. When the humidity level is set, the display will return to show the current room humidity. When the room humidity level rises above the set humidity, the humidifier will stop. When the humidity level drops below the set humidity, the humidifier will turn on automatically.
IMPORTANT: If you do not plan to use the humidifier for two or more days, make sure any residual water is drained from the water tank and base to prevent algae or bacteria growth.
USING THE PROGRAMMABLE TIMER
AccuSet Plus™ allows the user to program the humidifier to come on at a preset time, or turn off after a set amount of time.
Setting the Off Timer:
1.Select the Mode and or humidity you wish the humidifier to run in.
2.While the humidifier is running, press and hold the up and down buttons simultaneously for 2 seconds. The display will flash “00”.
3.By pressing the up and down buttons, program the humidifier to turn off up to 16 hours later in increments of 1 hour.
4.After setting the timer, the display will return to show the current room humidity. A light in the display panel will illuminate to show that the timer is activated.
5.After the predetermined length of time has passed, the humidifier will automatically shut off.
Setting the On Timer:
1.While the humidifier is off, press and hold the up and down buttons simultaneously for 2 seconds.
2.By pressing the up and down buttons, program the humidifier to turn on up to 16 hours in advance in increments of 1 hour.
3.After the preset length of time has passed, the humidifier will automatically turn on Auto Mode HI with 45% for a preset time of 2 hours.
WARM MIST CLEANING AND MAINTENANCE INSTRUCTIONS
The following maintenance procedures must be routinely followed in order to ensure proper, efficient operation of your humidifier. The unit WILL NOT WORK CORRECTLY if it is not cleaned properly.
When the unit is in use, daily and weekly maintenance is recommended. Regular weekly cleaning prevents scale buildup on the heating element and tray. It also prevents micro-organisms from growing on the tray and tank. This ensures that maximum efficiency will be achieved.
We cannot over-emphasize how essential proper cleaning is to the maintenance and continued use of your unit and to the avoidance of algae or bacteria build-up.
DAILY MAINTENANCE
1.Allow to cool before maintenance. Be sure the unit is OFF and is disconnected from the electrical outlet.
2.Remove the water tank then unlock the housing by switching the two locks towards the front of the humidifier. Lift the housing from the base.
3.Empty water and minerals from the base and place in the top rack of the dishwasher. NOTE: the base is dishwasher safe TOP RACK ONLY.
4.Drain the water from the tank into the sink and rinse tank thoroughly. Wipe clean, and dry with a clean cloth or paper towel
5.Wipe the heating element clean with a soft cloth after it has had a chance to cool.
6.The Electronic Thermal Control Heating element is lined with a coating that is designed to provide the easiest cleaning and prolong the operating efficiency of the humidifier. DO NOT use any metal or hard objects to clean the Heating Element. Never use detergents, gasoline, kerosene, glass cleaner, furniture polish, paint thinner or and other household solvent to clean any part of the humidifier.
7.Follow Operating Instructions.
WEEKLY MAINTENANCE
Remove scale: Allow to cool before maintenance. 1. Repeat steps 1-6 above.
DISINFECT TANK
1.Fill the tank 1/2 full with water and 1/2 teaspoon of chlorine bleach.
2.Let the solution stand for 20 minutes, swishing every few minutes. Wet all surfaces.
3.Carefully empty the base and tank after 20 minutes, and rinse with water until you cannot detect any bleach smell. Dry with a clean cloth or paper towel.
4.Refill the water tank as directed with cool tap water, replace the humidifier housing, and repeat all Operating Instructions.
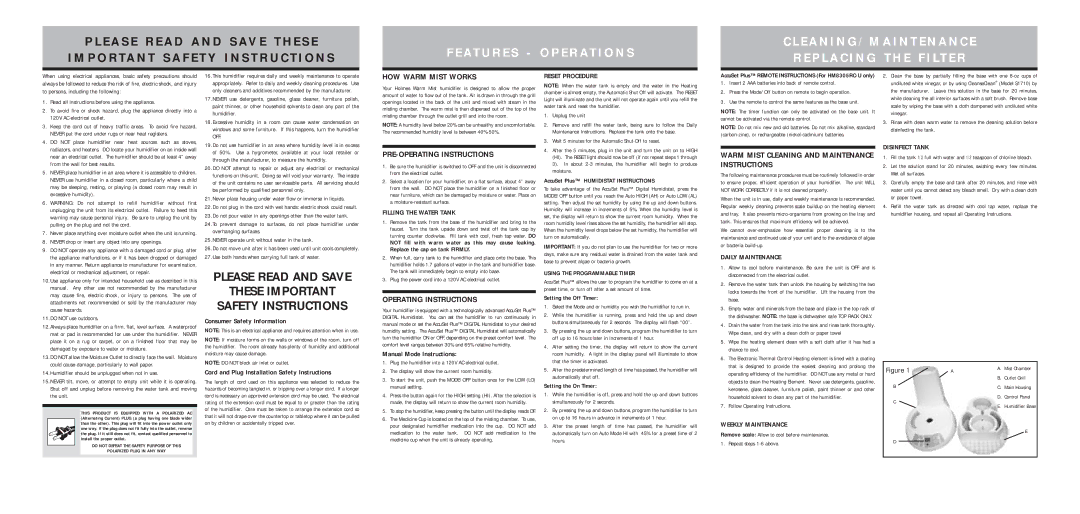
Figure 1 | A | A. | Mist Chamber |
| | B. | Outlet Grill |
B | | C. Main Housing |
C | | D. Control Panel |
| E. | Humidifier Base |
| |
| | | E |
D | | | |
| | | |