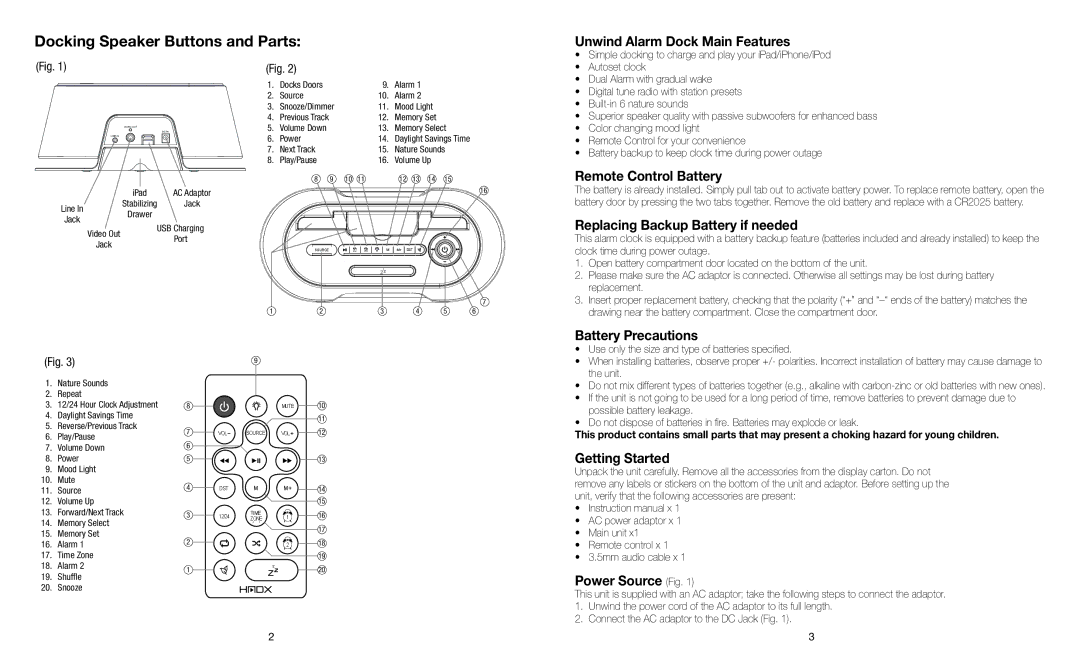
Docking Speaker Buttons and Parts:
(Fig. 1) | (Fig. 2) |
Unwind Alarm Dock Main Features
• Simple docking to charge and play your iPad/iPhone/iPod | |
• | Autoset clock |
• | Dual Alarm with gradual wake |
VIDEO OUT
DC IN
LINE IN
1. | Docks Doors | 9. | Alarm 1 |
2. | Source | 10. | Alarm 2 |
3. | Snooze/Dimmer | 11. | Mood Light |
4. | Previous Track | 12. | Memory Set |
5. | Volume Down | 13. | Memory Select |
6. | Power | 14. | Daylight Savings Time |
7. | Next Track | 15. | Nature Sounds |
8. | Play/Pause | 16. | Volume Up |
• Digital tune radio with station presets |
• |
• Superior speaker quality with passive subwoofers for enhanced bass |
• Color changing mood light |
• Remote Control for your convenience |
• Battery backup to keep clock time during power outage |
| iPad | AC Adaptor |
Line In | Stabilizing | Jack |
Jack |
| Drawer |
| USB Charging | |
| Video Out | |
| Port | |
| Jack | |
|
|
8 | 9 | 10 | 11 | 12 | 13 | 14 | 15 |
16
| SOURCE | 1 | 2 | M | M+ | DST |
|
|
|
|
|
| zz |
|
|
|
|
|
|
|
|
|
|
|
| 7 |
1 | 2 |
|
| 3 |
| 4 | 5 | 6 |
Remote Control Battery
The battery is already installed. Simply pull tab out to activate battery power. To replace remote battery, open the battery door by pressing the two tabs together. Remove the old battery and replace with a CR2025 battery.
Replacing Backup Battery if needed
This alarm clock is equipped with a battery backup feature (batteries included and already installed) to keep the clock time during power outage.
1.Open battery compartment door located on the bottom of the unit.
2.Please make sure the AC adaptor is connected. Otherwise all settings may be lost during battery replacement.
3.Insert proper replacement battery, checking that the polarity (“+” and
Battery Precautions
(Fig. 3) | 9 |
1.Nature Sounds
2.Repeat
3. | 12/24 Hour Clock Adjustment | 8 |
|
| MUTE | 10 | |
4. | Daylight Savings Time |
|
|
|
| 11 | |
5. | Reverse/Previous Track |
|
|
|
| ||
7 | VOL | SOURCE | VOL | 12 | |||
6. | Play/Pause | ||||||
6 |
|
|
|
| |||
7. | Volume Down |
|
|
|
| ||
8. | Power | 5 |
|
|
| 13 | |
9. | Mood Light |
|
|
|
|
| |
10. | Mute | 4 |
|
|
|
| |
11. | Source | DST |
|
| 14 | ||
12. | Volume Up |
|
|
|
| 15 | |
13. | Forward/Next Track | 3 | 12/24 | TIME | 1 | 16 | |
14. | Memory Select | ZONE | |||||
|
|
| |||||
|
|
|
| 17 | |||
15. | Memory Set |
|
|
|
| ||
2 |
|
|
|
| |||
16. | Alarm 1 |
|
| 2 | 18 | ||
17. | Time Zone |
|
|
|
| 19 | |
18. | Alarm 2 |
|
|
| z |
| |
19. | Shuffle | 1 |
|
| zz | 20 | |
20. | Snooze |
|
|
|
|
|
2
•Use only the size and type of batteries specified.
•When installing batteries, observe proper +/- polarities. Incorrect installation of battery may cause damage to the unit.
•Do not mix different types of batteries together (e.g., alkaline with
•If the unit is not going to be used for a long period of time, remove batteries to prevent damage due to possible battery leakage.
•Do not dispose of batteries in fire. Batteries may explode or leak.
This product contains small parts that may present a choking hazard for young children.
Getting Started
Unpack the unit carefully. Remove all the accessories from the display carton. Do not remove any labels or stickers on the bottom of the unit and adaptor. Before setting up the unit, verify that the following accessories are present:
•Instruction manual x 1
•AC power adaptor x 1
•Main unit x1
•Remote control x 1
•3.5mm audio cable x 1
Power Source (Fig. 1)
This unit is supplied with an AC adaptor; take the following steps to connect the adaptor.
1.Unwind the power cord of the AC adaptor to its full length.
2.Connect the AC adaptor to the DC Jack (Fig. 1).
3
