Ethernet Adaptor Kit for UDC3500
Document Number: 51-52-33-152
Effective: 06/03/2005
Supersedes: N/A
Summary
The
Contents
1 Ethernet Adaptor Assembly, 2 Tie Wraps
Table 1 UDC3500 procedure |
| |||
Step |
| Action |
|
|
1 | 10 | 19 | 28 |
|
|
| |||
L1 | 11 | 20 | Ethernet |
|
Adapt29 or |
| |||
L2/N | 12 | 21 | 30 |
|
4 | 13 | 22 | 31 |
|
5 | 14 | 23 | 32 |
|
6 | 15 | 24 | 33 |
|
Ethernet |
| |||
7 | 16 | 25 | Cable34 | 24 |
Hub or | ||||
8 | 17 | 26 | 35 |
|
9 | 18 | 27 | 36 |
|
Tie Wraps (2) |
| 27 | ||
|
| |||
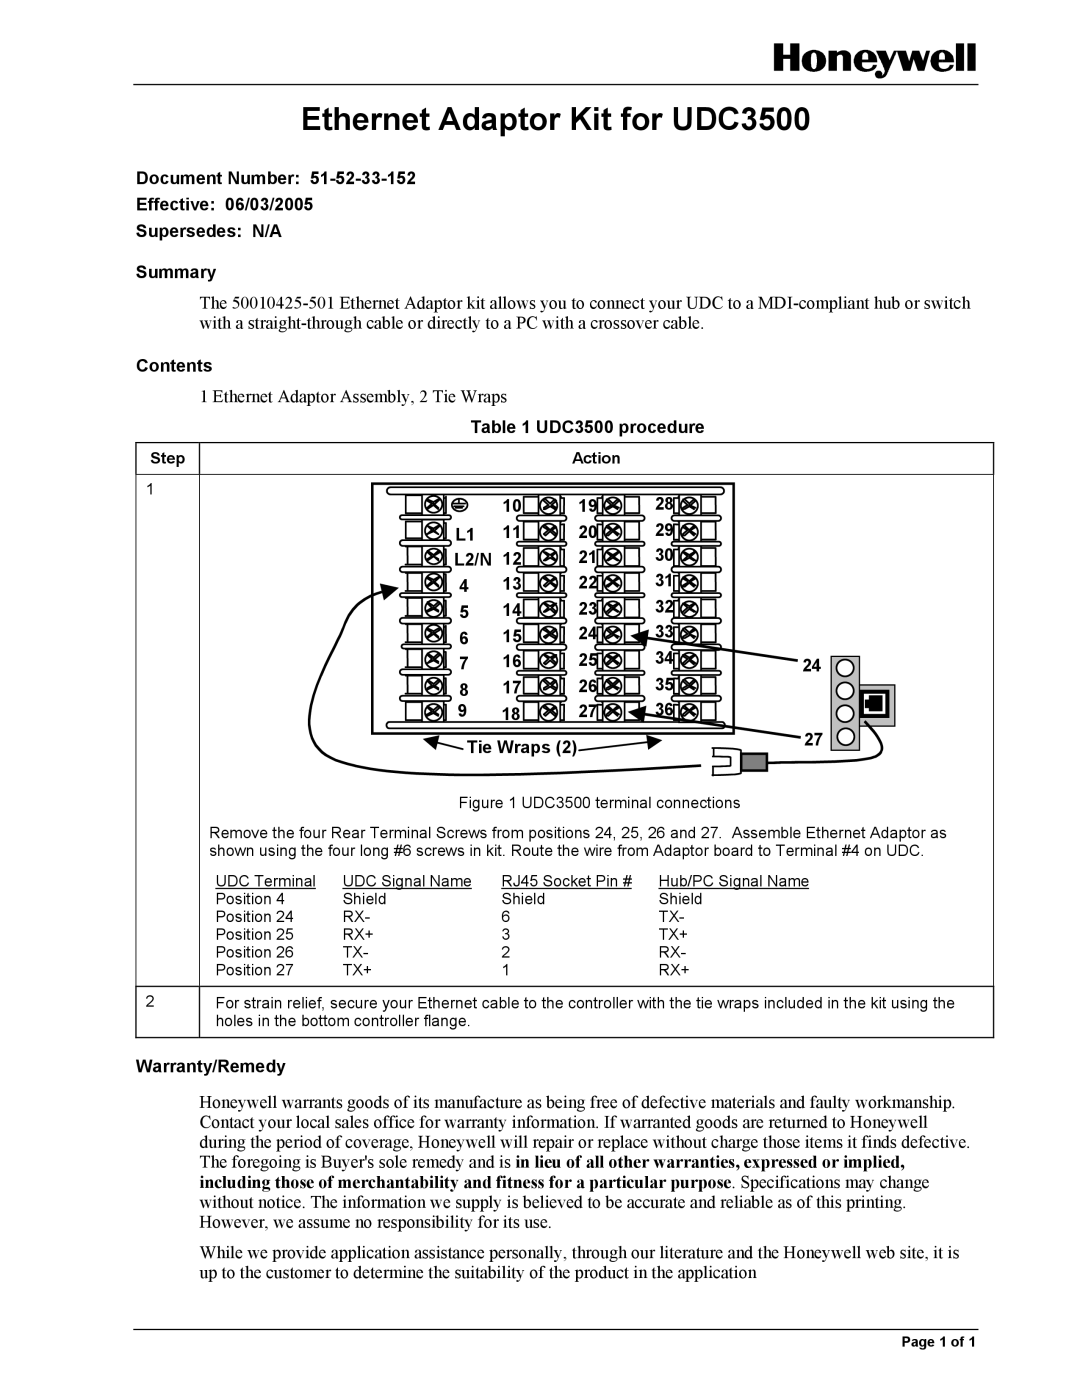
Figure 1 UDC3500 terminal connections
Remove the four Rear Terminal Screws from positions 24, 25, 26 and 27. Assemble Ethernet Adaptor as shown using the four long #6 screws in kit. Route the wire from Adaptor board to Terminal #4 on UDC.
UDC Terminal | UDC Signal Name | RJ45 Socket Pin # | Hub/PC Signal Name |
Position 4 | Shield | Shield | Shield |
Position 24 | RX- | 6 | TX- |
Position 25 | RX+ | 3 | TX+ |
Position 26 | TX- | 2 | RX- |
Position 27 | TX+ | 1 | RX+ |
2
For strain relief, secure your Ethernet cable to the controller with the tie wraps included in the kit using the holes in the bottom controller flange.
Warranty/Remedy
Honeywell warrants goods of its manufacture as being free of defective materials and faulty workmanship. Contact your local sales office for warranty information. If warranted goods are returned to Honeywell during the period of coverage, Honeywell will repair or replace without charge those items it finds defective. The foregoing is Buyer's sole remedy and is in lieu of all other warranties, expressed or implied, including those of merchantability and fitness for a particular purpose. Specifications may change without notice. The information we supply is believed to be accurate and reliable as of this printing. However, we assume no responsibility for its use.
While we provide application assistance personally, through our literature and the Honeywell web site, it is up to the customer to determine the suitability of the product in the application
Page 1 of 1
