5800MICRA

Wireless Recessed Transmitter

Page 2


Before drilling any holes, make sure that successful


BATTERY CAUTION: Risk of fire, explosion and burns.


Go/No Go transmission reception tests have been conducted as called for in the

Do not recharge, disassemble, heat above 212"F (100"C) or incinerate. Dispose

5800MICRA transmitter section.

of used batteries promptly. Keep away from children.

Reed Switch on

top side of PC board

MOUNTING (See Figure 1)

1.Mark the selected location for the transmitter on the frame of the window.

2.Mark the location for the magnet on the window sash, directly opposite the transmitter location. Before drilling any holes, make sure that the successful Go/No Go reception tests have been conducted as called for in the 5800 MICRA transmitter section. (see Page 1)

3.Drill holes at the locations marked, for the transmitter (3/4" diameter, no more than 11/32" deep) and magnet (3/4" diameter, no more than 11/32" deep using a 3/4 Forstner bit).

Figure 2


SPECIFICATIONS


5800MICRA transmitters


Dimensions

Dowel Package

0.750" diameter (3/4")


Additional Info

Dowel Lid 0.850" diameter x 0.060" thick


Wire Antenna

11" x 0.050" diameter (24 gauge)


Fits Cavity Depth

0.330" depth (11/32")

Power Source


3.0V Lithium Coin Cell Battery CR1620

Transmit Range


Typically >500 ft. open air

Temperature Range


10º to 120º F (-12º to 49º C)

Operating Gap


0.5"

(inside cap)

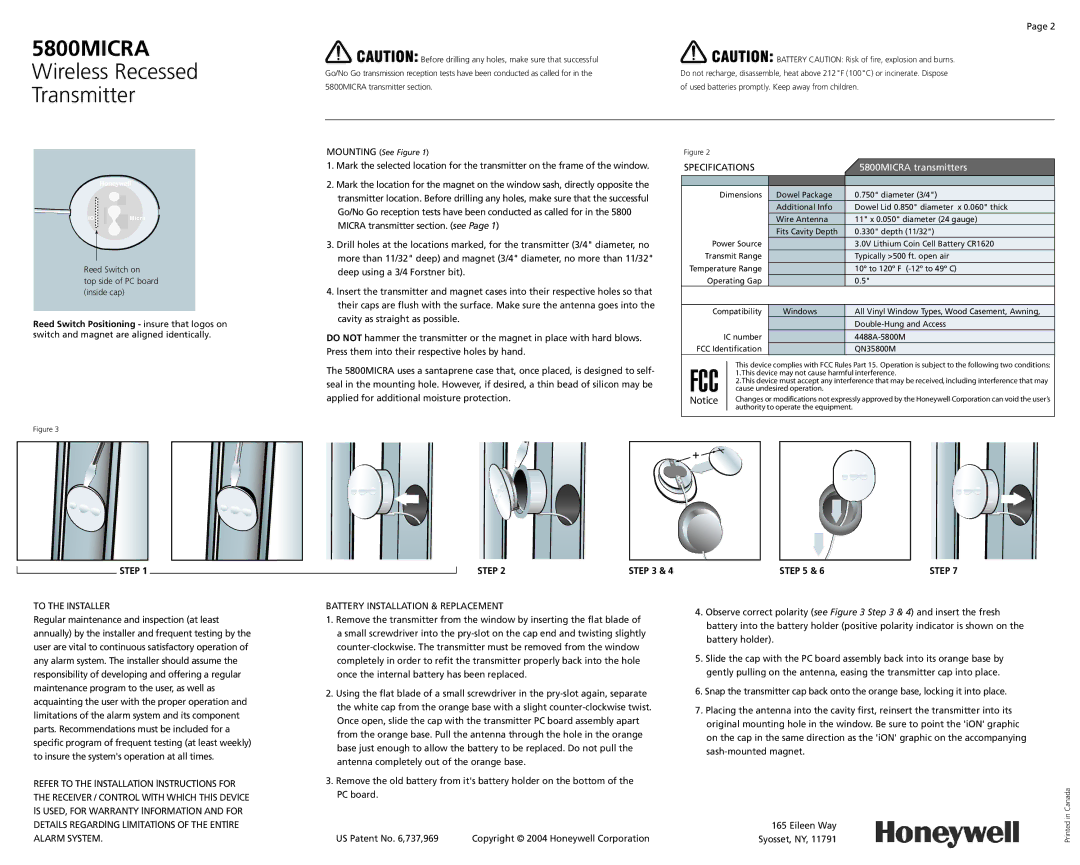
Reed Switch Positioning - insure that logos on switch and magnet are aligned identically.

Figure 3

4.lnsert the transmitter and magnet cases into their respective holes so that their caps are flush with the surface. Make sure the antenna goes into the cavity as straight as possible.

DO NOT hammer the transmitter or the magnet in place with hard blows. Press them into their respective holes by hand.

The 5800MICRA uses a santaprene case that, once placed, is designed to self- seal in the mounting hole. However, if desired, a thin bead of silicon may be applied for additional moisture protection.

Compatibility

Windows


All Vinyl Window Types, Wood Casement, Awning,


Double-Hung and Access


IC number


4488A-5800M

FCC Identification


QN35800M

FCC


This device complies with FCC Rules Part 15. Operation is subject to the following two conditions:


1. This device may not cause harmful interference.


2. This device must accept any interference that may be received, including interference that may


cause undesired operation.


Notice


Changes or modifications not expressly approved by the Honeywell Corporation can void the user’s


authority to operate the equipment.


+

STEP 1

TO THE INSTALLER

Regular maintenance and inspection (at least annually) by the installer and frequent testing by the user are vital to continuous satisfactory operation of any alarm system. The installer should assume the responsibility of developing and offering a regular maintenance program to the user, as well as acquainting the user with the proper operation and limitations of the alarm system and its component parts. Recommendations must be included for a specific program of frequent testing (at least weekly) to insure the system's operation at all times.

REFER TO THE lNSTALLATlON lNSTRUCTlONS FOR THE RECEIVER / CONTROL WlTH WHlCH THlS DEVlCE lS USED, FOR WARRANTY lNFORMATlON AND FOR DETAlLS REGARDlNG LlMlTATlONS OF THE ENTlRE

ALARM SYSTEM.

STEP 2

STEP 3 & 4

BATTERY INSTALLATION & REPLACEMENT

1.Remove the transmitter from the window by inserting the flat blade of a small screwdriver into the pry-slot on the cap end and twisting slightly counter-clockwise. The transmitter must be removed from the window completely in order to refit the transmitter properly back into the hole once the internal battery has been replaced.

2.Using the flat blade of a small screwdriver in the pry-slot again, separate the white cap from the orange base with a slight counter-clockwise twist. Once open, slide the cap with the transmitter PC board assembly apart from the orange base. Pull the antenna through the hole in the orange base just enough to allow the battery to be replaced. Do not pull the antenna completely out of the orange base.

3.Remove the old battery from it's battery holder on the bottom of the PC board.

US Patent No. 6,737,969 Copyright © 2004 Honeywell Corporation

STEP 5 & 6

STEP 7

4.Observe correct polarity (see Figure 3 Step 3 & 4) and insert the fresh battery into the battery holder (positive polarity indicator is shown on the battery holder).

5.Slide the cap with the PC board assembly back into its orange base by gently pulling on the antenna, easing the transmitter cap into place.

6.Snap the transmitter cap back onto the orange base, locking it into place.

7.Placing the antenna into the cavity first, reinsert the transmitter into its original mounting hole in the window. Be sure to point the 'iON' graphic on the cap in the same direction as the 'iON' graphic on the accompanying sash-mounted magnet.

165 Eileen Way

Syosset, NY, 11791

Printed in Canada

Page 2
Image 2
Honeywell 5800MICRA installation instructions Step, To the Installer, Alarm System, Battery Installation & Replacement

5800MICRA specifications

The Honeywell 5800MICRA is a compact, wireless magnetic contact sensor designed for residential and commercial security applications. This innovative device is a key component in safeguarding properties by monitoring door and window openings, providing reliable protection against unauthorized entry.

One of the standout features of the 5800MICRA is its ultra-slim design. Measuring just under half an inch in thickness, it allows for discreet installation on a variety of surfaces, including popular residential entry points. The sensor is specifically engineered for low-profile mounting, making it an excellent choice for areas where aesthetics or space constraints are a consideration.

In terms of technology, the Honeywell 5800MICRA uses advanced wireless communication protocols to ensure seamless integration with established Honeywell security systems. It operates in the 5800 series of wireless devices, providing a reliable range and minimizing interference with other home automation products. The sensor is powered by a long-lasting lithium battery, ensuring extended operational life with minimal maintenance.

Another notable characteristic of the 5800MICRA is its ease of installation. The device can be quickly set up without the need for complex wiring. Its double-sided tape backing allows for simple adhesion to doors, windows, or frames, enabling users with basic DIY skills to handle the installation effectively.

The sensor is also robust and reliable, featuring durable construction that can withstand various environmental factors. It is designed to perform consistently, providing peace of mind through low false alarm rates, which are crucial for the efficiency of any security system. Additionally, the 5800MICRA is compatible with Honeywell’s wide range of security panels, further extending its usability in multifaceted security setups.

Moreover, the Honeywell 5800MICRA is suitable for multiple applications beyond residential security, including commercial environments such as storefronts, warehouses, and offices. Its simplistic design, combined with rugged functionality, makes it versatile and adaptable to various security needs.

In conclusion, the Honeywell 5800MICRA is an advanced, compact magnetic contact sensor that excels in feature-rich performance and versatility. With its sleek design, reliable wireless communication, easy installation process, and durability, it stands to be an invaluable asset in the realm of security technology. Whether for protecting a home or a business, the 5800MICRA delivers security solutions that users can trust.