Honeywell AC-140-7, AC-220-7 manual Installing the Conduit

Models: AC-220-7 AC-140-7

1 44
Download 44 pages 10.02 Kb
Page 3
Image 3

SECTION 2

2.4INSTALLING THE CONDUIT

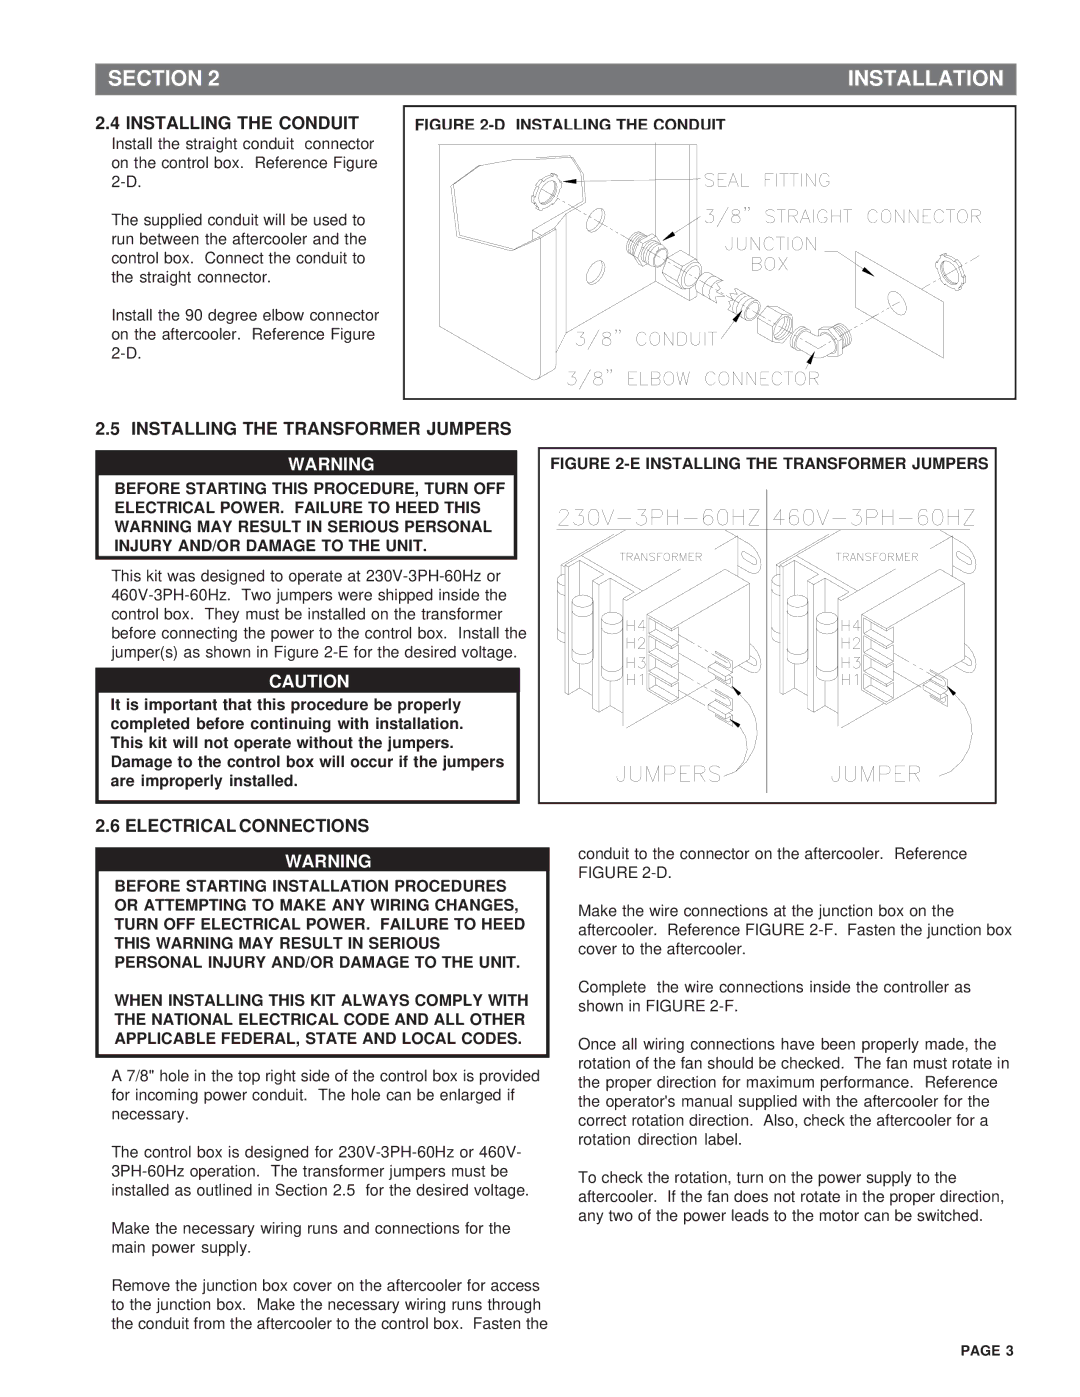
Install the straight conduit connector on the control box. Reference Figure 2-D.

The supplied conduit will be used to run between the aftercooler and the control box. Connect the conduit to the straight connector.

Install the 90 degree elbow connector on the aftercooler. Reference Figure 2-D.

INSTALLATION

FIGURE 2-D INSTALLING THE CONDUIT

2.5 INSTALLING THE TRANSFORMER JUMPERS

WARNING

BEFORE STARTING THIS PROCEDURE, TURN OFF ELECTRICAL POWER. FAILURE TO HEED THIS WARNING MAY RESULT IN SERIOUS PERSONAL INJURY AND/OR DAMAGE TO THE UNIT.

This kit was designed to operate at 230V-3PH-60Hz or 460V-3PH-60Hz. Two jumpers were shipped inside the control box. They must be installed on the transformer before connecting the power to the control box. Install the jumper(s) as shown in Figure 2-E for the desired voltage.

CAUTION

It is important that this procedure be properly completed before continuing with installation. This kit will not operate without the jumpers.

Damage to the control box will occur if the jumpers are improperly installed.

FIGURE 2-E INSTALLING THE TRANSFORMER JUMPERS

2.6 ELECTRICAL CONNECTIONS

WARNING

BEFORE STARTING INSTALLATION PROCEDURES OR ATTEMPTING TO MAKE ANY WIRING CHANGES, TURN OFF ELECTRICAL POWER. FAILURE TO HEED THIS WARNING MAY RESULT IN SERIOUS PERSONAL INJURY AND/OR DAMAGE TO THE UNIT.

WHEN INSTALLING THIS KIT ALWAYS COMPLY WITH THE NATIONAL ELECTRICAL CODE AND ALL OTHER APPLICABLE FEDERAL, STATE AND LOCAL CODES.

A 7/8" hole in the top right side of the control box is provided for incoming power conduit. The hole can be enlarged if necessary.

The control box is designed for 230V-3PH-60Hz or 460V- 3PH-60Hz operation. The transformer jumpers must be installed as outlined in Section 2.5 for the desired voltage.

Make the necessary wiring runs and connections for the main power supply.

Remove the junction box cover on the aftercooler for access to the junction box. Make the necessary wiring runs through the conduit from the aftercooler to the control box. Fasten the

conduit to the connector on the aftercooler. Reference FIGURE 2-D.

Make the wire connections at the junction box on the aftercooler. Reference FIGURE 2-F. Fasten the junction box cover to the aftercooler.

Complete the wire connections inside the controller as shown in FIGURE 2-F.

Once all wiring connections have been properly made, the rotation of the fan should be checked. The fan must rotate in the proper direction for maximum performance. Reference the operator's manual supplied with the aftercooler for the correct rotation direction. Also, check the aftercooler for a rotation direction label.

To check the rotation, turn on the power supply to the aftercooler. If the fan does not rotate in the proper direction, any two of the power leads to the motor can be switched.

PAGE 3

Page 3
Image 3
Honeywell AC-140-7, AC-220-7 manual Installing the Conduit

AC-220-7, AC-140-7 specifications

The Honeywell AC-140-7 and AC-220-7 are advanced air conditioning units that exemplify modern air conditioning technology, delivering both comfort and efficiency. Designed for varying space requirements, these units cater to both residential and light commercial settings, providing versatile solutions for climate control.

The AC-140-7 model is particularly known for its compact design, making it suitable for smaller spaces without sacrificing performance. It delivers an impressive cooling output, effectively maintaining comfortable indoor temperatures even during the hottest months. The system utilizes a high-efficiency compressor that operates quietly, ensuring minimal disruption to daily activities. Additionally, the AC-140-7 features an advanced air filtration system that helps to improve indoor air quality by capturing dust, allergens, and other particulates.

In contrast, the AC-220-7 is designed for larger spaces, providing robust cooling capacity. It incorporates multiple fan speeds and advanced thermostatic controls, allowing users to customize their cooling experience according to their preferences and requirements. One of the standout characteristics of the AC-220-7 is its energy efficiency, with a high Seasonal Energy Efficiency Ratio (SEER) rating, which is crucial for reducing energy costs while maintaining optimal performance.

Both models are equipped with state-of-the-art technologies, including smart diagnostic features that help users troubleshoot issues quickly and efficiently. This capability not only enhances the user experience but also prolongs the lifespan of the units. Furthermore, these units are easy to install and maintain, with accessible components for service and cleaning.

A critical characteristic of the Honeywell AC-140-7 and AC-220-7 is their environmentally friendly refrigerants, which align with modern environmental regulations. This aspect makes them a responsible choice for environmentally conscious consumers.

In summary, the Honeywell AC-140-7 and AC-220-7 units are excellent examples of innovation in air conditioning solutions. With their combination of efficiency, advanced features, and quiet operation, these models represent a significant investment in comfort and sustainability for any space. Whether cooling a small room or a larger area, Honeywell’s engineering excellence ensures that users enjoy effective climate control tailored to their needs.