Fixing

The appliance must be installed on a perfectly level supporting surface.

Any deformities caused by improper fixing could affect the features and operation of the hob.

The thickness of the supporting surface should be taken into account when choosing the length of the screws for the fixing hooks:

30 mm thick: 23 mm screws

40 mm thick: 13 mm screws

Fix the hob as follows:

1.Use short flat-bottomed screws to fix the 4 alignment springs in the holes provided at the central point of each side of the hob.

2.Place the hob in the cavity, make sure it is in a central position and push down on the whole perimeter until the hob is stuck to the supporting surface.

3.For hobs with raised sides: After inserting the hob into its cavity, insert the 4 fixing hooks (each has its own pin) into the lower edges of the hob, using the long pointed screws to fix them in place, until the glass is stuck to the supporting surface.

￿The screws for the alignment springs must remain accessible.

￿In order to adhere to safety standards, the appliance must not come into contact with electrical parts once it has been installed.

￿All parts which ensure the safe operation of the appliance must not be removable without the aid of a tool.

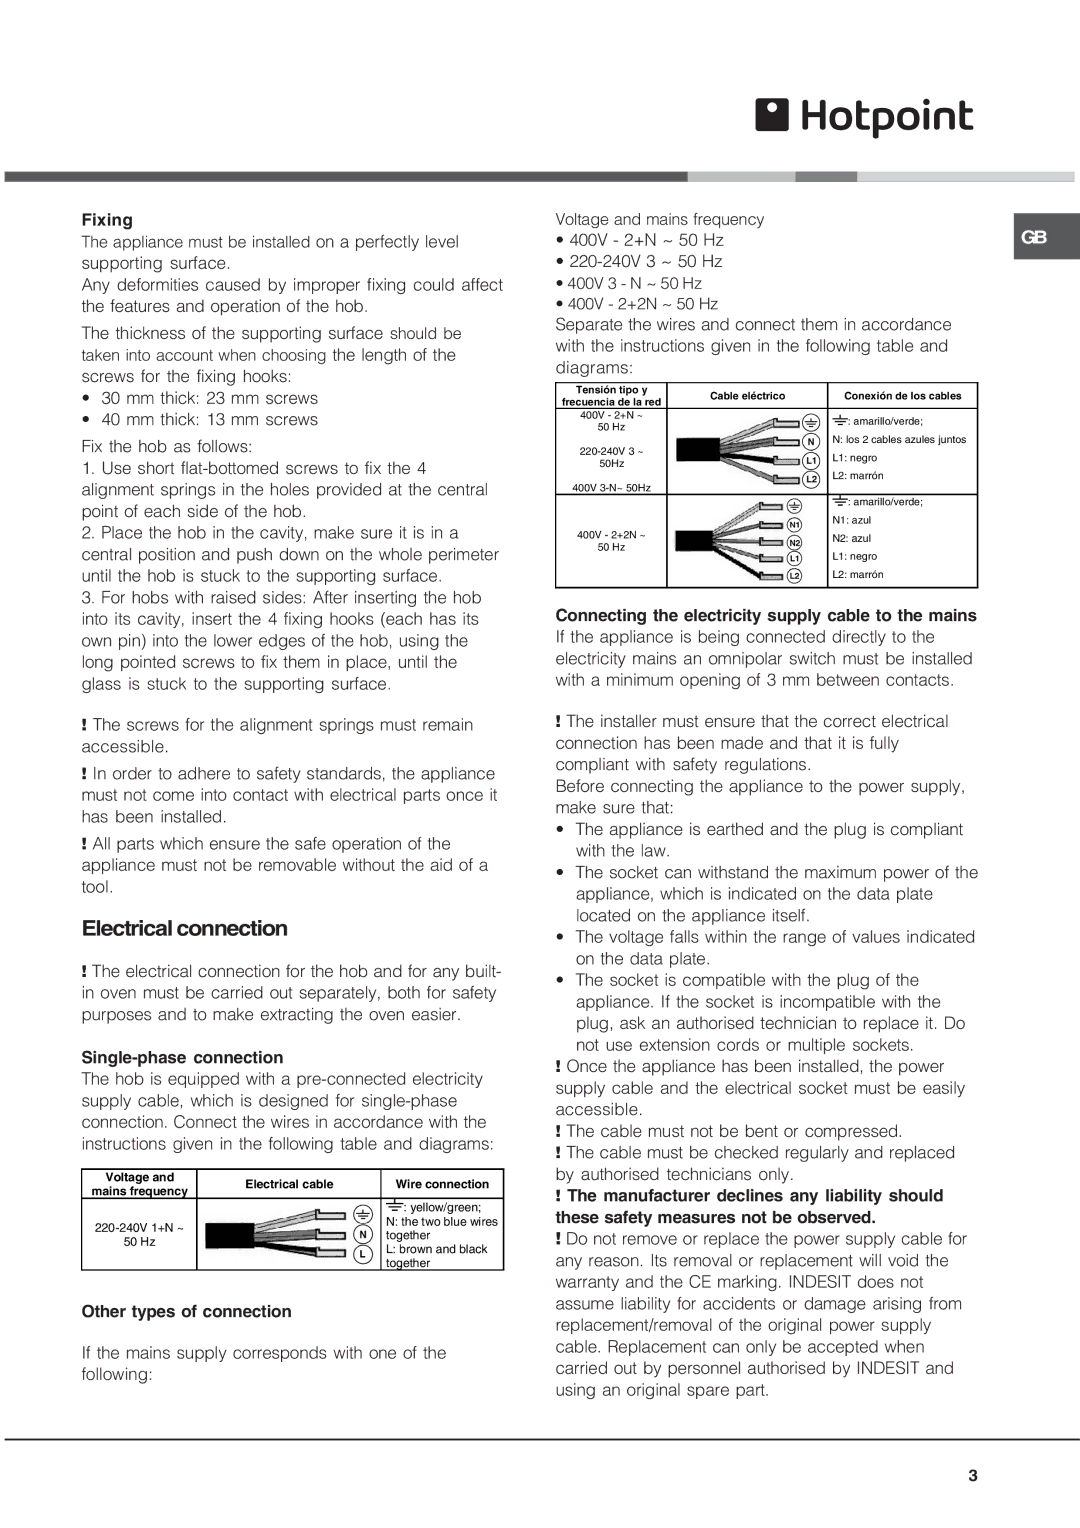
Electrical connection

￿The electrical connection for the hob and for any built- in oven must be carried out separately, both for safety purposes and to make extracting the oven easier.

Single-phase connection

The hob is equipped with a pre-connected electricity supply cable, which is designed for single-phase connection. Connect the wires in accordance with the instructions given in the following table and diagrams:

Voltage and

Electrical cable

Wire connection

mains frequency


: yellow/green;

220-240V 1+N ~


N: the two blue wires


together

50 Hz


L: brown and black


together

Other types of connection

If the mains supply corresponds with one of the following:

Voltage and mains frequency

GB

• 400V - 2+N ~ 50 Hz

220-240V 3 ~ 50 Hz


• 400V 3 - N ~ 50 Hz

• 400V - 2+2N ~ 50 Hz

Separate the wires and connect them in accordance with the instructions given in the following table and diagrams:

Tensión tipo y

Cable eléctrico

Conexión de los cables

frecuencia de la red


400V - 2+N ~


: amarillo/verde;

50 Hz


220-240V 3 ~


N: los 2 cables azules juntos


L1: negro

50Hz


L2: marrón

400V 3-N~ 50Hz


: amarillo/verde;


N1: azul

400V - 2+2N ~


N2: azul

50 Hz


L1: negro


L2: marrón


Connecting the electricity supply cable to the mains If the appliance is being connected directly to the electricity mains an omnipolar switch must be installed with a minimum opening of 3 mm between contacts.

￿The installer must ensure that the correct electrical connection has been made and that it is fully compliant with safety regulations.

Before connecting the appliance to the power supply, make sure that:

• The appliance is earthed and the plug is compliant with the law.

• The socket can withstand the maximum power of the appliance, which is indicated on the data plate located on the appliance itself.

• The voltage falls within the range of values indicated on the data plate.

• The socket is compatible with the plug of the appliance. If the socket is incompatible with the plug, ask an authorised technician to replace it. Do not use extension cords or multiple sockets.

￿Once the appliance has been installed, the power supply cable and the electrical socket must be easily accessible.

￿The cable must not be bent or compressed.

￿The cable must be checked regularly and replaced by authorised technicians only.

￿The manufacturer declines any liability should these safety measures not be observed.

￿Do not remove or replace the power supply cable for any reason. Its removal or replacement will void the warranty and the CE marking. INDESIT does not assume liability for accidents or damage arising from replacement/removal of the original power supply cable. Replacement can only be accepted when carried out by personnel authorised by INDESIT and using an original spare part.

3

Page 3
Image 3
Hotpoint CIC 642 C manual Electrical connection, Single-phase connection

CIC 642 C specifications

The Hotpoint CIA 641 C S and CIC 642 C are modern built-in gas hobs that blend performance, modern aesthetics, and advanced cooking technologies, catering to the needs of contemporary kitchens. These hobs resonate with the essence of contemporary cooking, appealing to both amateur cooks and seasoned chefs.

The CIA 641 C S model boasts a sleek and stylish design, perfect for kitchens that prioritize both form and function. With four gas burners, including a powerful Wok burner, it allows users to manage multiple cooking tasks simultaneously. The innovative design ensures even heat distribution, enhancing cooking efficiency and flavor.

One of the standout features of the CIA 641 C S is its high-efficiency burners, engineered to provide faster boiling times and improved energy efficiency. These burners not only reduce cooking times but also allow for better control over cooking temperatures, making it easier to prepare a variety of dishes.

The CIC 642 C model takes it a step further, offering a slightly larger cooking surface. It comes with five burners, including a dual flame Wok burner that delivers intense heat for stir-frying or quick searing. The additional burner adds versatility to the kitchen, providing more options for meal preparation.

In terms of safety, both models are equipped with advanced flame failure devices. This technology automatically cuts off the gas supply if the flame goes out, providing peace of mind for users and ensuring a safer cooking environment. The easy-to-clean enamel pan supports are designed to simplify maintenance, making clean-up post-cooking quick and hassle-free.

Both hobs feature user-friendly rotary controls, allowing for precision cooking. The controls are designed for intuitive operation, meaning that adjustments to heat settings can be made quickly and effortlessly. This feature is particularly useful for recipes that require precise temperature control.

Incorporating a stylish stainless-steel finish, these hobs enhance the visual appeal of any kitchen, blending seamlessly with various design elements. The combination of sophisticated technology and aesthetic appeal makes the Hotpoint CIA 641 C S and CIC 642 C an excellent choice for anyone looking to upgrade their cooking experience while maintaining a modern kitchen design.