Hotpoint HXC9.8AT, HXC6.8AT manual I2I4, Models with Touch control glass + display high

Models: HXC6.8AT HXC9.8AT

1 16
Download 16 pages 51.13 Kb
Page 12
Image 12
The antigrease (A) and/or odour (B) filters need cleaning/


Antigrease and odour filter signal

GB

The antigrease (A) and/or odour (B) filters need cleaning/


replacing after a certain number of hours of use (the latter


for filtering hoods only).


The indicator light I1 on indicates that the antigrease filter


is saturated, while the indicator light I2 on indicates that the


odour filter is saturated (for hoods in filtering mode only).


Press T5 + T4 for 3 seconds with the hood on to reset the


counter.

Hood type setting

The hood can be set to the ventilation (default) or filtering mode. To change the setting proceed as follows:

with the hood OFF, the menu is accessed by pressing the T4 e T5 buttons for a prolonged time; this is signalled by a sound emitted by the hood and by the I4 icon lighting up and the writing C1-0appearing on the display;

use the buttons T4 and T5 to go through the menu. Use T4 to go through the various menu items (C1, C2, C3, C4, etc) and T5 to select them (0, 1 or 0, 1, 2);

to set the hood type, access the menu, select the item C6 with T4 and set the value 0 with T5 to set the hood on ventilation mode or 1 for the filtering mode. Press T1 at the end.

Hood off

The hood can be turned off manually by pressing the T1 button (ON/OFF). If the hood stays on in manual mode, it turns off automatically after a certain “safety” time. If the timer is set, the hood turns off automatically when the set time runs out.

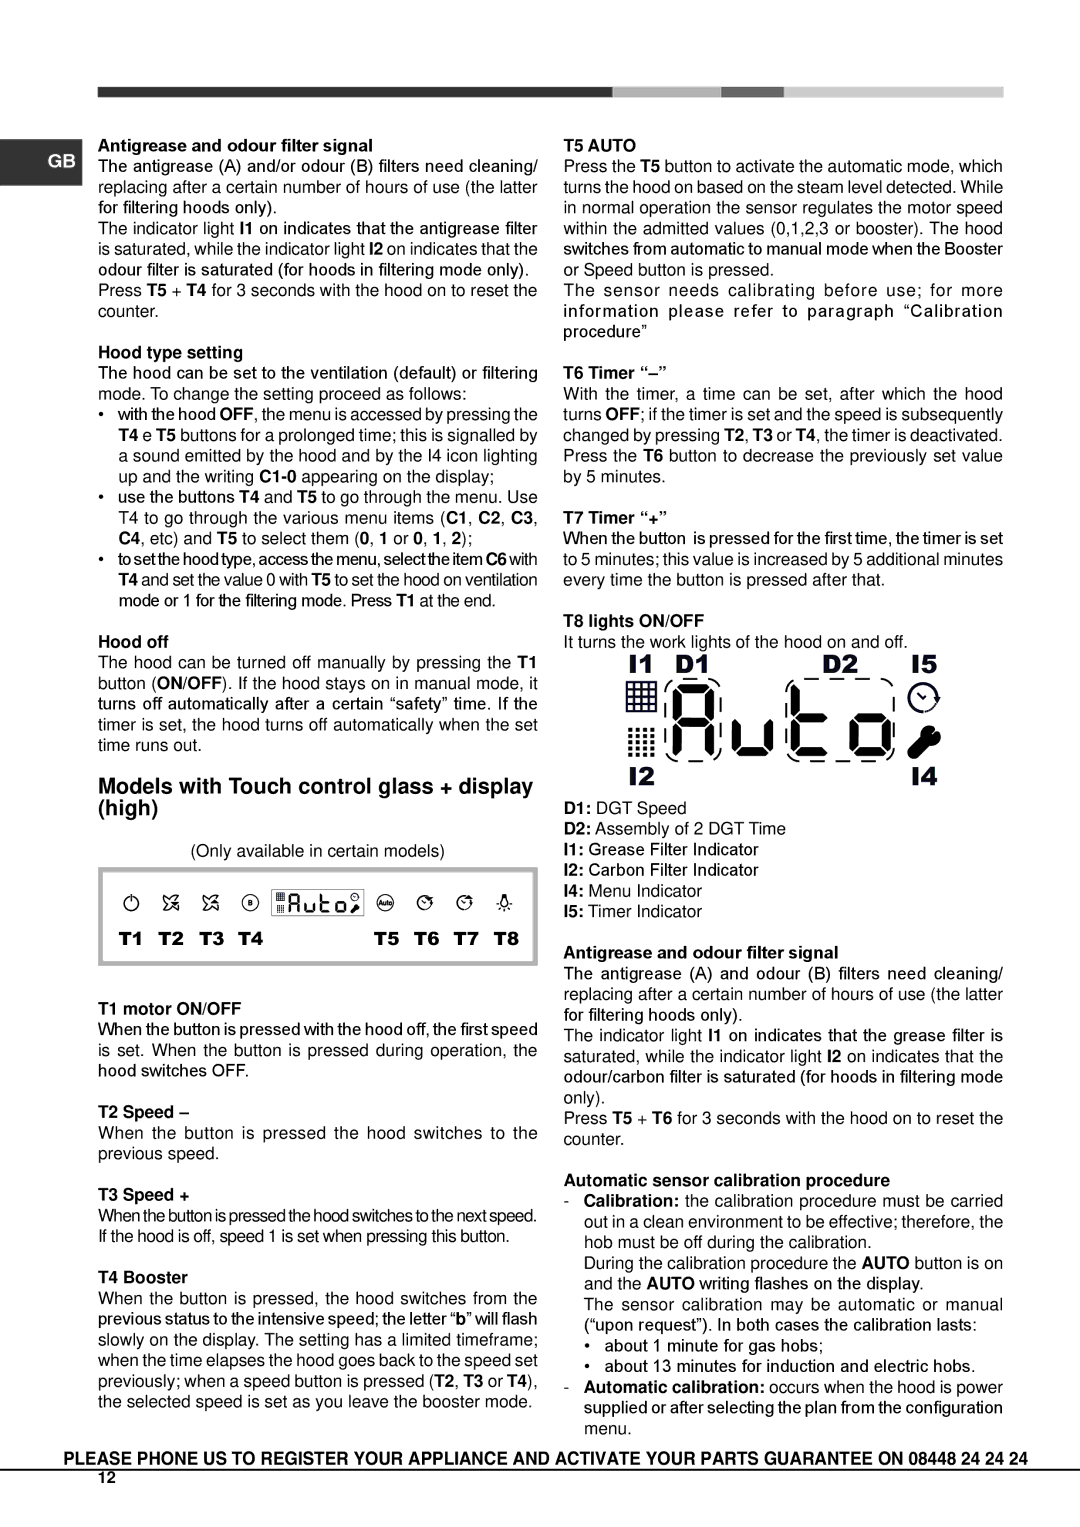
Models with Touch control glass + display (high)

(Only available in certain models)

T1

T2

T3

T4


T5

T6

T7

T8


T1 motor ON/OFF

When the button is pressed with the hood off, the first speed is set. When the button is pressed during operation, the hood switches OFF.

T2 Speed –

When the button is pressed the hood switches to the previous speed.

T3 Speed +

When the button is pressed the hood switches to the next speed. If the hood is off, speed 1 is set when pressing this button.

T4 Booster

When the button is pressed, the hood switches from the previous status to the intensive speed; the letter “b” will flash slowly on the display. The setting has a limited timeframe; when the time elapses the hood goes back to the speed set previously; when a speed button is pressed (T2, T3 or T4), the selected speed is set as you leave the booster mode.

T5 AUTO

Press the T5 button to activate the automatic mode, which turns the hood on based on the steam level detected. While in normal operation the sensor regulates the motor speed within the admitted values (0,1,2,3 or booster). The hood switches from automatic to manual mode when the Booster or Speed button is pressed.

The sensor needs calibrating before use; for more information please refer to paragraph “Calibration procedure”

T6 Timer “–”

With the timer, a time can be set, after which the hood turns OFF; if the timer is set and the speed is subsequently changed by pressing T2, T3 or T4, the timer is deactivated. Press the T6 button to decrease the previously set value by 5 minutes.

T7 Timer “+”

When the button is pressed for the first time, the timer is set to 5 minutes; this value is increased by 5 additional minutes every time the button is pressed after that.

T8 lights ON/OFF

It turns the work lights of the hood on and off.

I1

D1

D2

I5


I2I4

D1: DGT Speed

D2: Assembly of 2 DGT Time

I1: Grease Filter Indicator

I2: Carbon Filter Indicator

I4: Menu Indicator

I5: Timer Indicator

Antigrease and odour filter signal

The antigrease (A) and odour (B) filters need cleaning/ replacing after a certain number of hours of use (the latter for filtering hoods only).

The indicator light I1 on indicates that the grease filter is saturated, while the indicator light I2 on indicates that the odour/carbon filter is saturated (for hoods in filtering mode only).

Press T5 + T6 for 3 seconds with the hood on to reset the counter.

Automatic sensor calibration procedure

-Calibration: the calibration procedure must be carried out in a clean environment to be effective; therefore, the hob must be off during the calibration.

During the calibration procedure the AUTO button is on and the AUTO writing flashes on the display.

The sensor calibration may be automatic or manual

(“upon request”). In both cases the calibration lasts:

about 1 minute for gas hobs;

about 13 minutes for induction and electric hobs.

-Automatic calibration: occurs when the hood is power supplied or after selecting the plan from the configuration menu.

PLEASE PHONE US TO REGISTER YOUR APPLIANCE AND ACTIVATE YOUR PARTS GUARANTEE ON 08448 24 24 24

12

Page 12
Image 12
Hotpoint HXC9.8AT, HXC6.8AT manual I2I4, Models with Touch control glass + display high