• The inside of the oven should ideally be cleaned after GB each use, while it is still lukewarm. Use hot water and

Sliding rack kit assembly

detergent, then rinse well and dry with a soft cloth. Do not use abrasive products.

All accessories - with the exception of the sliding racks

- can be washed like everyday crockery, and are even dishwasher safe.

We recommend that detergents are not sprayed directly onto the control panel, but that a sponge is used instead.

!Never use steam cleaners or pressure cleaners on the appliance.

A

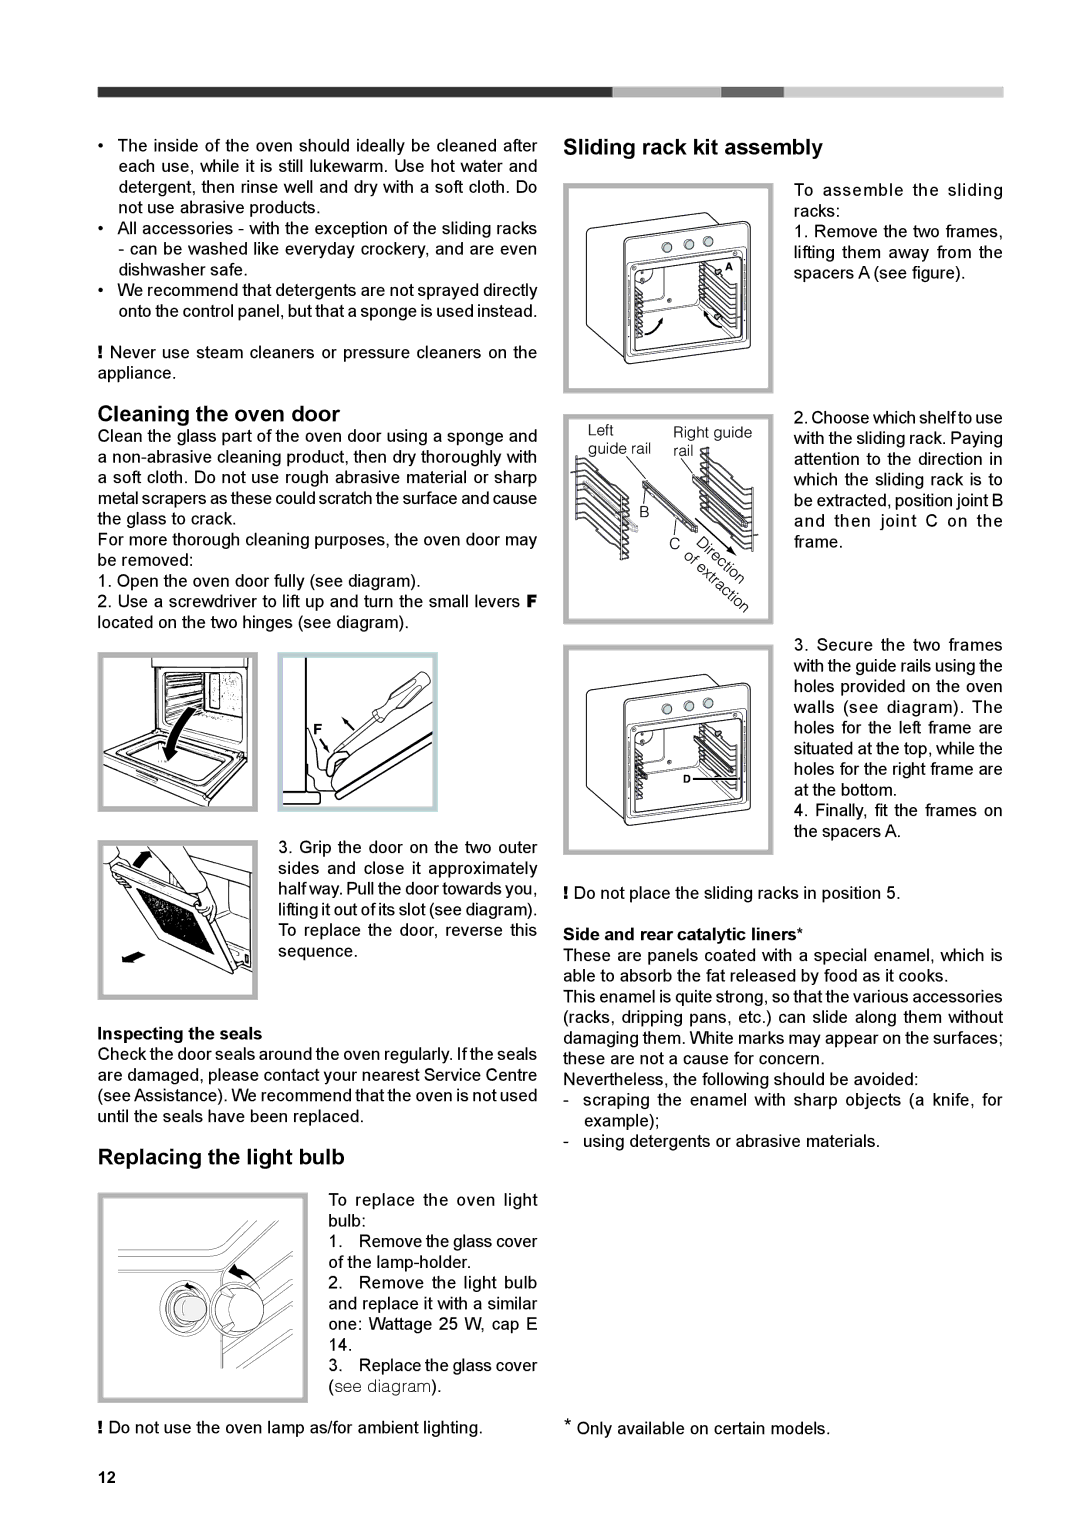
To assemble the sliding racks:

1.Remove the two frames, lifting them away from the spacers A (see figure).

Cleaning the oven door

Clean the glass part of the oven door using a sponge and a non-abrasive cleaning product, then dry thoroughly with a soft cloth. Do not use rough abrasive material or sharp metal scrapers as these could scratch the surface and cause the glass to crack.

For more thorough cleaning purposes, the oven door may be removed:

1.Open the oven door fully (see diagram).

2.Use a screwdriver to lift up and turn the small levers F located on the two hinges (see diagram).

Left

Right guide

guide rail

rail

B


C


of


Direction


extraction

2.Choose which shelf to use with the sliding rack. Paying attention to the direction in which the sliding rack is to be extracted, position joint B and then joint C on the frame.

F

3. Grip the door on the two outer sides and close it approximately

D

3.Secure the two frames with the guide rails using the holes provided on the oven walls (see diagram). The holes for the left frame are situated at the top, while the holes for the right frame are at the bottom.

4.Finally, fit the frames on the spacers A.

half way. Pull the door towards you, lifting it out of its slot (see diagram). To replace the door, reverse this sequence.

Inspecting the seals

Check the door seals around the oven regularly. If the seals are damaged, please contact your nearest Service Centre (see Assistance). We recommend that the oven is not used until the seals have been replaced.

Replacing the light bulb

To replace the oven light bulb:

1. Remove the glass cover of the lamp-holder.

2. Remove the light bulb and replace it with a similar one: Wattage 25 W, cap E 14.

3. Replace the glass cover (see diagram).

!Do not use the oven lamp as/for ambient lighting.

!Do not place the sliding racks in position 5.

Side and rear catalytic liners*

These are panels coated with a special enamel, which is able to absorb the fat released by food as it cooks.

This enamel is quite strong, so that the various accessories (racks, dripping pans, etc.) can slide along them without damaging them. White marks may appear on the surfaces; these are not a cause for concern.

Nevertheless, the following should be avoided:

-scraping the enamel with sharp objects (a knife, for example);

-using detergents or abrasive materials.

*Only available on certain models.

PLEASE PHONE US TO REGISTER YOUR APPLIANCE AND ACTIVATE YOUR PARTS GUARANTEE ON 08448 24 24 24

12

Page 12
Image 12
Hotpoint SH 103 CX S Sliding rack kit assembly, Cleaning the oven door, Replacing the light bulb, Inspecting the seals

SH 103 CX S specifications

The Hotpoint SH 103 CX S is an impressive built-in oven that combines advanced technology with stylish design to enhance any kitchen. Designed for efficiency and performance, this oven is a perfect choice for both amateur cooks and seasoned chefs alike.

One of the standout features of the Hotpoint SH 103 CX S is its multifunctional cooking capabilities. With several cooking modes, including traditional convection baking, grilling, and more, it provides versatility to prepare a variety of dishes. The oven is equipped with a large capacity of 71 liters, allowing you to cook larger meals or multiple dishes simultaneously, making it ideal for families or entertaining guests.

The oven's sleek stainless steel finish adds a modern touch to your kitchen, while its compact built-in design allows for seamless integration into cabinetry. This aesthetic appeal is complemented by user-friendly controls, featuring an intuitive digital display and easy-to-use knobs that make operation effortless.

In terms of technology, the Hotpoint SH 103 CX S includes a unique HomeMade design, which replicates the traditional shape of a wood-fired oven. This innovative design promotes better airflow, helping to ensure even cooking results. Whether you're baking bread or roasting meats, the consistent heat distribution leads to delicious outcomes.

Energy efficiency is another critical aspect of this oven. With a high energy rating, it ensures that you can cook your meals without being burdened by high energy bills. It also includes features such as Eco function, which optimizes energy usage while maintaining cooking performance, helping you to reduce your carbon footprint.

Cleaning is made easy with the Hotpoint SH 103 CX S, thanks to the innovative Hydro Clean technology. This self-cleaning function uses steam to help loosen grime and grease, making it easier to wipe the interior clean. This feature saves time and effort, allowing you to focus on what matters most—enjoying your culinary creations.

In summary, the Hotpoint SH 103 CX S is a sophisticated built-in oven that combines style, versatility, and performance. With its multifunction capabilities, efficient energy usage, and easy cleaning options, it stands out as an essential kitchen appliance for anyone looking to elevate their cooking experience.