Overview of the main window
This overview describes frequently used features | clicking on tabs, task buttons, and format options to see |
so you can quickly start creating scrapbooks. | what happens. The more you explore the possibilities, |
Try experimenting with choosing menu items and | the faster you will learn how to use the software to |
expand your own creativity. And don’t forget to visit www.hp.com/go/scrapbooking to browse and download inspiring projects.
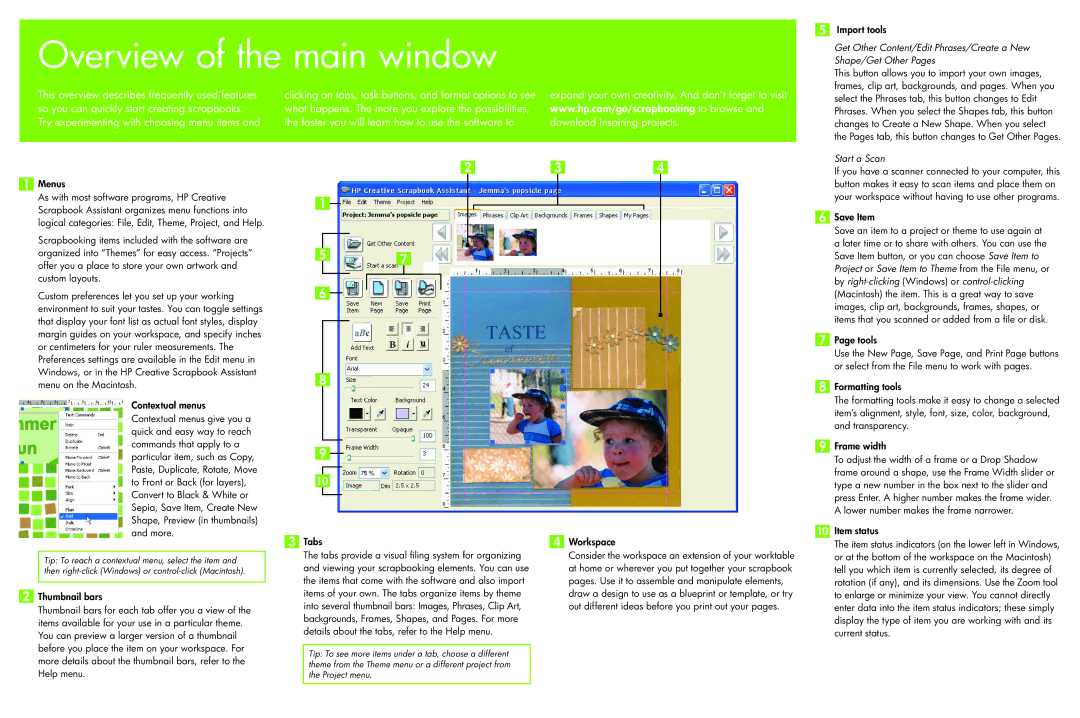
5Import tools
Get Other Content/Edit Phrases/Create a New Shape/Get Other Pages
This button allows you to import your own images, frames, clip art, backgrounds, and pages. When you select the Phrases tab, this button changes to Edit Phrases. When you select the Shapes tab, this button changes to Create a New Shape. When you select the Pages tab, this button changes to Get Other Pages.
1Menus
As with most software programs, HP Creative Scrapbook Assistant organizes menu functions into logical categories: File, Edit, Theme, Project, and Help.
Scrapbooking items included with the software are organized into “Themes” for easy access. “Projects” offer you a place to store your own artwork and custom layouts.
Custom preferences let you set up your working environment to suit your tastes. You can toggle settings that display your font list as actual font styles, display margin guides on your workspace, and specify inches or centimeters for your ruler measurements. The Preferences settings are available in the Edit menu in Windows, or in the HP Creative Scrapbook Assistant menu on the Macintosh.
Contextual menus Contextual menus give you a quick and easy way to reach commands that apply to a particular item, such as Copy, Paste, Duplicate, Rotate, Move to Front or Back (for layers), Convert to Black & White or Sepia, Save Item, Create New Shape, Preview (in thumbnails) and more.
Tip: To reach a contextual menu, select the item and then
2Thumbnail bars
Thumbnail bars for each tab offer you a view of the items available for your use in a particular theme. You can preview a larger version of a thumbnail before you place the item on your workspace. For more details about the thumbnail bars, refer to the Help menu.
2 | 3 | 4 |
1
5 | 7 |
|
6
8
9
10
3 Tabs | 4 Workspace |
The tabs provide a visual filing system for organizing | Consider the workspace an extension of your worktable |
and viewing your scrapbooking elements. You can use | at home or wherever you put together your scrapbook |
the items that come with the software and also import | pages. Use it to assemble and manipulate elements, |
items of your own. The tabs organize items by theme | draw a design to use as a blueprint or template, or try |
into several thumbnail bars: Images, Phrases, Clip Art, | out different ideas before you print out your pages. |
backgrounds, Frames, Shapes, and Pages. For more |
|
details about the tabs, refer to the Help menu. |
|
Tip: To see more items under a tab, choose a different theme from the Theme menu or a different project from the Project menu.
Start a Scan
If you have a scanner connected to your computer, this button makes it easy to scan items and place them on your workspace without having to use other programs.
6Save Item
Save an item to a project or theme to use again at a later time or to share with others. You can use the Save Item button, or you can choose Save Item to Project or Save Item to Theme from the File menu, or by
7Page tools
Use the New Page, Save Page, and Print Page buttons or select from the File menu to work with pages.
8Formatting tools
The formatting tools make it easy to change a selected item’s alignment, style, font, size, color, background, and transparency.
9Frame width
To adjust the width of a frame or a Drop Shadow frame around a shape, use the Frame Width slider or type a new number in the box next to the slider and press Enter. A higher number makes the frame wider. A lower number makes the frame narrower.
10Item status
The item status indicators (on the lower left in Windows, or at the bottom of the workspace on the Macintosh) tell you which item is currently selected, its degree of rotation (if any), and its dimensions. Use the Zoom tool to enlarge or minimize your view. You cannot directly enter data into the item status indicators; these simply display the type of item you are working with and its current status.