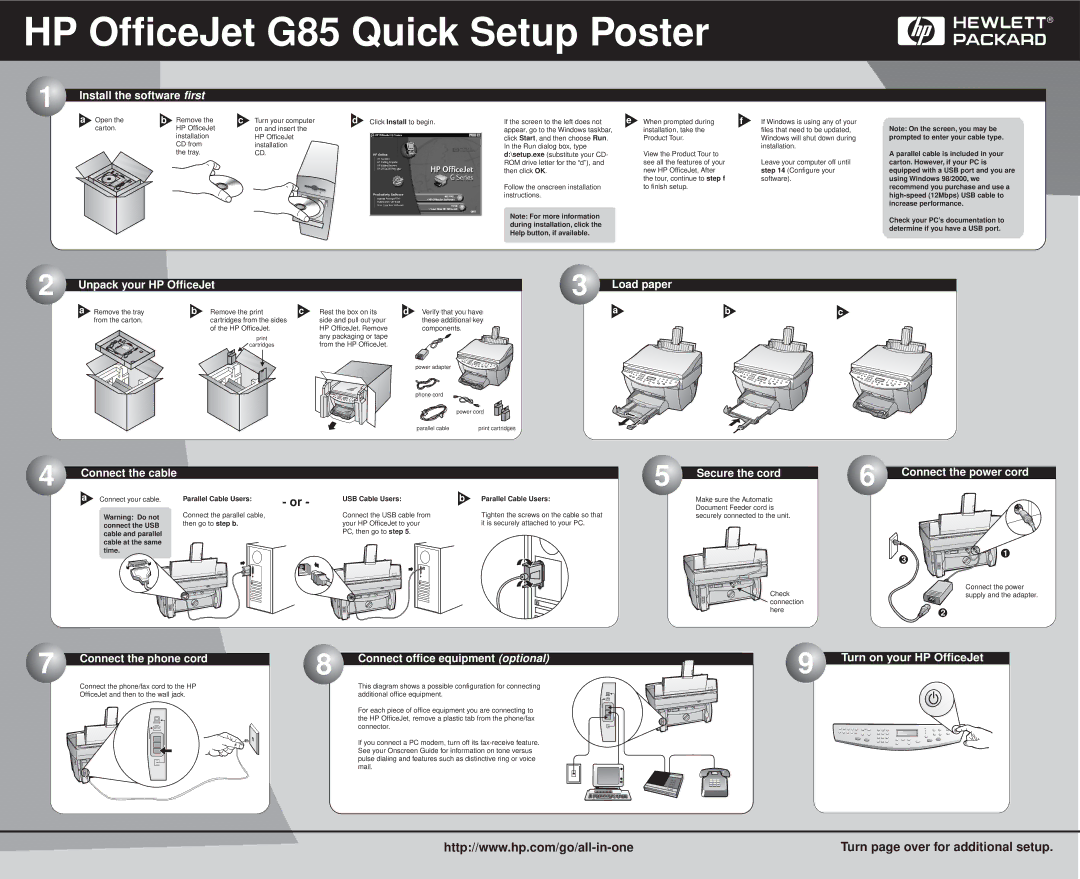
HP OfficeJet G85 Quick Setup Poster
1 | Install the software first |
|
a Open the | b Remove the |
carton. | HP OfficeJet |
| installation |
| CD from |
| the tray. |
c Turn your computer | d | Click Install to begin. | ||||||||
on and insert the |
|
| ||||||||
HP OfficeJet |
|
| ||||||||
installation |
|
|
|
|
|
|
|
|
|
|
|
|
|
|
|
|
|
|
|
|
|
CD. |
|
|
|
|
|
|
|
|
|
|
|
|
|
|
|
|
|
|
|
| |
|
|
|
|
|
|
|
|
|
|
|
|
|
|
|
|
|
|
|
|
|
|
|
|
|
|
|
|
|
|
|
|
|
|
|
|
|
|
|
|
|
|
|
|
|
|
|
|
|
|
|
|
|
|
|
|
|
|
|
|
|
|
|
|
|
|
|
|
|
|
|
|
|
|
|
|
|
|
|
|
|
|
|
|
|
|
|
|
|
|
|
|
|
|
|
|
|
|
|
|
|
|
|
|
|
|
|
|
|
|
|
|
|
|
|
|
|
|
|
|
|
|
|
|
|
|
|
|
|
|
|
|
If the screen to the left does not | e | When prompted during | f | If Windows is using any of your |
appear, go to the Windows taskbar, |
| installation, take the |
| files that need to be updated, |
click Start, and then choose Run. |
| Product Tour. |
| Windows will shut down during |
In the Run dialog box, type |
| View the Product Tour to |
| installation. |
d:\setup.exe (substitute your CD- |
|
|
| |
ROM drive letter for the “d”), and |
| see all the features of your |
| Leave your computer off until |
then click OK. |
| new HP OfficeJet. After |
| step 14 (Configure your |
|
| the tour, continue to step f |
| software). |
Follow the onscreen installation |
| to finish setup. |
|
|
instructions. |
|
|
|
|
Note: For more information |
|
|
|
|
during installation, click the |
|
|
|
|
Help button, if available. |
|
|
|
|
Note: On the screen, you may be prompted to enter your cable type.
A parallel cable is included in your carton. However, if your PC is equipped with a USB port and you are using Windows 98/2000, we recommend you purchase and use a
Check your PC’s documentation to determine if you have a USB port.
2 | Unpack your HP OfficeJet |
|
|
|
| |
| a Remove the tray | b Remove the print | c | Rest the box on its | d Verify that you have | |
| from the carton. | cartridges from the sides |
| side and pull out your | these additional key | |
|
| of the HP OfficeJet. |
| HP OfficeJet. Remove | components. | |
|
|
| any packaging or tape |
|
| |
|
| cartridges |
| from the HP OfficeJet. |
|
|
|
|
|
|
| power adapter |
|
|
|
|
|
| phone cord |
|
|
|
|
|
|
| power cord |
|
|
|
|
| parallel cable | print cartridges |
3 | Load paper |
|
|
| a | b | c |
4 |
|
|
|
|
|
|
|
| Connect the cable |
|
|
|
|
| |
|
|
|
|
|
|
| |
|
| a Connect your cable. | Parallel Cable Users: | - or - | USB Cable Users: | b | Parallel Cable Users: |
|
| Warning: Do not | Connect the parallel cable, |
| Connect the USB cable from |
| Tighten the screws on the cable so that |
|
| then go to step b. |
| your HP OfficeJet to your |
| it is securely attached to your PC. | |
|
| connect the USB |
|
| |||
|
|
|
|
|
|
|
cable and parallel | PC, then go to step 5. |
| |
cable at the same |
|
time. |
|
5 | Secure the cord |
|
Make sure the Automatic Document Feeder cord is securely connected to the unit.
Check connection here
6 | Connect the power cord |
|
![]() 1 3
1 3 ![]()
![]()
Connect the power supply and the adapter.
2
|
|
|
|
|
|
|
7 | Connect the phone cord | |||||
|
| |||||
|
| Connect the phone/fax cord to the HP | ||||
|
| OfficeJet and then to the wall jack. | ||||
|
|
|
|
|
|
|
|
|
|
|
|
|
|
|
|
|
|
|
|
|
|
|
|
|
|
|
|
|
|
|
|
|
|
|
|
|
|
|
|
|
|
|
|
|
|
|
|
|
|
|
|
|
|
|
|
8 | Connect office equipment (optional) |
|
This diagram shows a possible configuration for connecting additional office equipment.
For each piece of office equipment you are connecting to the HP OfficeJet, remove a plastic tab from the phone/fax connector.
If you connect a PC modem, turn off its
9 | Turn on your HP OfficeJet |
|
Turn page over for additional setup. |