Before Using Your Device
A. Remove the back cover | C. Install the battery |
D. Replace the back cover
F. Power on/off the device
 Quick Setup Wizard
When you power on your device for the first time, a Quick Start Wizard will guide you through touch screen calibration, provide a quick tutorial on stylus operation and
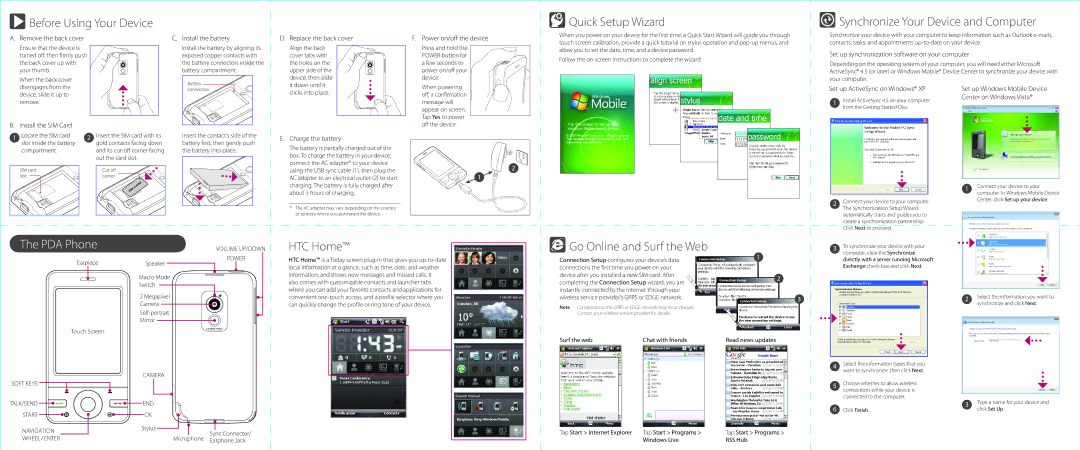
 Synchronize Your Device and Computer
Synchronize your device with your computer to keep information such as Outlook
Ensure that the device is turned off, then firmly push the back cover up with your thumb.
When the back cover disengages from the device, slide it up to remove.
B. Install the SIM Card
1 | Locate the SIM card | 2 | Insert the SIM card with its |
| slot inside the battery |
| gold contacts facing down |
| compartment. |
| and its |
|
|
| out the card slot. |
Install the battery by aligning its exposed copper contacts with the battery connectors inside the battery compartment.
Battery |
connectors |
Insert the contact’s side of the battery first, then gently push the battery into place.
Align the back cover tabs with the holes on the upper side of the device, then slide it down until it clicks into place.
E. | Charge the battery |
| The battery is partially charged out of the |
| box. To charge the battery in your device, |
| connect the AC adapter* to your device |
Press and hold the POWER button for a few seconds to power on/off your device.
When powering off, a confirmation message will appear on screen. Tap Yes to power off the device.
allow you to set the date, time, and a device password. Follow the
Set up synchronization software on your computer
Depending on the operating system of your computer, you will need either Microsoft ActiveSync® 4.5 (or later) or Windows Mobile® Device Center to synchronize your device with your computer.
Set up ActiveSync on Windows® XP | Set up Windows Mobile Device | |
1 | Install ActiveSync 4.5 on your computer | Center on Windows Vista® |
| ||
| from the Getting Started Disc. |
|
SIM card |
slot |
corner |
using the USB sync cable (1), then plug the |
AC adapter to an electrical outlet (2) to start |
charging. The battery is fully charged after |
about 3 hours of charging. |
* The AC adapter may vary depending on the country |
or territory where you purchased the device. |
2 1![]()
![]()
2Connect your device to your computer. The Synchronization Setup Wizard automatically starts and guides you to create a synchronization partnership. Click Next to proceed.
1Connect your device to your computer. In Windows Mobile Device Center, click Set up your device.
The PDA Phone |
| VOLUME UP/DOWN |
Earpiece | Speaker | POWER |
| ||
| Macro Mode |
|
| Switch |
|
| 2 Megapixel |
|
| Camera |
|
|
| |
| Mirror |
|
Touch Screen |
|
|
HTC Home™
HTC Home™ is a Today screen
Go Online and Surf the Web
Connection Setup configures your device’s data | 1 | ||
| |||
connections the first time you power on your |
| ||
device after you installed a new SIM card. After | 2 | ||
completing the Connection Setup wizard, you are | |||
| |||
instantly connected to the Internet through your |
| ||
wireless service provider’s GPRS or EDGE network. | 3 | ||
|
| ||
Note Connection to the GPRS or EDGE network may incur charges. |
| ||
Contact your wireless service provider for details. |
| ||
Surf the web | Chat with friends | Read news updates | |
3To synchronize your device with your computer, clear the Synchronize directly with a server running Microsoft Exchange check box and click Next.
2Select the information you want to synchronize and click Next.
| CAMERA |
|
|
SOFT KEYS |
|
|
|
TALK/SEND | END |
|
|
START | OK |
|
|
NAVIGATION | Stylus |
| Sync Connector/ |
|
| ||
WHEEL / ENTER |
| Microphone | |
| Earphone Jack | ||
|
|
|
4 | Select the information types that you |
| want to synchronize, then click Next. |
5 | Choose whether to allow wireless |
| connections while your device is |
| connected to the computer. |
6 | Click Finish. |
Tap Start > Internet Explorer | Tap Start > Programs > | Tap Start > Programs > |
| Windows Live | RSS Hub |
3Type a name for your device and click Set Up.