INSTALLATION

Use the following procedure to relieve spring tension prior to cable or spring replacement.

!WARNING

DO NOT insert hands into gearbox until springs are fully

detensioned. Doing so could lead to serious injury.

1.Cycle reel thru normal operating cycle and stop when maximum amount of cable is wound onto reel spool.

2.Set spool lock to prevent spool from turning.

3.Remove access cover from top of gearbox.

4.Using open end wrench, loosen large hex nut slowly to allow springs to unwind. Fully loosen nut further with wrench until springs are completely unwound.

5.Repair reel or replace springs or cable as necessary.

6.Retighten nut until definite resistance is felt and spring washers are full compressed (flat). Replace cover.

NOTE: If hex nut is not adequately tightened, spring unwinding can occur during reel operation.

7. Pretension reel. See INSTALLATION section, front page.

CABLE REMOVAL

Use the following procedure to remove worn or damaged cable from reel prior to installation of new cable.

!CAUTION

Failure to relieve all spring tension prior to removing

cable could result in damage to equipment or personal injury. Follow instructions carefully.

1.Move machine serviced by reel to a position closest to reel. Springs will still be under pre-tension at this point.

2.Turn off all electric power.

3.Using spool lock. lock spool to prevent turning.

4.Disconnect cable from machine junction box.

5.Detension springs as described above.

6.Remove cable from spool. Loosen cable clamp and water-tight connector and disconnect conductors from slip ring.

CABLE INSTALLATION

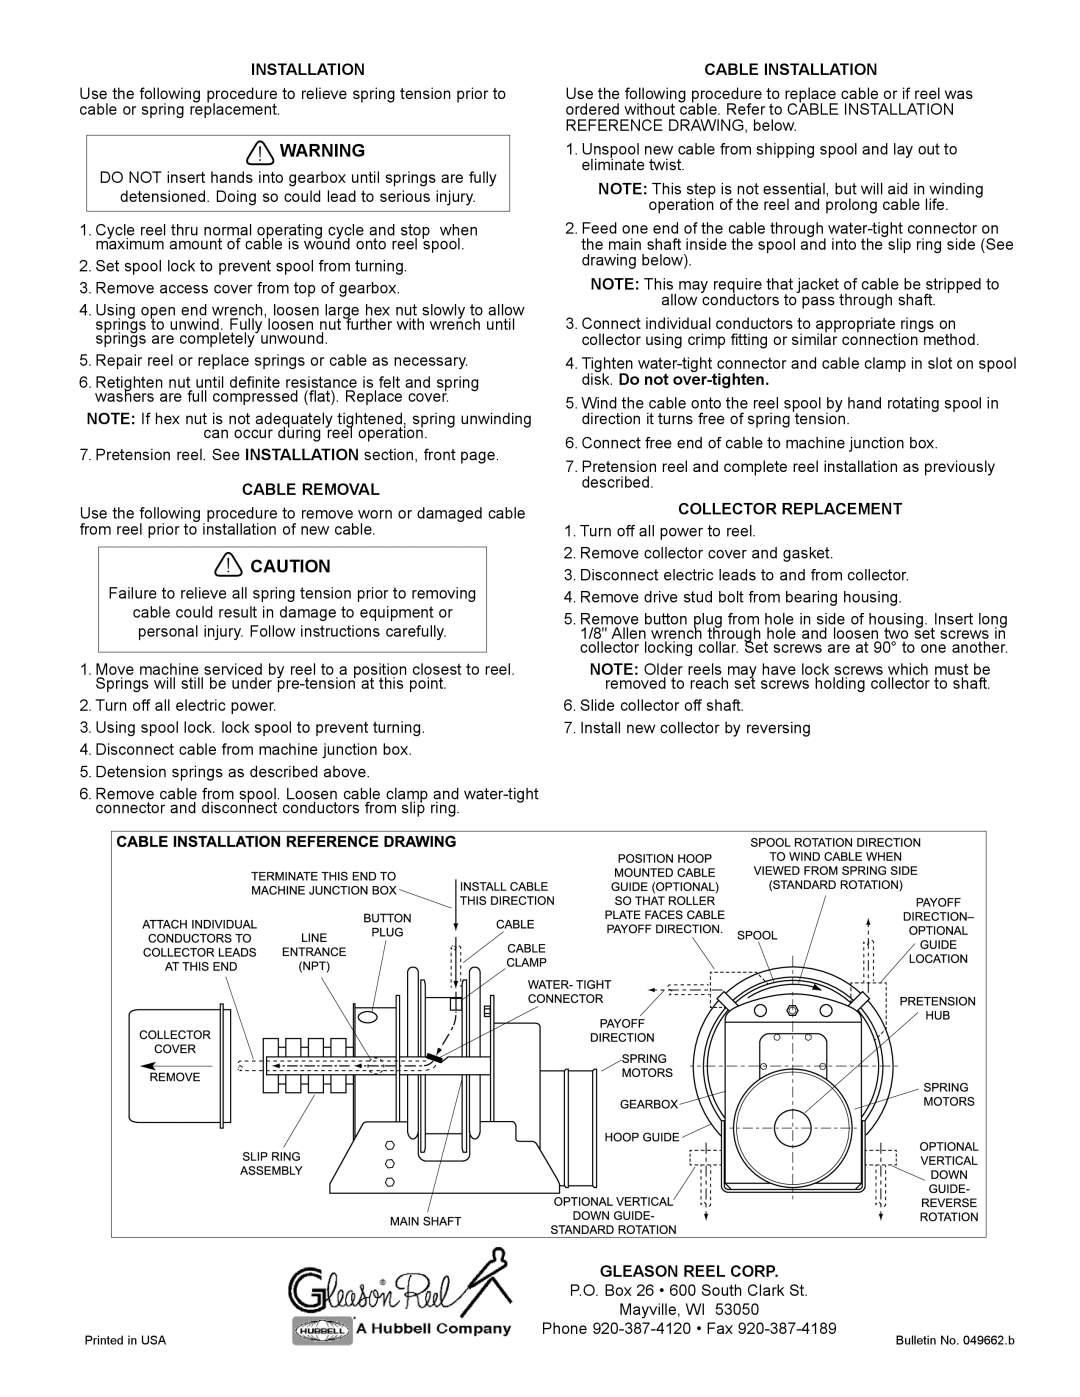
Use the following procedure to replace cable or if reel was ordered without cable. Refer to CABLE INSTALLATION REFERENCE DRAWING, below.

1.Unspool new cable from shipping spool and lay out to eliminate twist.

NOTE: This step is not essential, but will aid in winding operation of the reel and prolong cable life.

2.Feed one end of the cable through water-tight connector on the main shaft inside the spool and into the slip ring side (See drawing below).

NOTE: This may require that jacket of cable be stripped to allow conductors to pass through shaft.

3.Connect individual conductors to appropriate rings on collector using crimp fitting or similar connection method.

4.Tighten water-tight connector and cable clamp in slot on spool disk. Do not over-tighten.

5.Wind the cable onto the reel spool by hand rotating spool in direction it turns free of spring tension.

6.Connect free end of cable to machine junction box.

7.Pretension reel and complete reel installation as previously described.

COLLECTOR REPLACEMENT

1.Turn off all power to reel.

2.Remove collector cover and gasket.

3.Disconnect electric leads to and from collector.

4.Remove drive stud bolt from bearing housing.

5.Remove button plug from hole in side of housing. Insert long 1/8" Allen wrench through hole and loosen two set screws in collector locking collar. Set screws are at 90° to one another.

NOTE: Older reels may have lock screws which must be removed to reach set screws holding collector to shaft.

6.Slide collector off shaft.

7.Install new collector by reversing

Printed in USA

GLEASON REEL CORP.

P.O. Box 26 • 600 South Clark St.

Mayville, WI 53050

Phone 920-387-4120 • Fax 920-387-4189

Bulletin No. 049662.b

Page 4
Image 4
Hubbell SM-24 manual Cable Removal, Cable Installation, Collector Replacement, Gleason Reel Corp

SM-24 specifications

The Hubbell SM-24 is an advanced street lighting solution designed to deliver efficiency and reliability in outdoor illumination. Engineered with cutting-edge technologies, the SM-24 boasts a range of features aimed at meeting the demands of various urban and suburban environments.

One of the standout characteristics of the SM-24 is its robust construction, which ensures longevity and resilience against harsh weather conditions. The housing is made from durable materials that provide protection against corrosion and impacts, making it ideal for installation in public areas subject to vandalism and extreme weather.

Equipped with LED technology, the SM-24 offers energy-efficient lighting while significantly reducing maintenance costs. LEDs provide high luminous efficacy, producing more light per watt compared to traditional lighting sources. This energy efficiency not only lowers electricity bills but also contributes to a decrease in carbon footprint, aligning with sustainable urban development goals.

The SM-24 is designed with an adaptive lighting feature, which allows for customized light output based on environmental conditions. Integrated sensors adjust the brightness according to traffic patterns and ambient light levels, enhancing visibility when needed and conserving energy during off-peak hours. This smart functionality can lead to substantial energy savings and increased operational efficiency.

Additionally, the Hubbell SM-24 comes with advanced optics technology that ensures uniform light distribution. Its engineered lens system minimizes glare while maximizing the coverage area, providing a safe and visually comfortable environment for pedestrians and drivers alike.

Installation and maintenance of the SM-24 are made simple with its user-friendly design. Modular components facilitate quick setup and replacement, reducing downtime and labor costs. The fixture also offers the option for remote monitoring and control, enabling city managers to oversee lighting performance and respond promptly to outages or malfunctions.

The Hubbell SM-24 stands out as not just a lighting fixture but as a comprehensive outdoor lighting solution that combines durability, efficiency, and intelligence. With its innovative features and sustainable technology, it plays a vital role in enhancing safety and aesthetics in urban landscapes while contributing to energy conservation efforts. As cities continue to evolve, the SM-24 positions itself as an ideal choice for modern street lighting needs, paving the way for smarter and greener communities.