2

Flush Mount Temp/Speed Gauge

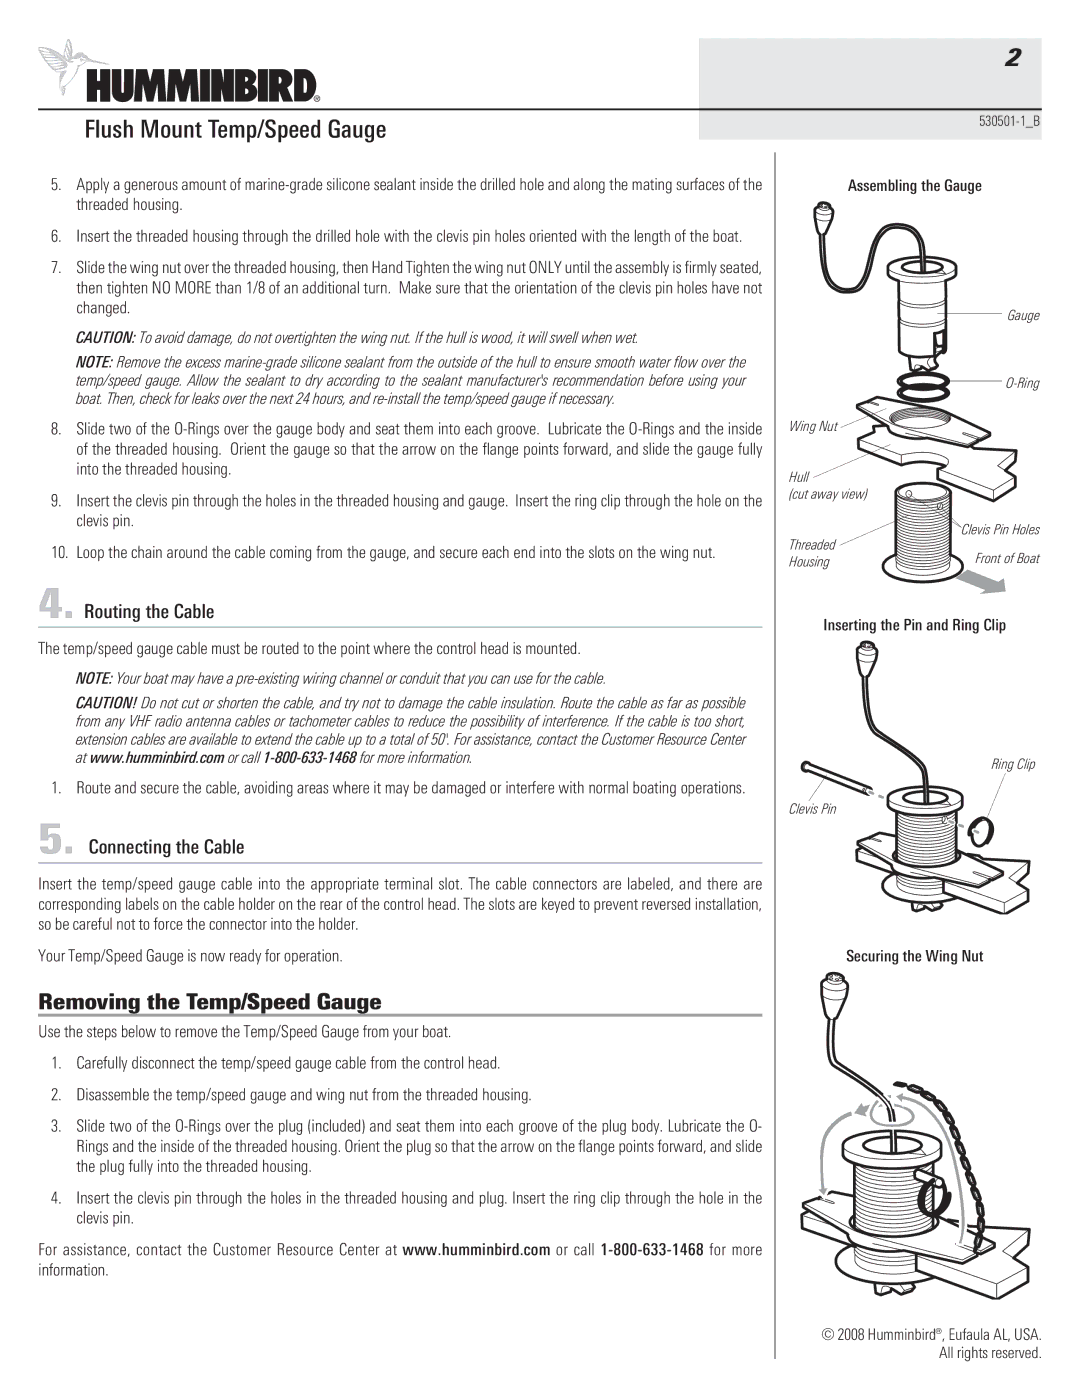
5.Apply a generous amount of marine-grade silicone sealant inside the drilled hole and along the mating surfaces of the threaded housing.

6.Insert the threaded housing through the drilled hole with the clevis pin holes oriented with the length of the boat.

7.Slide the wing nut over the threaded housing, then Hand Tighten the wing nut ONLY until the assembly is firmly seated, then tighten NO MORE than 1/8 of an additional turn. Make sure that the orientation of the clevis pin holes have not changed.

CAUTION: To avoid damage, do not overtighten the wing nut. If the hull is wood, it will swell when wet.

NOTE: Remove the excess marine-grade silicone sealant from the outside of the hull to ensure smooth water flow over the temp/speed gauge. Allow the sealant to dry according to the sealant manufacturer's recommendation before using your boat. Then, check for leaks over the next 24 hours, and re-install the temp/speed gauge if necessary.

8.Slide two of the O-Rings over the gauge body and seat them into each groove. Lubricate the O-Rings and the inside of the threaded housing. Orient the gauge so that the arrow on the flange points forward, and slide the gauge fully into the threaded housing.

9.Insert the clevis pin through the holes in the threaded housing and gauge. Insert the ring clip through the hole on the clevis pin.

10.Loop the chain around the cable coming from the gauge, and secure each end into the slots on the wing nut.

4. Routing the Cable

The temp/speed gauge cable must be routed to the point where the control head is mounted.

NOTE: Your boat may have a pre-existing wiring channel or conduit that you can use for the cable.

CAUTION! Do not cut or shorten the cable, and try not to damage the cable insulation. Route the cable as far as possible from any VHF radio antenna cables or tachometer cables to reduce the possibility of interference. If the cable is too short, extension cables are available to extend the cable up to a total of 50'. For assistance, contact the Customer Resource Center at www.humminbird.com or call 1-800-633-1468 for more information.

1. Route and secure the cable, avoiding areas where it may be damaged or interfere with normal boating operations.

5. Connecting the Cable

Insert the temp/speed gauge cable into the appropriate terminal slot. The cable connectors are labeled, and there are corresponding labels on the cable holder on the rear of the control head. The slots are keyed to prevent reversed installation, so be careful not to force the connector into the holder.

Your Temp/Speed Gauge is now ready for operation.

Removing the Temp/Speed Gauge

Use the steps below to remove the Temp/Speed Gauge from your boat.

1.Carefully disconnect the temp/speed gauge cable from the control head.

2.Disassemble the temp/speed gauge and wing nut from the threaded housing.

3.Slide two of the O-Rings over the plug (included) and seat them into each groove of the plug body. Lubricate the O- Rings and the inside of the threaded housing. Orient the plug so that the arrow on the flange points forward, and slide the plug fully into the threaded housing.

4.Insert the clevis pin through the holes in the threaded housing and plug. Insert the ring clip through the hole in the clevis pin.

For assistance, contact the Customer Resource Center at www.humminbird.com or call 1-800-633-1468 for more information.

530501-1_B

Assembling the Gauge

Gauge

O-Ring

Wing Nut

Hull (cut away view)

Threaded

Clevis Pin Holes

Front of Boat

Housing

Inserting the Pin and Ring Clip

Ring Clip

Clevis Pin

Securing the Wing Nut

©2008 Humminbird®, Eufaula AL, USA. All rights reserved.

Page 2
Image 2
Humminbird 530501-1_B warranty Removing the Temp/Speed Gauge, Routing the Cable, Connecting the Cable

530501-1_B specifications

The Humminbird 530501-1_B is a cutting-edge fish finder that combines advanced technology with user-friendly features, making it an essential tool for both amateur anglers and seasoned fishing enthusiasts. This model stands out in the market due to its innovative capabilities, superior display, and impressive performance.

One of the key features of the Humminbird 530501-1_B is its DualBeam Plus sonar technology. This sophisticated system allows users to choose between two beams for sonar imaging: a narrow beam that provides detailed bottom coverage and a wider beam that scans a larger area. As a result, anglers can easily locate fish and underwater structures with improved accuracy. The device also features CHIRP (Compressed High-Intensity Radiated Pulse) sonar, which enhances target separation and provides clearer images of fish and structures at various depths.

The Humminbird 530501-1_B is equipped with a large, vibrant color display that ensures excellent visibility in various lighting conditions. This high-resolution screen presents sonar readings in an easy-to-read format, making it simple for users to interpret crucial information quickly. The intuitive interface further simplifies operation, allowing users to navigate menus and settings without hassle.

Another noteworthy characteristic of the Humminbird 530501-1_B is its built-in GPS capabilities. This feature enables anglers to mark precise fishing locations, track routes, and create detailed maps of the water body. With contour mapping technology, users can enhance their understanding of underwater terrain, which is vital for successful fishing expeditions.

The device also supports various accessories and compatibility options, such as Ethernet networking, which allows for connection with other compatible devices for an integrated fishing experience. This flexibility ensures that users can expand their system as necessary, making the Humminbird 530501-1_B an investment that grows with their fishing needs.

Durability is another hallmark of the Humminbird 530501-1_B. Designed to withstand harsh marine environments, this fish finder is built with waterproof materials and rugged features that ensure longevity, even in challenging conditions.

In summary, the Humminbird 530501-1_B combines advanced sonar technology, a user-friendly display, and GPS capabilities to deliver a comprehensive fishing experience. With its commitment to quality and innovation, this fish finder is poised to enhance any angler’s trip, helping them find success on the water. Whether fishing for sport or leisure, the Humminbird 530501-1_B is an indispensable companion.