English

This appliance is for household use only.

1.Place the fan on a dry, safe, flat surface where it cannot fall or be pulled by the cord.

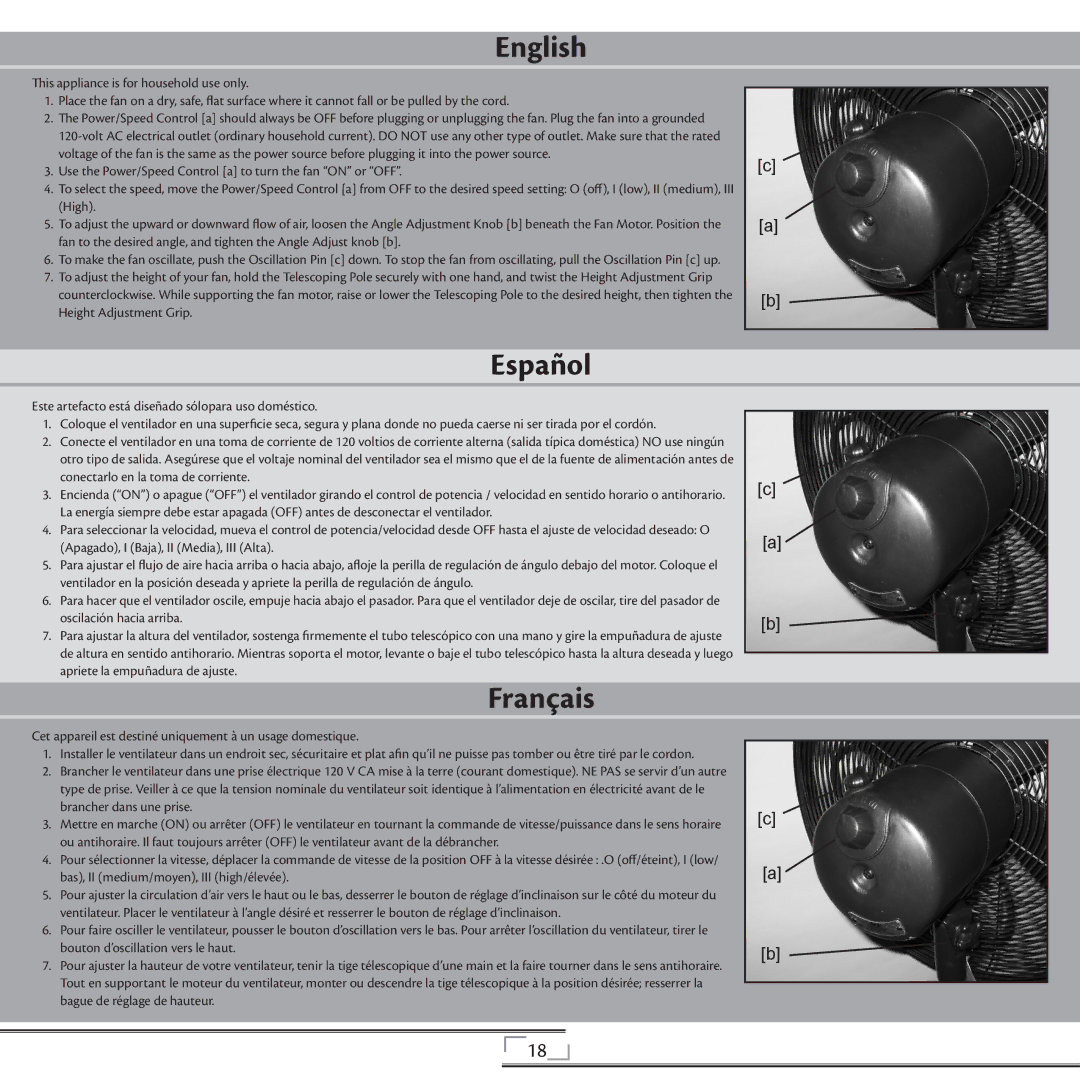
2.The Power/Speed Control [a] should always be OFF before plugging or unplugging the fan. Plug the fan into a grounded

120-volt AC electrical outlet (ordinary household current). DO NOT use any other type of outlet. Make sure that the rated voltage of the fan is the same as the power source before plugging it into the power source.

3.Use the Power/Speed Control [a] to turn the fan “ON” or “OFF”.

4.To select the speed, move the Power/Speed Control [a] from OFF to the desired speed setting: O (off), I (low), II (medium), III (High).

5.To adjust the upward or downward flow of air, loosen the Angle Adjustment Knob [b] beneath the Fan Motor. Position the fan to the desired angle, and tighten the Angle Adjust knob [b].

6.To make the fan oscillate, push the Oscillation Pin [c] down. To stop the fan from oscillating, pull the Oscillation Pin [c] up.

7.To adjust the height of your fan, hold the Telescoping Pole securely with one hand, and twist the Height Adjustment Grip counterclockwise. While supporting the fan motor, raise or lower the Telescoping Pole to the desired height, then tighten the Height Adjustment Grip.

[c]

[a]

[b]

Español

Este artefacto está diseñado sólopara uso doméstico.

1.Coloque el ventilador en una superficie seca, segura y plana donde no pueda caerse ni ser tirada por el cordón.

2.Conecte el ventilador en una toma de corriente de 120 voltios de corriente alterna (salida típica doméstica) NO use ningún otro tipo de salida. Asegúrese que el voltaje nominal del ventilador sea el mismo que el de la fuente de alimentación antes de conectarlo en la toma de corriente.

3.Encienda (“ON”) o apague (“OFF”) el ventilador girando el control de potencia / velocidad en sentido horario o antihorario. La energía siempre debe estar apagada (OFF) antes de desconectar el ventilador.

4.Para seleccionar la velocidad, mueva el control de potencia/velocidad desde OFF hasta el ajuste de velocidad deseado: O

(Apagado), I (Baja), II (Media), III (Alta).

5.Para ajustar el flujo de aire hacia arriba o hacia abajo, afloje la perilla de regulación de ángulo debajo del motor. Coloque el ventilador en la posición deseada y apriete la perilla de regulación de ángulo.

6.Para hacer que el ventilador oscile, empuje hacia abajo el pasador. Para que el ventilador deje de oscilar, tire del pasador de oscilación hacia arriba.

7.Para ajustar la altura del ventilador, sostenga firmemente el tubo telescópico con una mano y gire la empuñadura de ajuste de altura en sentido antihorario. Mientras soporta el motor, levante o baje el tubo telescópico hasta la altura deseada y luego apriete la empuñadura de ajuste.

Français

Cet appareil est destiné uniquement à un usage domestique.

1.Installer le ventilateur dans un endroit sec, sécuritaire et plat afin qu’il ne puisse pas tomber ou être tiré par le cordon.

2.Brancher le ventilateur dans une prise électrique 120 V CA mise à la terre (courant domestique). NE PAS se servir d’un autre type de prise. Veiller à ce que la tension nominale du ventilateur soit identique à l’alimentation en électricité avant de le brancher dans une prise.

3.Mettre en marche (ON) ou arrêter (OFF) le ventilateur en tournant la commande de vitesse/puissance dans le sens horaire ou antihoraire. Il faut toujours arrêter (OFF) le ventilateur avant de la débrancher.

4.Pour sélectionner la vitesse, déplacer la commande de vitesse de la position OFF à la vitesse désirée : .O (off/éteint), I (low/ bas), II (medium/moyen), III (high/élevée).

5.Pour ajuster la circulation d’air vers le haut ou le bas, desserrer le bouton de réglage d’inclinaison sur le côté du moteur du ventilateur. Placer le ventilateur à l’angle désiré et resserrer le bouton de réglage d’inclinaison.

6.Pour faire osciller le ventilateur, pousser le bouton d’oscillation vers le bas. Pour arrêter l’oscillation du ventilateur, tirer le bouton d’oscillation vers le haut.

7.Pour ajuster la hauteur de votre ventilateur, tenir la tige télescopique d’une main et la faire tourner dans le sens antihoraire.

Tout en supportant le moteur du ventilateur, monter ou descendre la tige télescopique à la position désirée; resserrer la bague de réglage de hauteur.

[c]

[a]

[b]

[c]

[a]

[b]

18

Page 18
Image 18
Hunter Fan 42733, 20081013 installation manual Este artefacto está diseñado sólopara uso doméstico

20081013, 42733 specifications

The Hunter Fan Company has long been a trusted name in the ceiling fan industry, renowned for its combination of aesthetics, functionality, and durability. One of the standout models in their extensive lineup is the Hunter Fan model 42733 from the 2008 collection, also known by its model number 20081013. This fan embodies modern engineering and design, making it an excellent choice for both residential and commercial spaces.

The Hunter Fan 42733 is designed with a remarkable blend of style and performance. It features a sleek contemporary look that can complement a wide range of interior designs, from minimalist to traditional. The fan is available in various finishes, allowing homeowners to select a model that best suits their décor. With precision-engineered blades, the fan provides optimal airflow while preserving energy efficiency, making it ideal for climate control throughout the year.

One of the key technologies featured in the Hunter Fan 42733 is its WhisperWind motor. This innovative motor technology is designed to deliver powerful airflow without the disruptive noise often associated with ceiling fans. As a result, users can enjoy a comfortably cool environment without any distracting sounds, making it perfect for bedrooms, living rooms, and other quiet spaces.

The fan is equipped with robust and aerodynamic blades, which enhance its overall performance. The blade pitch is carefully designed to maximize air movement while maintaining energy efficiency, contributing to lower electricity bills. Additionally, the fan's multi-speed settings empower users to customize their cooling experience according to their preferences, providing versatility for various occasions and weather conditions.

Another noteworthy characteristic of the Hunter Fan 42733 is its easy installation. The fan comes with thorough installation instructions and all necessary mounting hardware, ensuring that even novice DIYers can set it up without much difficulty. The fan's stylish and streamlined design also means minimal cleaning and maintenance are required, a significant advantage for busy households.

In summary, the Hunter Fan model 42733, 20081013 is an exemplary choice for those seeking a stylish and effective cooling solution. With cutting-edge technology, thoughtful design, and user-friendly features, it offers both comfort and aesthetic appeal. Its combination of elegance and efficiency positions it as a top-tier option in the ceiling fan market.