12

7 • Completing Your Installation With or Without a Light Fixture (Continued)

Uninstalling the Light Fixture


Steps 1 – 6


Light


1.

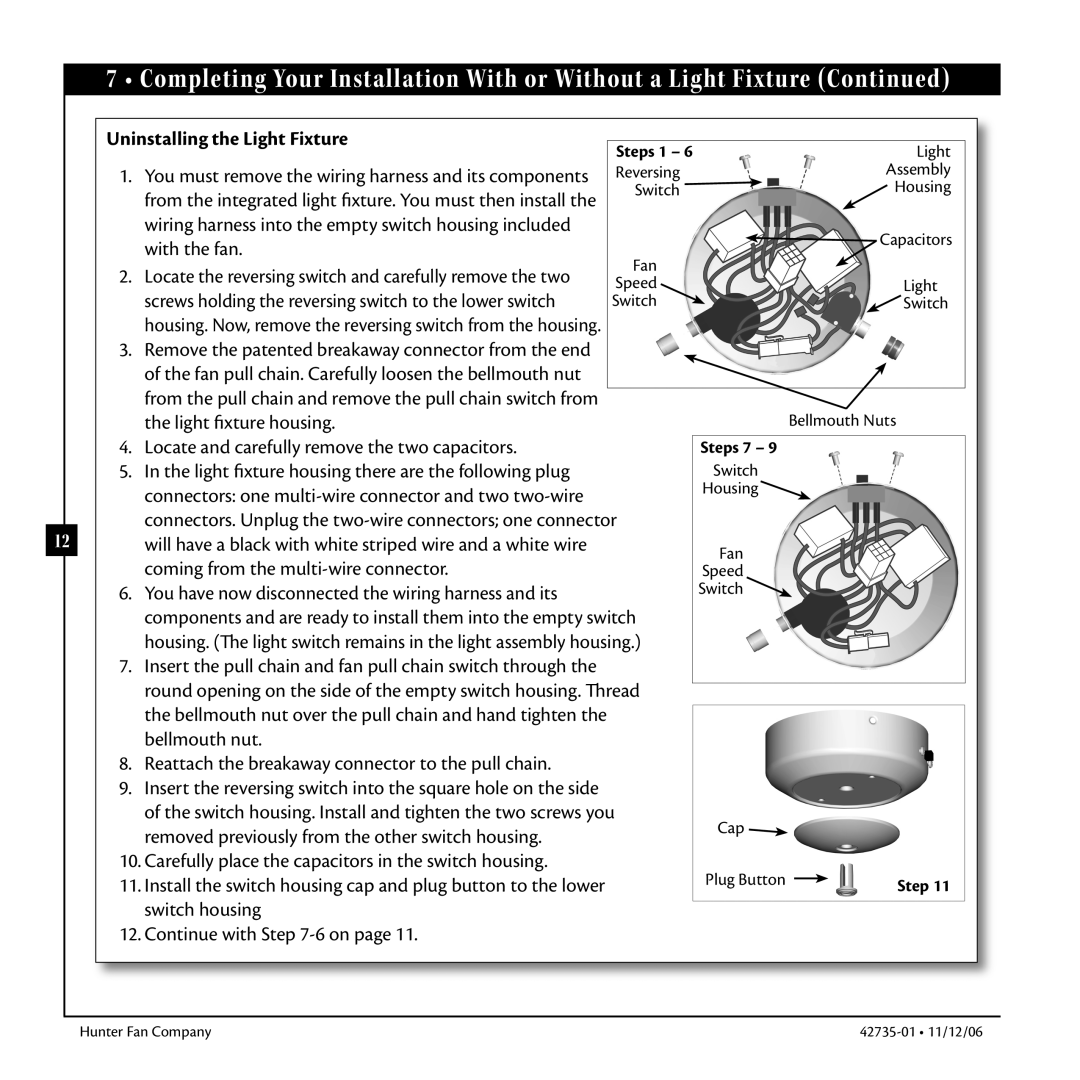
You must remove the wiring harness and its components

Reversing


Assembly


from the integrated light fixture. You must then install the

Switch


Housing


wiring harness into the empty switch housing included


Capacitors


with the fan.


Fan


2.

Locate the reversing switch and carefully remove the two


Speed


Light


screws holding the reversing switch to the lower switch


Switch


Switch


housing. Now, remove the reversing switch from the housing.


3.

Remove the patented breakaway connector from the end


of the fan pull chain. Carefully loosen the bellmouth nut


from the pull chain and remove the pull chain switch from


Bellmouth Nuts


the light fixture housing.


4.

Locate and carefully remove the two capacitors.


Steps 7 – 9


5.

In the light fixture housing there are the following plug


Switch


connectors: one multi-wire connector and two two-wire


Housing


connectors. Unplug the two-wire connectors; one connector


will have a black with white striped wire and a white wire


Fan


coming from the multi-wire connector.


Speed


6.

You have now disconnected the wiring harness and its


Switch


components and are ready to install them into the empty switch


housing. (The light switch remains in the light assembly housing.)


7.

Insert the pull chain and fan pull chain switch through the


round opening on the side of the empty switch housing. Thread


the bellmouth nut over the pull chain and hand tighten the


bellmouth nut.


8.

Reattach the breakaway connector to the pull chain.


9.

Insert the reversing switch into the square hole on the side


of the switch housing. Install and tighten the two screws you


Cap


removed previously from the other switch housing.


10. Carefully place the capacitors in the switch housing.


Plug Button


11. Install the switch housing cap and plug button to the lower


Step 11


switch housing


12. Continue with Step 7-6 on page 11.


Hunter Fan Company

42735-01 • 11/12/06

Page 12
Image 12
Hunter Fan 42735-01 warranty Uninstalling the Light Fixture

42735-01 specifications

The Hunter Fan 42735-01 is an exceptional ceiling fan that combines style, functionality, and modern technology into a single fixture, making it a perfect addition to any home or office environment. Designed with a sleek and contemporary aesthetic, this fan is not just a cooling solution but also a stylish statement piece.

One of the main features of the Hunter Fan 42735-01 is its powerful motor, designed to deliver optimal airflow while operating quietly. The WhisperWind motor technology ensures that users can enjoy a cool breeze without the distracting noise commonly associated with traditional ceiling fans. This makes it an ideal choice for bedrooms, living rooms, or study spaces where tranquility is essential.

The fan comes with a set of well-crafted, five blades that are not only attractive but efficiently engineered to enhance airflow. These blades are pitched at the perfect angle, allowing the fan to move large volumes of air, making it effective in both cooling and air circulation. The fan’s size, typically around 52 inches in diameter, makes it suitable for medium to large rooms.

Another notable feature is its versatility in design. The Hunter Fan 42735-01 is available in different finishes, which allows it to blend seamlessly with various interior styles, from modern to rustic. Whether you prefer a polished bronze, brushed nickel, or matte black finish, there’s an option that complements your décor.

The fan also integrates modern conveniences such as remote control functionality. This allows users to adjust the fan speed and lighting from anywhere in the room, adding to the overall convenience and comfort. Additionally, the fan is designed to be compatible with smart home systems, enabling users to incorporate it into their existing technology ecosystem.

Energy efficiency is also a key characteristic of the Hunter Fan 42735-01. It is designed to consume less energy while still providing powerful performance, making it an eco-friendly option. This not only helps reduce electricity bills but also contributes to a greener environment.

Lastly, installation is user-friendly, with a straightforward guide that allows DIY enthusiasts to set it up with ease. The fan also comes with a comprehensive warranty, ensuring peace of mind and long-term satisfaction. In summary, the Hunter Fan 42735-01 stands out as a blend of style, efficiency, and advanced features, making it a top choice for discerning homeowners.