
42743-01 specifications
The Hunter Fan 42743-01 is a stylish and functional ceiling fan designed to enhance both the aesthetics and comfort of your living spaces. With its contemporary design coupled with cutting-edge technology, it stands out as a popular choice for homeowners and interior decorators alike.One of the key features of the Hunter Fan 42743-01 is its sleek, modern design, which seamlessly blends with various interior decors. Available in multiple finishes, it can easily complement any room's color scheme. The fan also comes with five wooden blades that provide excellent air circulation. Each blade is thoughtfully designed for optimal performance and is built to last, ensuring that homeowners can enjoy their fan for years to come.
Equipped with a robust motor, the Hunter Fan 42743-01 operates quietly and efficiently. The WhisperWind motor technology ensures that the fan delivers powerful airflow without the annoying noise commonly associated with ceiling fans. As a result, it is ideal for any room, whether it's a cozy living space, bedroom, or large gathering area.
Another notable characteristic of this ceiling fan is its compatibility with Hunter's exclusive Breeze mode. This technology allows users to toggle between different speed settings to create a personalized comfort level for any time of year. Furthermore, the fan can operate in both summer and winter modes, allowing for year-round use. During the summer, the fan's counter-clockwise rotation provides a cooling breeze, while in winter mode, it rotates clockwise to circulate warm air, ensuring all-season comfort.
The Hunter Fan 42743-01 is also designed with energy efficiency in mind. It uses LED bulbs that provide ample lighting while consuming minimal energy, contributing to lower electricity bills. The integrated light kit features dimmable options, enabling users to set the perfect ambiance for any occasion.
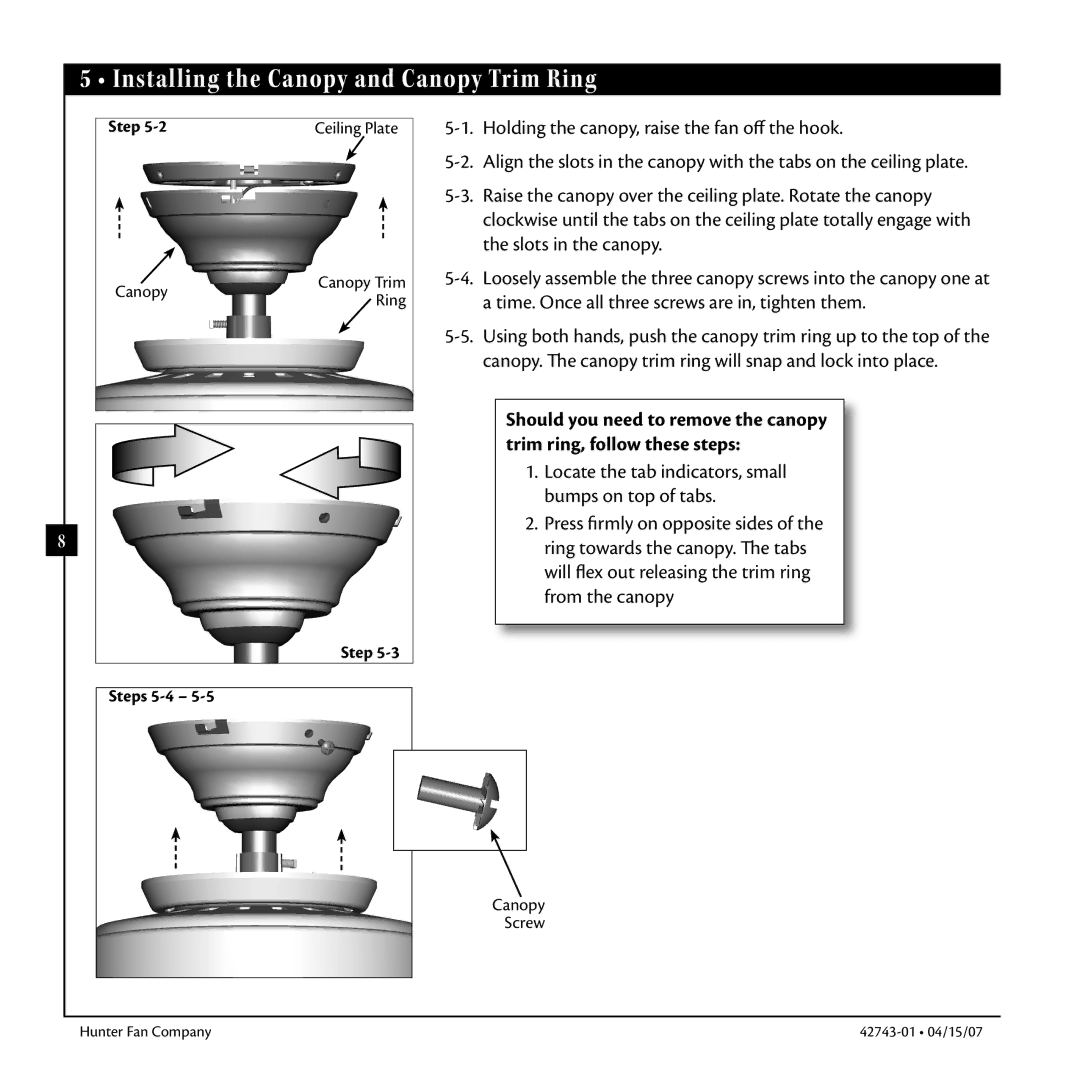
In addition to its aesthetic appeal and efficient performance, the fan offers ease of installation. The included instructions are straightforward, making setup a breeze for even those with minimal DIY experience.
In summary, the Hunter Fan 42743-01 combines stylish design, advanced technology, and efficient operation. Whether you’re looking to enhance your home decor or improve air circulation, this ceiling fan is a reliable choice that delivers quality and functionality.