45057-01 specifications
The Hunter Fan 45057-01 is a sophisticated ceiling fan designed to enhance the atmosphere and comfort of any living space. With its classic yet contemporary design, this fan seamlessly blends into various interior styles, making it an ideal addition to both modern and traditional decor.One of the standout features of the Hunter Fan 45057-01 is its powerful yet quiet motor. Utilizing the latest in whisper-quiet technology, this fan is designed to provide optimal airflow without the distracting noise often associated with standard ceiling fans. This makes it perfect for bedrooms, living rooms, or any area where peace and quiet are desired.
The fan offers a robust three-speed reversible motor, allowing users to easily switch the direction of the blades to optimize airflow for both summer and winter use. In warmer months, the fan can circulate cool air, making high temperatures more bearable, while in colder months, the reversible feature helps to distribute warm air that naturally rises, enhancing heating efficiency and comfort throughout the home.
The Hunter Fan 45057-01 is equipped with high-quality, durable blades made from premium materials that ensure longevity and reliability. These blades are designed for superior aerodynamic performance, promoting improved airflow and energy efficiency. Additionally, the fan’s design includes a sleek, clean finish that not only looks great but is also easy to maintain.
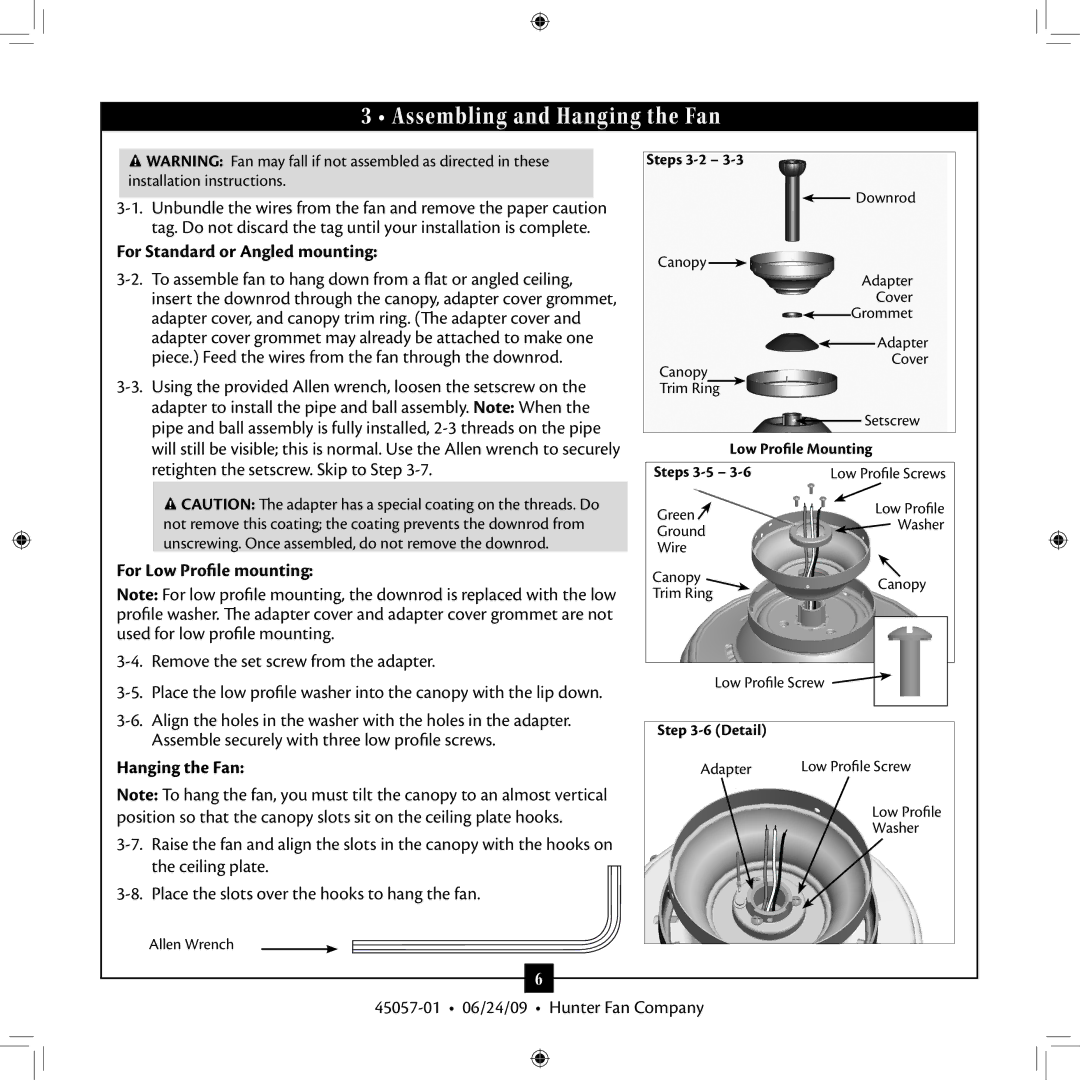
Installation of the Hunter Fan 45057-01 is straightforward, thanks to its user-friendly mounting system. It comes with a comprehensive installation guide that helps ensure a quick and hassle-free setup. It can be mounted on both flat and sloped ceilings, providing versatility in its placement.
Adding to its modern appeal, the Hunter Fan 45057-01 often includes integrated LED lighting. This feature enhances the fan's utility by providing bright, energy-efficient lighting options that brighten up spaces while reducing electricity costs. The LED lights are designed to last longer than traditional bulbs, minimizing the need for frequent replacements.
In conclusion, with its combination of aesthetic appeal, advanced technology, and efficient performance, the Hunter Fan 45057-01 is an excellent choice for anyone looking to enhance their home’s comfort while enjoying stylish decor. Whether you are seeking improved airflow on a hot day or looking to circulate warm air during the cold months, this ceiling fan stands out as a reliable and attractive solution.