ASSEMBLY

Insert a finger into the centre hole of the cover (I) while grasping the cover with your other fingers. Using the index finger and thumb of your other hand, release the two catches (J) that engage in the cut-outs in the bottom half

(K). Pull apart the trimmer head, grasping the cover firmly.

Place the cover (I) and the support flange (F) on the output shaft.

Fit the nut (G). The nut must be tightened to a torque of 35-50 Nm (3.5-5 kpm). Use the socket spanner in the tool kit. Hold the shaft of the spanner as close to the blade guard as possible. To tighten the nut, turn the spanner in the opposite direction to the direction of rotation (Caution! left-hand thread).

Fit the bottom half of the trimmer head (K) to the cover (I) by pressing them together, with the cut-outs on the bottom half aligned with the catches on the cover.

To dismantle, follow the instructions in the reverse order.

Fitting the blade guard/combination guard, grass blade and grass cutter

Hook the blade guard/combination guard (A) onto the fitting on the shaft and secure with the bolt. CAUTION! Use the recommended blade guard. See the Technical data section.

G

F

E

D

A

B


C

Fit the drive disc (B) on the output shaft.

Turn the blade shaft until one of the holes in the drive disc aligns with the corresponding hole in the gear housing.

Insert the locking pin (C) in the hole to lock the shaft.

Place the blade (D), support cup (E) and support flange

(F) on the output shaft.

Fit the nut (G). The nut must be tightened to a torque of 35-50 Nm (3.5-5 kpm). Use the socket spanner in the tool kit. Hold the shaft of the spanner as close to the blade guard as possible. To tighten the nut, turn the spanner in the opposite direction to the direction of rotation (Caution! left-hand thread).

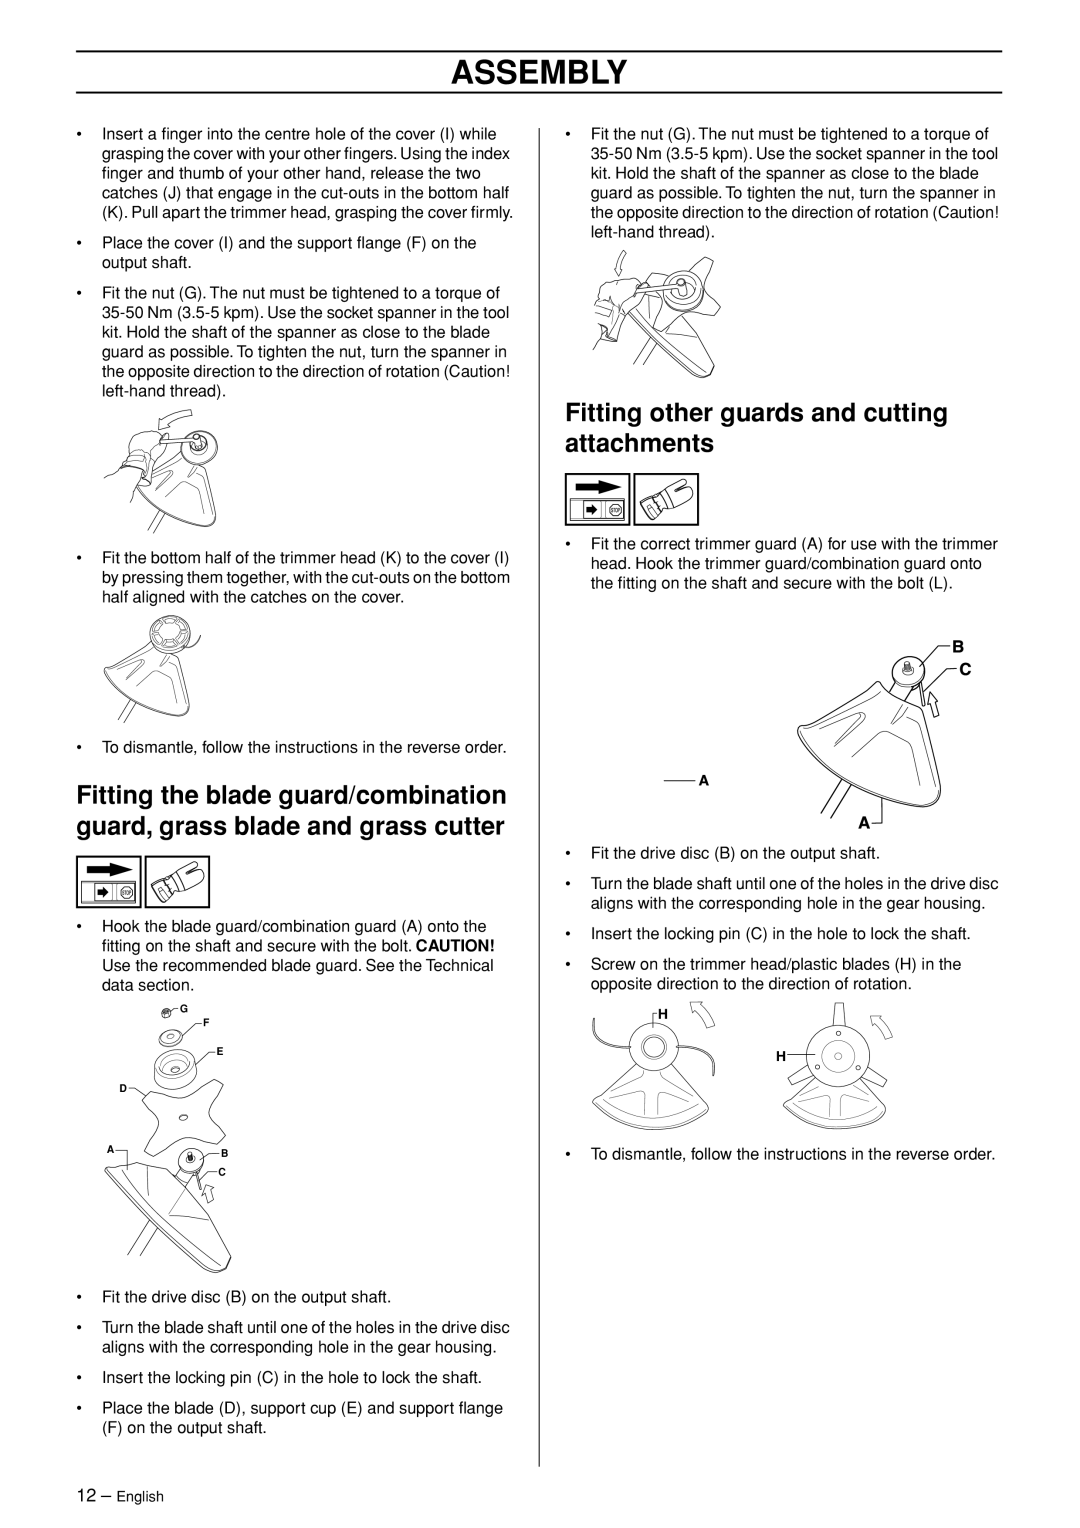
Fitting other guards and cutting attachments

Fit the correct trimmer guard (A) for use with the trimmer head. Hook the trimmer guard/combination guard onto the fitting on the shaft and secure with the bolt (L).

Fit the drive disc (B) on the output shaft.

Turn the blade shaft until one of the holes in the drive disc aligns with the corresponding hole in the gear housing.

Insert the locking pin (C) in the hole to lock the shaft.

Screw on the trimmer head/plastic blades (H) in the opposite direction to the direction of rotation.

H

H

To dismantle, follow the instructions in the reverse order.

12 – English

Page 12
Image 12
Husqvarna 326RJ manual Fitting other guards and cutting attachments

326RJ specifications

The Husqvarna 326RJ is an innovative addition to the line of string trimmers that caters to both residential and commercial users looking for efficiency and power. Designed with a focus on ergonomic handling and versatility, the 326RJ allows users to tackle various landscaping tasks with ease.

One of the standout features of the Husqvarna 326RJ is its lightweight design, weighing in at just under 10 pounds. This makes it easy to maneuver in tight spaces and reduces fatigue during extended use. The trimmer is powered by a robust 25cc two-stroke engine, which delivers reliable performance and a strong power-to-weight ratio, ensuring that it can handle tough grass and weeds without compromising speed.

Equipped with an efficient X-Torq engine, the Husqvarna 326RJ significantly reduces fuel consumption and minimizes harmful exhaust emissions. This technology not only makes it an environmentally friendly option but also means longer operating times between fuel refills. Users can expect optimal performance while minimizing their carbon footprint.

The ergonomics of the 326RJ are enhanced by the adjustable handle and comfortable grip, allowing for a customizable fit that suits various body types and working conditions. The anti-vibration technology further enhances user comfort by reducing the amount of vibration transmitted to the operator's hands, making long jobs significantly less taxing.

In terms of versatility, the Husqvarna 326RJ is designed to be compatible with a range of optional attachments. This compatibility allows it to not only function as a string trimmer but also perform tasks such as edging and brush cutting, making it a multi-functional tool for landscapers and homeowners alike.

The trimmer features a semi-automatic feed system, which ensures that the trimming line is fed out automatically when tapped on the ground. This keeps the workflow uninterrupted and allows users to focus more on their landscaping tasks without the need to frequently stop to adjust the line.

Overall, the Husqvarna 326RJ combines power, efficiency, and user comfort with a suite of advanced technologies that make it a valuable tool for anyone looking to maintain their lawn or garden. With its blend of features and innovative design, it remains a popular choice among both professionals and DIY enthusiasts.