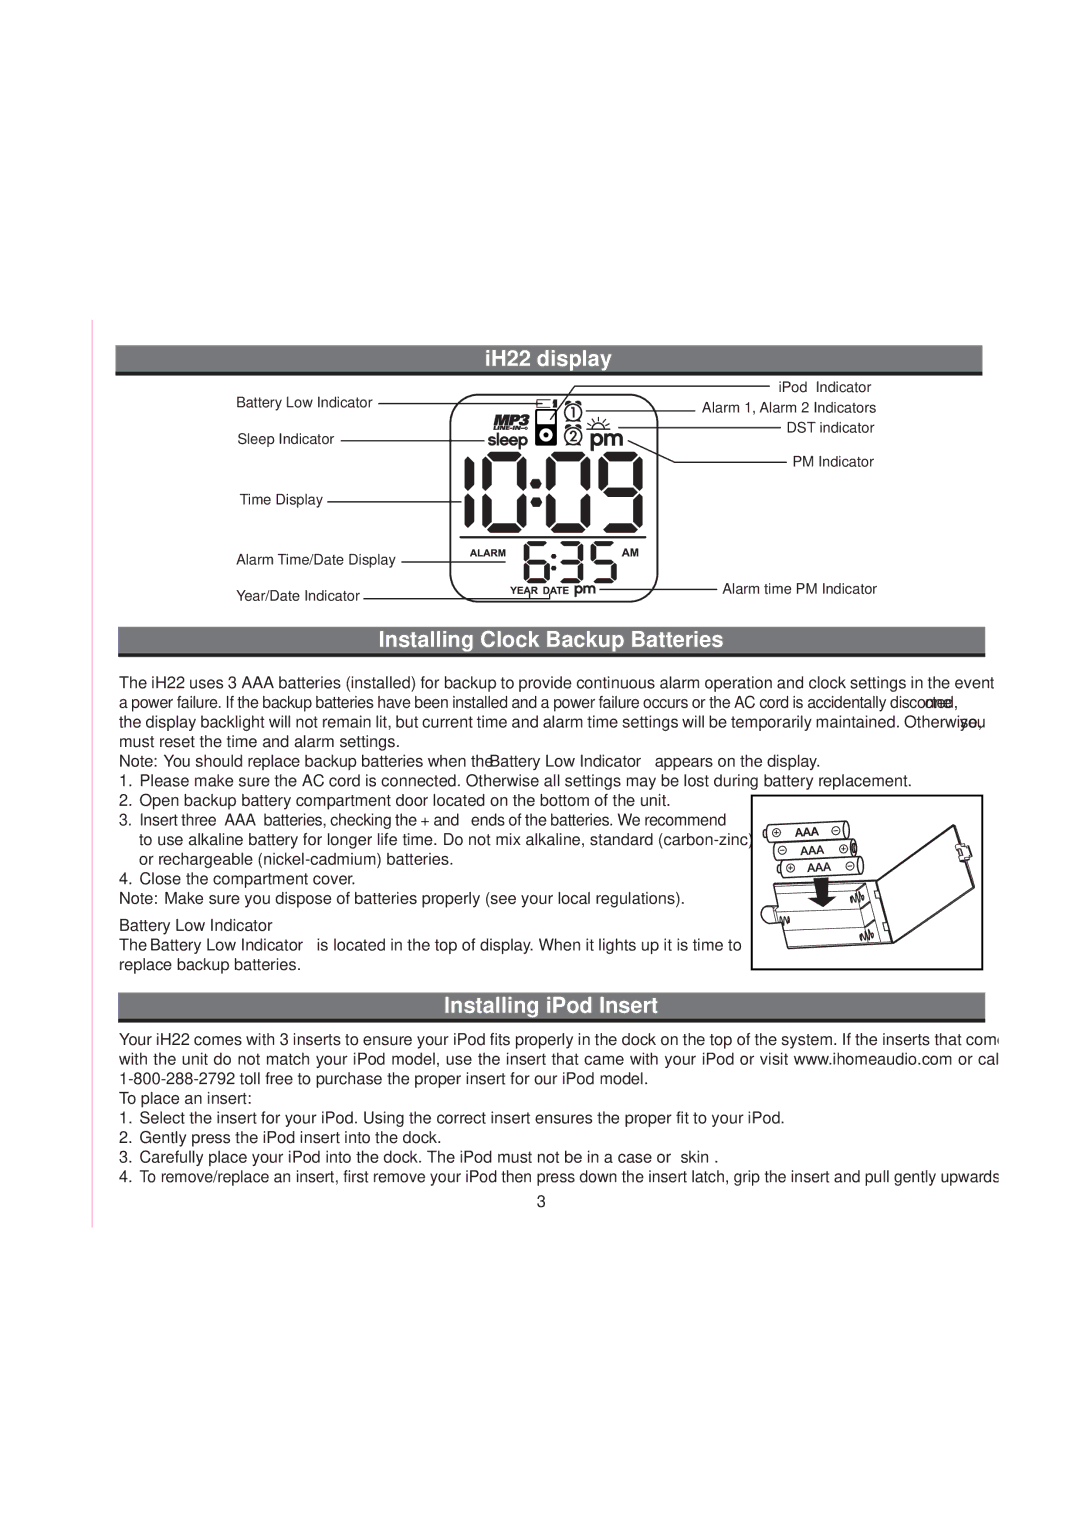
iH22 display
iPod Indicator
Battery Low Indicator |
|
|
|
|
|
|
|
| Alarm 1, Alarm 2 Indicators | |||
|
|
|
|
|
|
|
| |||||
|
|
|
|
|
|
|
| |||||
|
|
|
|
|
|
|
|
|
|
| ||
|
|
|
|
|
|
|
|
|
|
| ||
Sleep Indicator |
|
|
|
|
|
|
|
|
|
| DST indicator | |
|
|
|
|
|
|
|
|
|
| |||
|
|
|
|
|
|
|
|
|
| PM Indicator | ||
|
|
|
|
|
|
|
|
|
| |||
|
|
|
|
|
|
|
|
|
|
|
| |
Time Display |
|
|
|
|
|
|
|
|
|
|
|
|
|
|
|
|
|
|
|
|
|
|
|
| |
Alarm Time/Date Display ![]()
Year/Date Indicator ![]()
![]()
![]()
![]() Alarm time PM Indicator
Alarm time PM Indicator
Installing Clock Backup Batteries
The iH22 uses 3 AAA batteries (installed) for backup to provide continuous alarm operation and clock settings in the event of a power failure. If the backup batteries have been installed and a power failure occurs or the AC cord is accidentally disconnected, the display backlight will not remain lit, but current time and alarm time settings will be temporarily maintained. Otherwise, you must reset the time and alarm settings.
Note: You should replace backup batteries when the Battery Low Indicator appears on the display.
1.Please make sure the AC cord is connected. Otherwise all settings may be lost during battery replacement.
2.Open backup battery compartment door located on the bottom of the unit.
3.Insert three “AAA” batteries, checking the + and – ends of the batteries. We recommend
to use alkaline battery for longer life time. Do not mix alkaline, standard
4. Close the compartment cover.
Note: Make sure you dispose of batteries properly (see your local regulations).
Battery Low Indicator
The Battery Low Indicator is located in the top of display. When it lights up it is time to replace backup batteries.
Installing iPod Insert
Your iH22 comes with 3 inserts to ensure your iPod fits properly in the dock on the top of the system. If the inserts that come with the unit do not match your iPod model, use the insert that came with your iPod or visit www.ihomeaudio.com or call
To place an insert:
1.Select the insert for your iPod. Using the correct insert ensures the proper fit to your iPod.
2.Gently press the iPod insert into the dock.
3.Carefully place your iPod into the dock. The iPod must not be in a case or “skin”.
4.To remove/replace an insert, first remove your iPod then press down the insert latch, grip the insert and pull gently upwards.
3
