AF35 Flash Settings continued |
|
the subject. If the subject is overexposed (light), then you can rotate | |
the mode switch clockwise to reduce the light output of the flash | |
until the desired exposure is obtained. The AF35 provides five | |
reductions in power in | |
power setting, (Fig 4), for example, shows the mode switch set to | |
minus |
|
When the AF35 is in any manual setting the Auto Exposure Selector | |
Dial setting has no effect on the flash output. |
|
Switch the AF35 between Auto and Manual settings at any time. | |
AF35 Flash Ready Light |
|
The Ikelite AF35 Flash features a |
|
ready/confidence light at the rear of the flash | AUTO |
that glows when the flash has recycled and is |
|
ready to fire. When the recycle times range |
|
between 10 and 15 seconds it is recommended |
|
that fresh batteries be installed. |
|
NOTE: The AF35 flash will most likely recycle |
|
faster than the camera’s |
|
the camera’s | Ready |
the AF35 flash, make sure the camera’s | Light |
flash has recycled and is ready to fire before |
|
taking a picture. |
|
Ready Light in Auto Mode
When the AF35 fires in the Auto Mode and enough light reaches the subject for proper exposure the ready light will glow green for about
5
Setting the Auto Exposure Selector Dial continued Using Dual AF35 AutoFlashes
When using dual AF35 AutoFlashes, determine the optimum Auto Exposure Value for one AF35 Autoflash as described on page 6, then set the same Auto Exposure Value on the second AF35’s selector dial.
Setting the Auto Exposure Selector Dial |
|
|
| ||||||
On the side of the Auto Sensor is the | Auto Exposure Selector Dial |
|
|
| |||||
Auto Exposure Selector Dial. |
|
|
|
|
|
|
| Indicator Mark | |
|
|
|
|
|
|
| |||
Different cameras may require |
|
|
|
|
|
|
|
|
|
different exposure values. Once the |
|
|
|
|
|
|
|
| |
correct exposure value is determined |
|
|
|
|
|
|
|
| |
for a particular camera, no further |
|
|
|
|
|
|
|
|
|
adjustments should be necessary to |
|
|
|
|
|
|
|
| |
obtain acceptable flash exposures of |
|
|
|
|
|
|
|
| |
|
|
|
|
|
|
|
| ||
varying subjects within normal shooting ranges. |
|
|
| ||||||
To determine the camera’s optimum Exposure Value we recommend | |||||||||
the following procedure. This procedure can be done above water. | |||||||||
Make sure the camera’s battery is fully charged and the AF35 flash | |||||||||
has fresh batteries. Assemble the AF35 flash and camera housing with | |||||||||
the flash deflector installed on the housing. Make sure the camera’s | |||||||||
AF35 flash mode dial to AUTO. Set the Auto Exposure Selector Dial to | |||||||||
5 as shown above. Position the camera and flash approximately 1m (3 | |||||||||
feet) from a colorful subject. Subject should not be allwhite or black. | |||||||||
Take a picture, review the picture, if the picture is overexposed (light), | |||||||||
turn the Auto Exposure Selector Dial down to 4, if the picture is | |||||||||
underexposed (dark) turn the Auto Exposure Selector Dial up to 6. | |||||||||
Repeat this procedure until the optimum exposure is obtained. Once | |||||||||
the optimum Auto Exposure Value has been determined for that | |||||||||
camera, use that value anytime that camera is used with the AF35 in | |||||||||
the Auto Mode. Repeat this procedure anytime a different camera is | |||||||||
used with the AF35 AutoFlash. |
|
|
|
|
|
|
|
|
|
For advanced users, the Auto Exposure Selector Dial can be used for | |||||||||
exposure compensation while remaining in the automatic mode. | |||||||||
When the AF35 Autoflash is set in the Auto Mode the Auto Exposure | |||||||||
Selector Dial can be used to increase or decrease the flash intensity in | |||||||||
difficult lighting conditions. | 6 |
|
|
|
|
|
|
|
|
|
|
|
|
|
|
|
|
| |
Mounting Ikelite Housings to the Tray
Applies to Single or Dual Tray.
NOTE: The AF35 AutoFlash can ONLY be mounted to Ikelite Compact Digital housing models
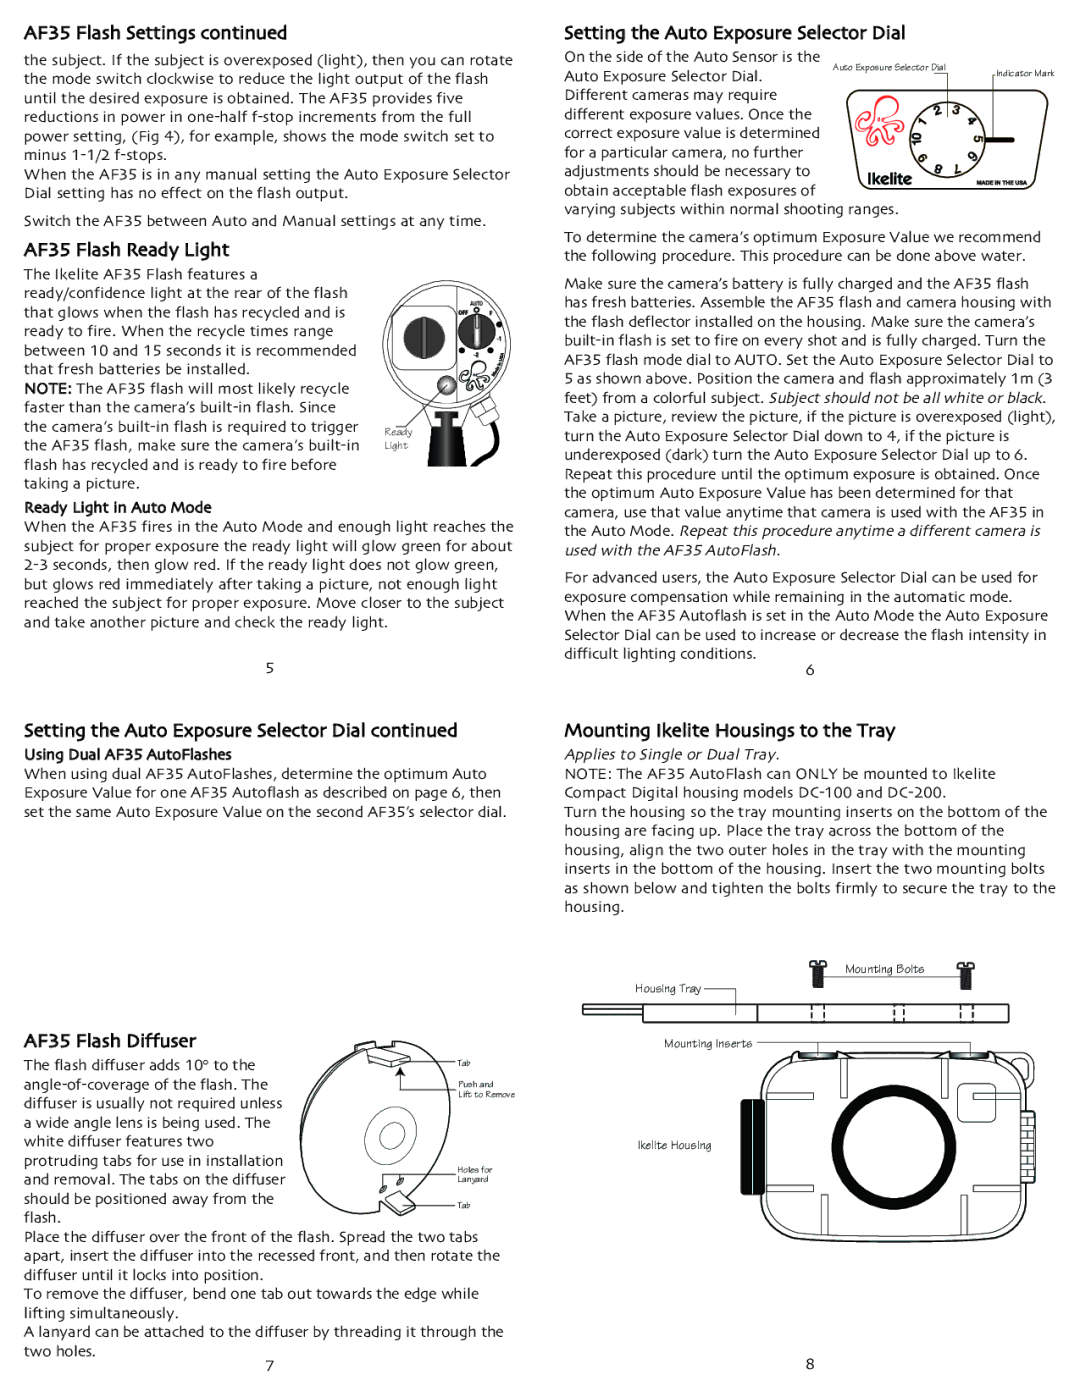
Turn the housing so the tray mounting inserts on the bottom of the housing are facing up. Place the tray across the bottom of the housing, align the two outer holes in the tray with the mountin g inserts in the bottom of the housing. Insert the two mounting b olts as shown below and tighten the bolts firmly to secure the tray to the housing.
AF35 Flash Diffuser
The flash diffuser adds 10° to the | Tab |
Push and | |
Lift to Remove | |
diffuser is usually not required unless |
|
a wide angle lens is being used. The |
|
white diffuser features two |
|
protruding tabs for use in installation | Holes for |
and removal. The tabs on the diffuser | Lanyard |
should be positioned away from the | Tab |
flash. |
|
Place the diffuser over the front of the flash. Spread the two tabs |
apart, insert the diffuser into the recessed front, and then rotate the |
diffuser until it locks into position. |
To remove the diffuser, bend one tab out towards the edge while |
lifting simultaneously. |
A lanyard can be attached to the diffuser by threading it through the |
Housing Tray
Mounting Inserts
Ikelite Housing
Mounting Bolts
two holes. | 7 |
|
8
