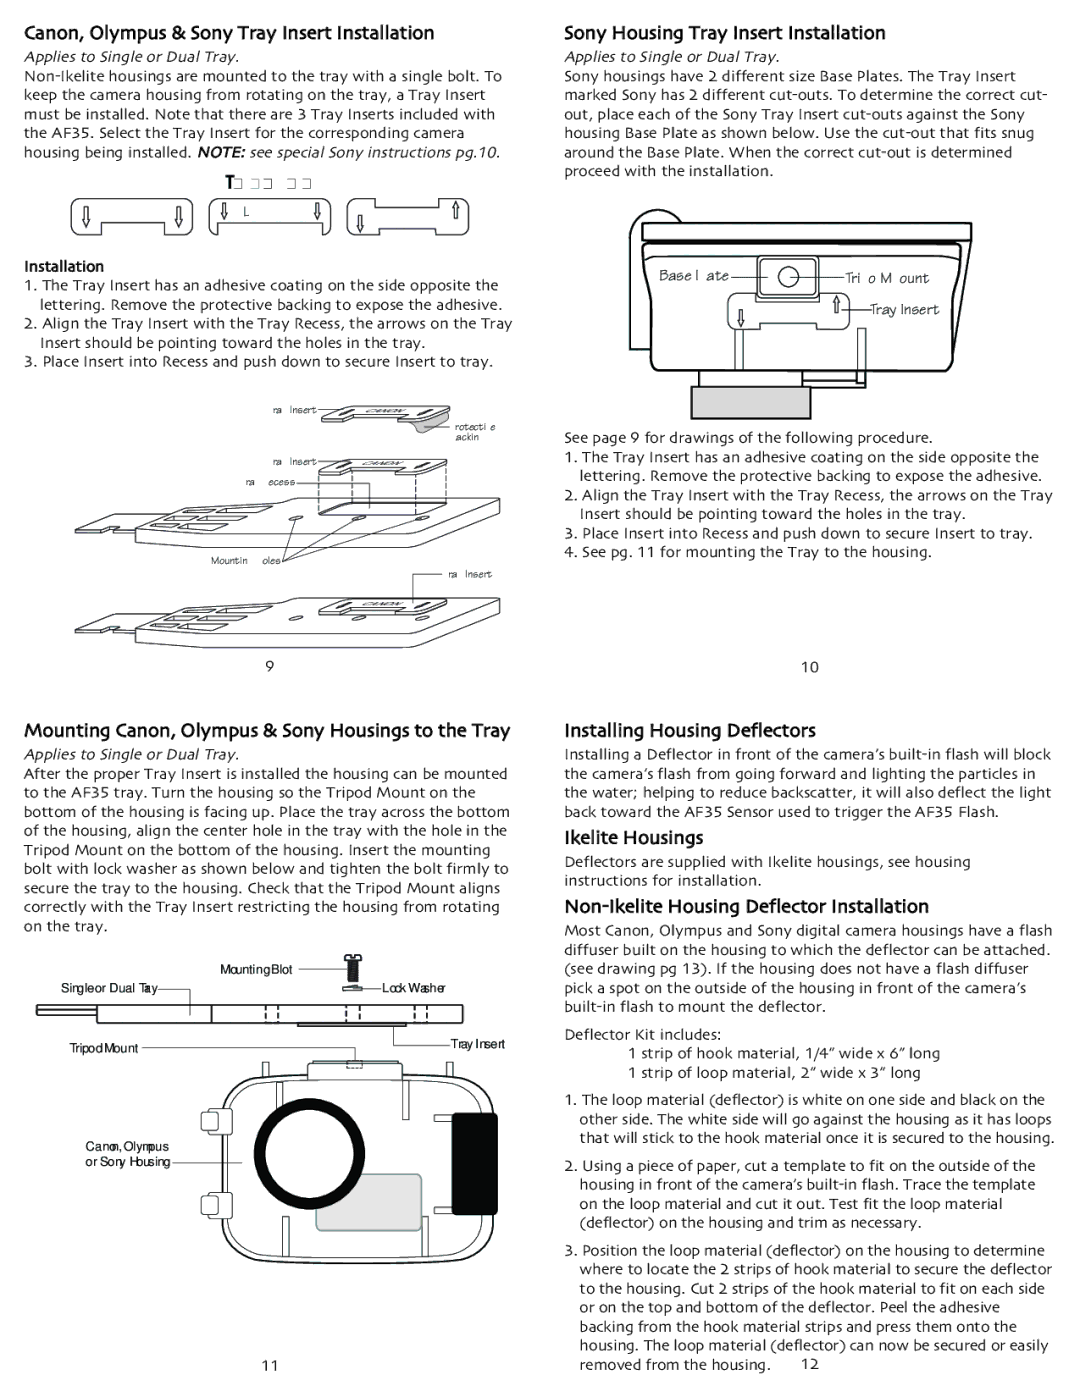
Canon, Olympus & Sony Tray Insert Installation Applies to Single or Dual Tray.
Tray Inserts
CANONOLYMPUS
SONY A | SON Y B |
Installation
1. The Tray Insert has an adhesive coating on the side opposite the lettering. Remove the protective backing to expose the adhesive.
2. Align the Tray Insert with the Tray Recess, the arrows on the Tray Insert should be pointing toward the holes in the tray.
3. Place Insert into Recess and push down to secure Insert to tray.
Tray Insert ![]() CANON
CANON
Protective
Backing
Tray Insert | CANON |
Tray Recess |
|
Mounting Holes
Tray Insert
CANON
Sony Housing Tray Insert Installation
Applies to Single or Dual Tray.
Sony housings have 2 different size Base Plates. The Tray Insert marked Sony has 2 different
Base Plate | Tripod Mount | |
SONY A | SON Y B | Tray Insert |
See page 9 for drawings of the following procedure.
1. The Tray Insert has an adhesive coating on the side opposite t he lettering. Remove the protective backing to expose the adhesive.
2. Align the Tray Insert with the Tray Recess, the arrows on the Tray Insert should be pointing toward the holes in the tray.
3. Place Insert into Recess and push down to secure Insert to tray.
4. See pg. 11 for mounting the Tray to the housing.
9
Mounting Canon, Olympus & Sony Housings to the Tray Applies to Single or Dual Tray.
After the proper Tray Insert is installed the housing can be mounted to the AF35 tray. Turn the housing so the Tripod Mount on the bottom of the housing is facing up. Place the tray across the bottom of the housing, align the center hole in the tray with the hole in the Tripod Mount on the bottom of the housing. Insert the mounting bolt with lock washer as shown below and tighten the bolt firmly to secure the tray to the housing. Check that the Tripod Mount aligns correctly with the Tray Insert restricting the housing from rotating on the tray.
| Mounting Blot |
Single or Dual Tray | Lock Washer |
Tripod Mount | Tray Insert |
|
Canon, Olympus or Sony Housing
11
10
Installing Housing Deflectors | |
Installing a Deflector in front of the camera’s | |
the camera’s flash from going forward and lighting the particles in | |
the water; helping to reduce backscatter, it will also deflect the light | |
back toward the AF35 Sensor used to trigger the AF35 Flash. | |
Ikelite Housings |
|
Deflectors are supplied with Ikelite housings, see housing | |
instructions for installation. |
|
| |
Most Canon, Olympus and Sony digital camera housings have a flash | |
diffuser built on the housing to which the deflector can be attached. | |
(see drawing pg 13). If the housing does not have a flash diffuser | |
pick a spot on the outside of the housing in front of the camera’s | |
Deflector Kit includes: |
|
1 strip of hook material, 1/4” wide x 6” long | |
1 strip of loop material, 2” wide x 3” long | |
1. The loop material (deflector) is white on one side and black on the | |
other side. The white side will go against the housing as it has loops | |
that will stick to the hook material once it is secured to the housing. | |
2. Using a piece of paper, cut a template to fit on the outside of the | |
housing in front of the camera’s | |
on the loop material and cut it out. Test fit the loop material | |
(deflector) on the housing and trim as necessary. | |
3. Position the loop material (deflector) on the housing to determine | |
where to locate the 2 strips of hook material to secure the deflector | |
to the housing. Cut 2 strips of the hook material to fit on each side | |
or on the top and bottom of the deflector. Peel the adhesive | |
backing from the hook material strips and press them onto the | |
housing. The loop material (deflector) can now be secured or easily | |
removed from the housing. | 12 |