FRAME ASSEMBLY
1.Before you begin this step, make sure that you have read all of the information on page 5. This brief introduction will save you much more time than it takes to read it.
Locate and open the parts bags labeled
“FRAME ASSEMBLY.”
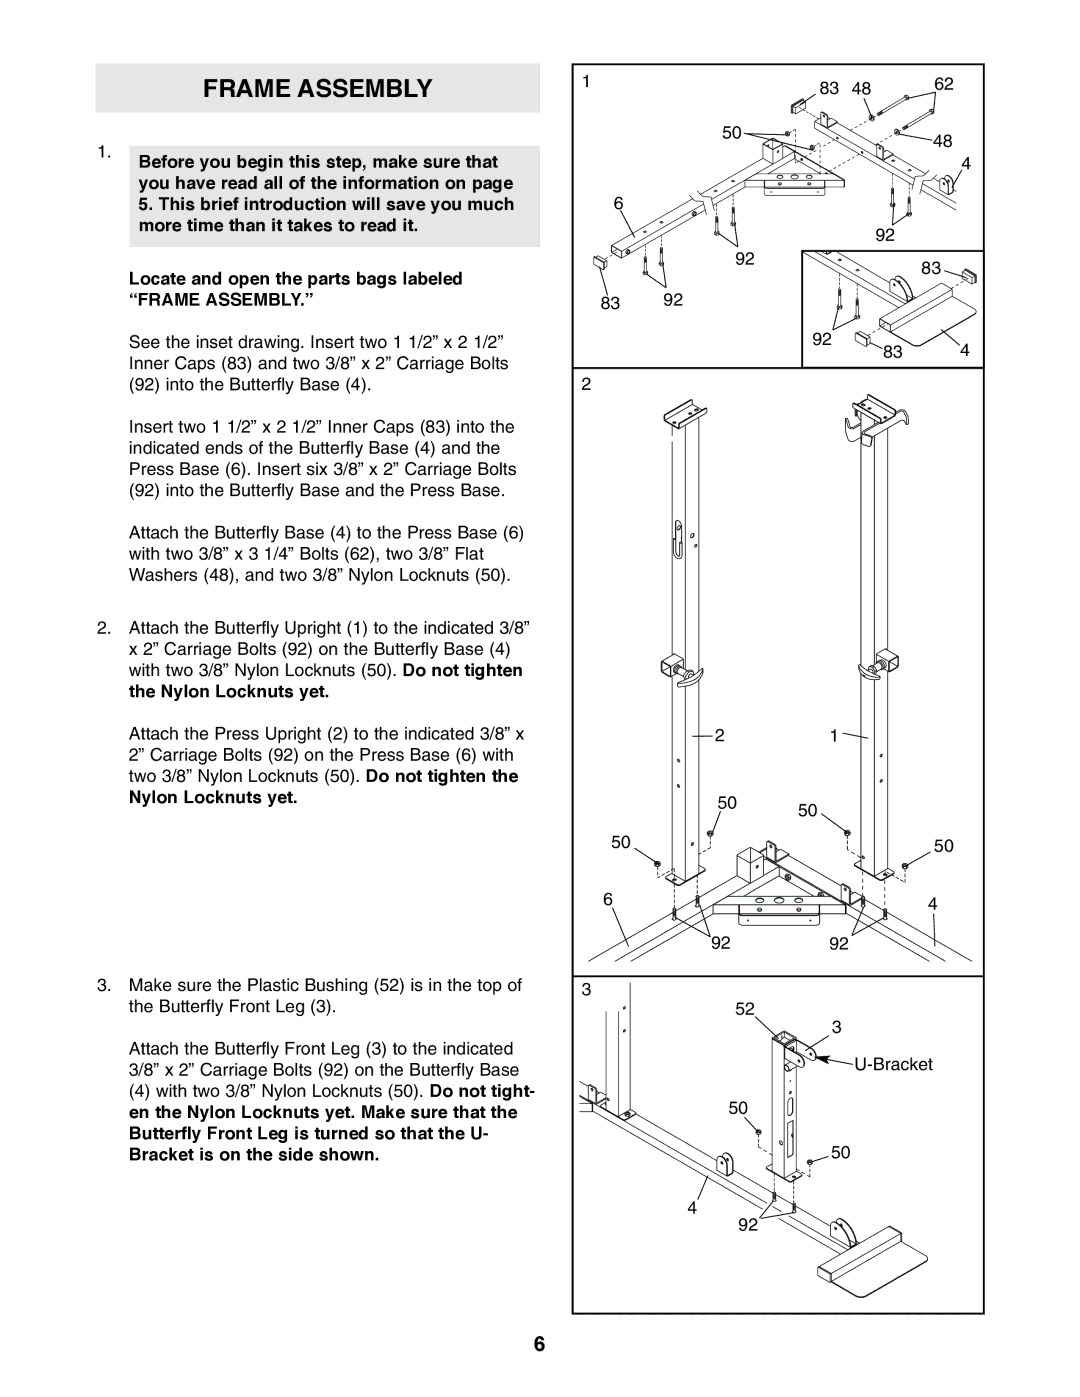
See the inset drawing. Insert two 1 1/2” x 2 1/2” Inner Caps (83) and two 3/8” x 2” Carriage Bolts (92) into the Butterfly Base (4).
Insert two 1 1/2” x 2 1/2” Inner Caps (83) into the indicated ends of the Butterfly Base (4) and the Press Base (6). Insert six 3/8” x 2” Carriage Bolts (92) into the Butterfly Base and the Press Base.
Attach the Butterfly Base (4) to the Press Base (6) with two 3/8” x 3 1/4” Bolts (62), two 3/8” Flat Washers (48), and two 3/8” Nylon Locknuts (50).
2.Attach the Butterfly Upright (1) to the indicated 3/8” x 2” Carriage Bolts (92) on the Butterfly Base (4) with two 3/8” Nylon Locknuts (50). Do not tighten the Nylon Locknuts yet.
Attach the Press Upright (2) to the indicated 3/8” x 2” Carriage Bolts (92) on the Press Base (6) with two 3/8” Nylon Locknuts (50). Do not tighten the
Nylon Locknuts yet.
3.Make sure the Plastic Bushing (52) is in the top of the Butterfly Front Leg (3).
Attach the Butterfly Front Leg (3) to the indicated 3/8” x 2” Carriage Bolts (92) on the Butterfly Base
(4) with two 3/8” Nylon Locknuts (50). Do not tight- en the Nylon Locknuts yet. Make sure that the Butterfly Front Leg is turned so that the U- Bracket is on the side shown.
6
1 |
| 83 | 48 | 62 |
| 50 |
|
| 48 |
|
|
|
| |
|
|
|
| 4 |
6 |
|
|
|
|
|
|
| 92 |
|
| 92 |
|
| 83 |
|
|
|
| |
83 | 92 |
|
|
|
|
| 92 | 83 | 4 |
|
|
| ||
2 |
|
|
|
|
| 2 | 1 |
|
|
| 50 | 50 |
|
|
|
|
|
| |
50 |
|
|
| 50 |
6 |
|
|
| 4 |
| 92 | 92 |
|
|
3 | 52 |
|
|
|
| 3 |
|
| |
|
|
|
| |
|
|
| ||
| 50 |
|
|
|
|
| 50 |
|
|
| 4 |
|
|
|
| 92 |
|
|
|
