Contents
QUESTIONS?
Model No. IMSW20701 IMSG20701 IMSB20701 Serial No
CUSTOMER HOT LINE
Mon.-Fri., 6 a.m.-6 p.m. MST
TABLE OF CONTENTS
IMAGE is a registered trademark of ICON Health & Fitness, Inc
IMPORTANT SAFETY INSTRUCTIONS
READ AND FOLLOW ALL INSTRUCTIONS
2. Use the RENEW 207 only as described in this manual
10. Never insert any object into any opening
Always replace and lock the spa cover when the spa is not in use
28. DANGER-To reduce the risk of drowning
Never use the RENEW 207 alone
Keep pets away from the spa at all times
SAVE THESE INSTRUCTIONS
35. Do not use the RENEW 207 immediately after strenuous exercise
BEFORE YOU BEGIN
If you set up the RENEW 207 inside
If you set up the RENEW 207 outside
CHOOSING A LOCATION FOR THE RENEW
Do not use an extension cord with the RENEW
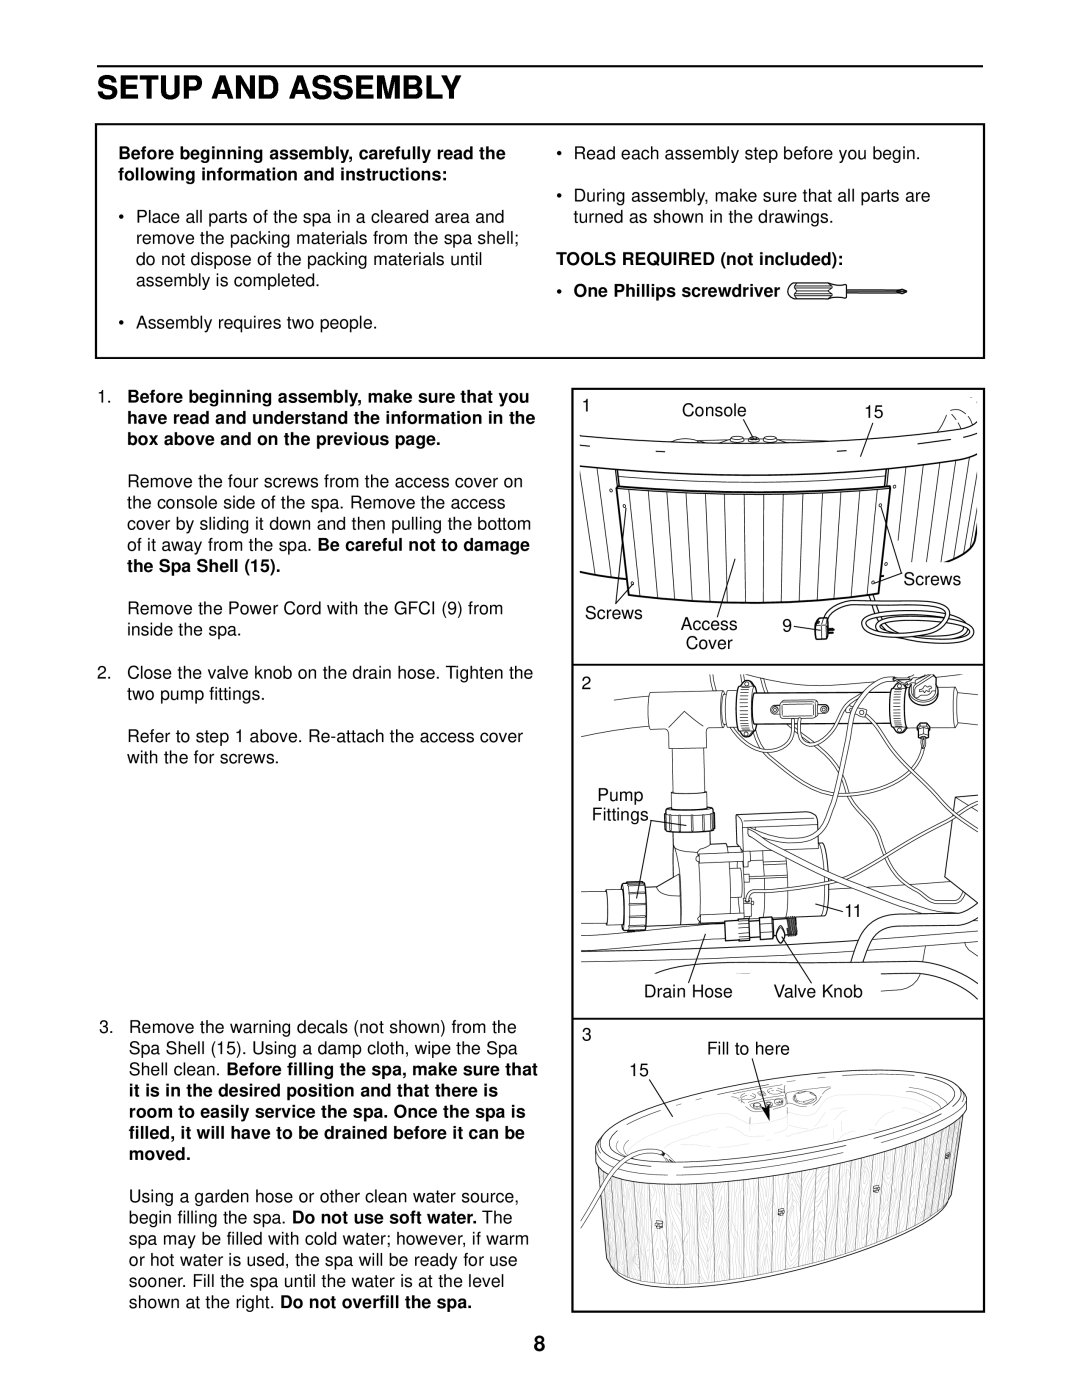
SETUP AND ASSEMBLY
TOOLS REQUIRED not included One Phillips screwdriver
Insulating Liner
PLUGGING IN THE RENEW
USING THE RENEW
POSTING THE WARNING SIGN
STARTING THE RENEW
TESTING AND TREATING THE WATER
USING THE CONSOLE
when the spa is not
SECURING THE SPA COVER
each end of the spa
cover
MAINTENANCE
MAINTENANCE SCHEDULE
CLEANING THE SPA SHELL
CHECKING AND CLEANING THE FILTER
5. Keep all containers closed tightly when not in use
REMOVING AND ATTACHING THE ACCESS COVER
WATER CHEMISTRY
2. Never mix different chemicals
WINTER USE AND CARE
TROUBLE-SHOOTING
1. SYMPTOM THE SPA WILL NOT OPERATE
3. SYMPTOM THE PUMP HUMS
4. SYMPTOM THE PUMP HUMS BUT DOES NOT ROTATE
10. SYMPTOM THE WATER LEVEL DROPS
8. SYMPTOM THE WATER PULSATES OR THERE IS MINIMUM WATER FLOW
9. SYMPTOM THE WATER IS NOT BEING CLEANED BY THE FILTER
PART LIST Model No. IMSW20701, IMSG20701, IMSB20701
Description
EXPLODED DRAWING Model No. IMSW20701, IMSG20701, IMSB20701
ICON HEALTH & FITNESS, INC., 1500 S. 1000 W., LOGAN, UT
ORDERING REPLACEMENT PARTS
LIMITED HYDROTHERAPY SPA WARRANTY