Menggunakan remote kontrol

Remote menggunakan dua (2) baterai AAA (tidak diberikan). Baterai mudah dipasang dengan mencabut penutup dari bagian belakang remote, sesuaikan kutub + dan - dari baterai, geser ke tempatnya, dan pasang kembali penutup.

Perhatian:

Bila mengganti baterai remote, perhatikan bahwa menggunakan baterai selain AAA dapat menyebabkan risiko kerusakan parah pada remote. Bila membuang baterai, pastikan Anda melakukannya dengan cara yang ramah lingkungan.

Keringkan segera jika remote control basah.

Hindari panas dan lembap yang berlebihan.

Pastikan bahwa polaritas baterai (+/-) dipasang dengan benar.

Jangan gabungkan baterai baru dan lama, atau jangan gabungkan berbagai jenis baterai.

Ganti baterai segera setelah habis.

Lepaskan baterai dari remote control ketika disimpan atau tidak digunakan dalam jangka waktu lama.

Untuk mengoperasikan remote control, arahkan remote ke depan proyektor (bukan komputer). Jangkauan pengoperasian optimal sekitar 15 kaki (4,5 m).

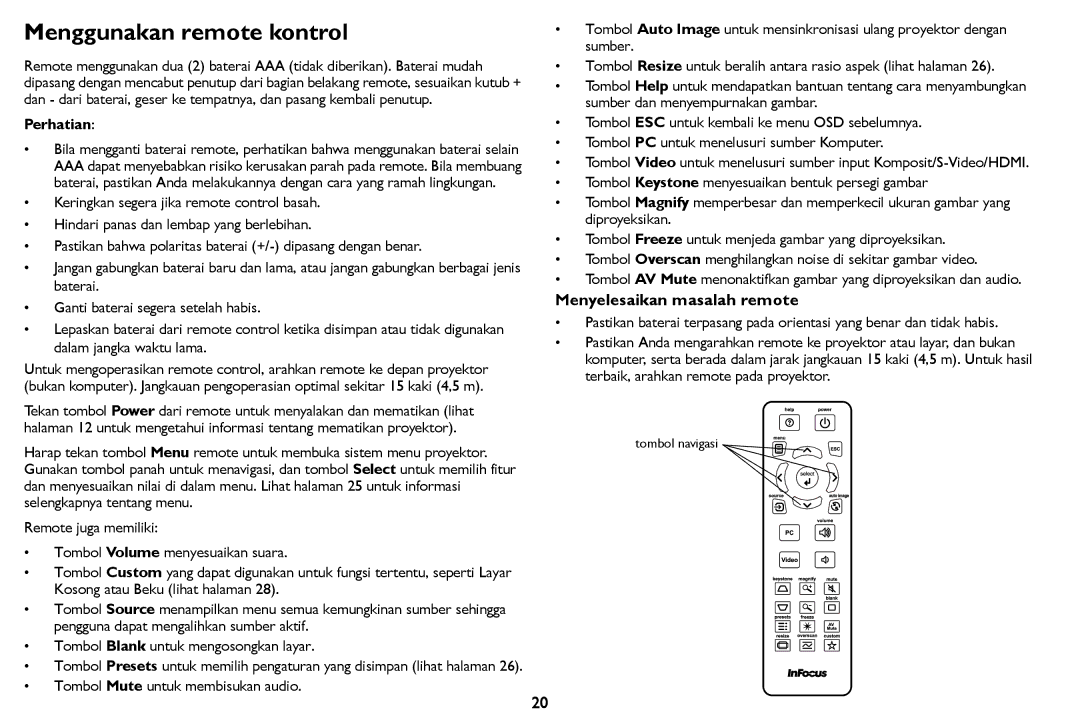
Tekan tombol Power dari remote untuk menyalakan dan mematikan (lihat halaman 12 untuk mengetahui informasi tentang mematikan proyektor).

Harap tekan tombol Menu remote untuk membuka sistem menu proyektor. Gunakan tombol panah untuk menavigasi, dan tombol Select untuk memilih fitur dan menyesuaikan nilai di dalam menu. Lihat halaman 25 untuk informasi selengkapnya tentang menu.

Remote juga memiliki:

Tombol Volume menyesuaikan suara.

Tombol Custom yang dapat digunakan untuk fungsi tertentu, seperti Layar Kosong atau Beku (lihat halaman 28).

Tombol Source menampilkan menu semua kemungkinan sumber sehingga pengguna dapat mengalihkan sumber aktif.

Tombol Blank untuk mengosongkan layar.

Tombol Presets untuk memilih pengaturan yang disimpan (lihat halaman 26).

Tombol Mute untuk membisukan audio.

Tombol Auto Image untuk mensinkronisasi ulang proyektor dengan sumber.

Tombol Resize untuk beralih antara rasio aspek (lihat halaman 26).

Tombol Help untuk mendapatkan bantuan tentang cara menyambungkan sumber dan menyempurnakan gambar.

Tombol ESC untuk kembali ke menu OSD sebelumnya.

Tombol PC untuk menelusuri sumber Komputer.

Tombol Video untuk menelusuri sumber input Komposit/S-Video/HDMI.

Tombol Keystone menyesuaikan bentuk persegi gambar

Tombol Magnify memperbesar dan memperkecil ukuran gambar yang diproyeksikan.

Tombol Freeze untuk menjeda gambar yang diproyeksikan.

Tombol Overscan menghilangkan noise di sekitar gambar video.

Tombol AV Mute menonaktifkan gambar yang diproyeksikan dan audio.

Menyelesaikan masalah remote

Pastikan baterai terpasang pada orientasi yang benar dan tidak habis.

Pastikan Anda mengarahkan remote ke proyektor atau layar, dan bukan komputer, serta berada dalam jarak jangkauan 15 kaki (4,5 m). Untuk hasil terbaik, arahkan remote pada proyektor.

tombol navigasi

20

Page 21
Image 21
InFocus IN126STa, IN124STa manual Menggunakan remote kontrol, Menyelesaikan masalah remote, Perhatian

IN126STa, IN124STa specifications

The InFocus IN126STA and IN124STA are compact projectors designed for versatility and high performance in various settings, such as classrooms, conference rooms, and home theaters. Both models leverage advanced projection technologies, making them an excellent choice for users looking for quality and reliability.

The IN126STA features a brightness of 3,600 lumens, facilitating clear, bright images even in well-lit environments. This high brightness level ensures that presentations and videos can be viewed without distortion or loss of color fidelity. In contrast, the IN124STA offers a slightly lower brightness of 3,200 lumens, catering effectively to dimmer environments without compromising image quality.

Both projectors utilize DLP (Digital Light Processing) technology, enabling them to deliver sharp images with excellent color representation. DLP technology is synonymous with longevity and reliability as it helps prevent color degradation over time, ensuring vibrant visuals throughout the projector's lifespan.

A key feature of the IN126STA and IN124STA is their impressive contrast ratio. The IN126STA boasts a contrast ratio of 20,000:1, whereas the IN124STA offers a slightly lower ratio of 15,000:1. This notable distinction allows for deep blacks and bright whites, enhancing overall picture quality and making them ideal for varied content, from text-heavy presentations to high-definition movie viewing.

Both models are equipped with multiple connectivity options, including HDMI, VGA, and USB ports, enabling seamless integration with laptops, Blu-ray players, and gaming consoles. This wide range of inputs ensures that users can easily connect their devices without the need for additional adapters.

Additionally, the InFocus IN126STA and IN124STA projectors feature a 1.2:1 throw ratio, allowing flexibility in setup. Users can project large images from a shorter distance, making these projectors suitable for smaller rooms where space might be limited. With both models supporting a variety of aspect ratios, including 16:9 and 4:3, they cater to diverse content formats.

In summary, the InFocus IN126STA and IN124STA projectors are built for performance, versatility, and user convenience. Their combination of brightness, DLP technology, high contrast ratios, and multiple connectivity options make them an appealing choice for anyone needing dependable projection solutions for educational or professional environments, as well as home entertainment.