on avec lecteur DVD Conexión de su cine en casa con reproductor de DVD

Step 3 Connecting the radio antenna

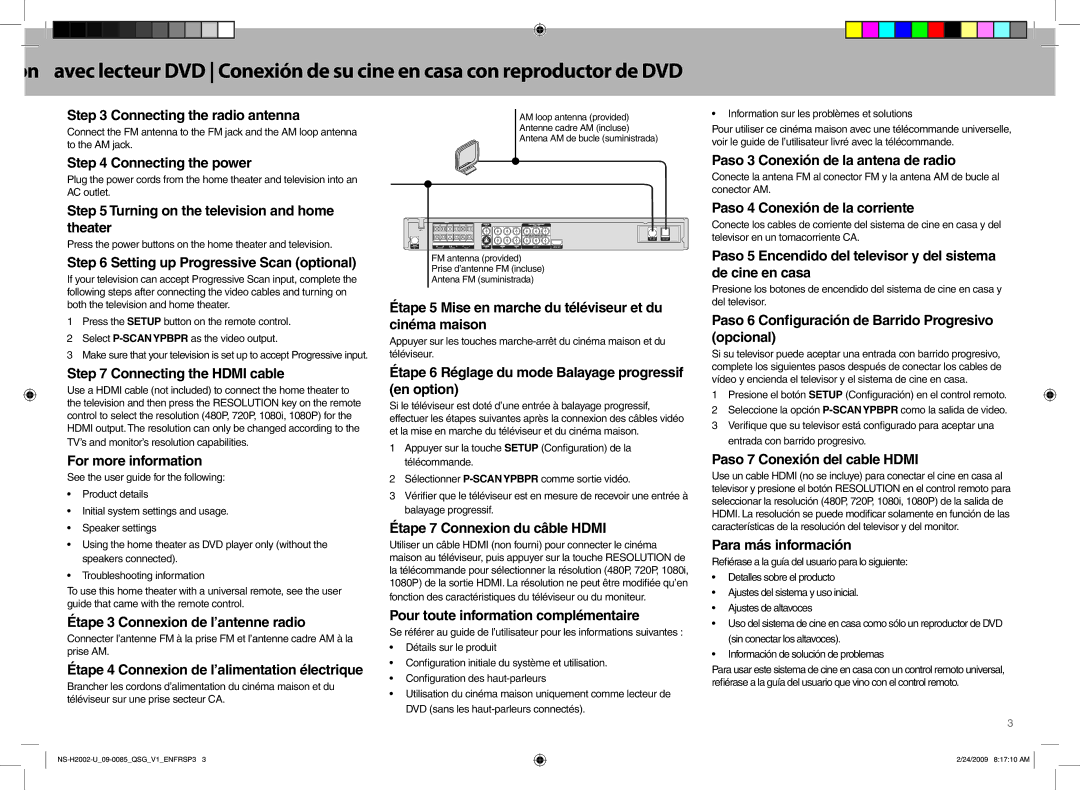
Connect the FM antenna to the FM jack and the AM loop antenna to the AM jack.

Step 4 Connecting the power

Plug the power cords from the home theater and television into an AC outlet.

Step 5 Turning on the television and home theater

Press the power buttons on the home theater and television.

Step 6 Setting up Progressive Scan (optional)

If your television can accept Progressive Scan input, complete the following steps after connecting the video cables and turning on both the television and home theater.

1Press the SETUP button on the remote control.

2Select P-SCANYPBPRas the video output.

3Make sure that your television is set up to accept Progressive input.

AM loop antenna (provided)

Antenne cadre AM (incluse)

Antena AM de bucle (suministrada)

FM antenna (provided)

Prise d’antenne FM (incluse)

Antena FM (suministrada)

Étape 5 Mise en marche du téléviseur et du cinéma maison

Appuyer sur les touches marche-arrêt du cinéma maison et du téléviseur.

Information sur les problèmes et solutions

Pour utiliser ce cinéma maison avec une télécommande universelle, voir le guide de l’utilisateur livré avec la télécommande.

Paso 3 Conexión de la antena de radio

Conecte la antena FM al conector FM y la antena AM de bucle al conector AM.

Paso 4 Conexión de la corriente

Conecte los cables de corriente del sistema de cine en casa y del televisor en un tomacorriente CA.

Paso 5 Encendido del televisor y del sistema de cine en casa

Presione los botones de encendido del sistema de cine en casa y del televisor.

Paso 6 Configuración de Barrido Progresivo (opcional)

Si su televisor puede aceptar una entrada con barrido progresivo, complete los siguientes pasos después de conectar los cables de

Step 7 Connecting the HDMI cable

Use a HDMI cable (not included) to connect the home theater to the television and then press the RESOLUTION key on the remote control to select the resolution (480P, 720P, 1080i, 1080P) for the HDMI output. The resolution can only be changed according to the TV’s and monitor’s resolution capabilities.

For more information

See the user guide for the following:

Product details

Initial system settings and usage.

Speaker settings

Using the home theater as DVD player only (without the speakers connected).

Troubleshooting information

To use this home theater with a universal remote, see the user guide that came with the remote control.

Étape 3 Connexion de l’antenne radio

Connecter l’antenne FM à la prise FM et l’antenne cadre AM à la prise AM.

Étape 4 Connexion de l’alimentation électrique

Brancher les cordons d’alimentation du cinéma maison et du téléviseur sur une prise secteur CA.

Étape 6 Réglage du mode Balayage progressif (en option)

Si le téléviseur est doté d’une entrée à balayage progressif, effectuer les étapes suivantes après la connexion des câbles vidéo et la mise en marche du téléviseur et du cinéma maison.

1Appuyer sur la touche SETUP (Configuration) de la télécommande.

2Sélectionner P-SCANYPBPRcomme sortie vidéo.

3Vérifier que le téléviseur est en mesure de recevoir une entrée à balayage progressif.

Étape 7 Connexion du câble HDMI

Utiliser un câble HDMI (non fourni) pour connecter le cinéma maison au téléviseur, puis appuyer sur la touche RESOLUTION de la télécommande pour sélectionner la résolution (480P, 720P, 1080i, 1080P) de la sortie HDMI. La résolution ne peut être modifiée qu’en fonction des caractéristiques du téléviseur ou du moniteur.

Pour toute information complémentaire

Se référer au guide de l’utilisateur pour les informations suivantes :

Détails sur le produit

Configuration initiale du système et utilisation.

Configuration des haut-parleurs

Utilisation du cinéma maison uniquement comme lecteur de DVD (sans les haut-parleurs connectés).

vídeo y encienda el televisor y el sistema de cine en casa.

1Presione el botón SETUP (Configuración) en el control remoto.

2Seleccione la opción P-SCANYPBPRcomo la salida de video.

3Verifique que su televisor está configurado para aceptar una entrada con barrido progresivo.

Paso 7 Conexión del cable HDMI

Use un cable HDMI (no se incluye) para conectar el cine en casa al televisor y presione el botón RESOLUTION en el control remoto para seleccionar la resolución (480P, 720P, 1080i, 1080P) de la salida de HDMI. La resolución se puede modificar solamente en función de las características de la resolución del televisor y del monitor.

Para más información

Refiérase a la guía del usuario para lo siguiente:

Detalles sobre el producto

Ajustes del sistema y uso inicial.

Ajustes de altavoces

Uso del sistema de cine en casa como sólo un reproductor de DVD (sin conectar los altavoces).

Información de solución de problemas

Para usar este sistema de cine en casa con un control remoto universal, refiérase a la guía del usuario que vino con el control remoto.

3

NS-H2002-U_09-0085_QSG_V1_ENFRSP3 3

2/24/20092/24/2009 8:17:108:17:10 AMAM

Page 3
Image 3
Insignia NS-H2002-U warranty Connecting the radio antenna, Connecting the power, Turning on the television and home theater

NS-H2002-U specifications

The Insignia NS-H2002-U is a versatile and budget-friendly speaker system that enhances the audio experience for various entertainment setups. It is designed with both quality and convenience in mind, making it a popular choice for users seeking well-rounded sound performance without breaking the bank.

One of the main features of the NS-H2002-U is its compact yet robust design, which allows it to fit seamlessly into different environments, from home theaters to computer desks. The unit includes two satellite speakers and a dedicated subwoofer, ensuring that users enjoy a full-range audio experience that captures the nuances of media content, from the high-pitched sounds of music to the low-frequency thumps of action-packed movie scenes.

The NS-H2002-U employs advanced audio technologies such as Dolby Digital decoding, which provides enriched sound output that immerses listeners in their favorite movies and music. The subwoofer is engineered with a powerful driver that produces deep bass, enhancing the overall sound quality and resonance across all audio formats. This makes the speaker system suitable for not only casual listening but also critical audio applications like gaming and professional audio monitoring.

Connectivity is another strong point of the Insignia NS-H2002-U. The system offers multiple input options, including RCA and 3.5mm aux inputs, enabling users to connect a variety of devices such as televisions, computers, and smartphones. The plug-and-play feature ensures that setup is straightforward, allowing for immediate enjoyment of high-quality sound without the need for complicated installations.

The speaker system is also equipped with a user-friendly volume control knob, conveniently located for easy adjustments. Its attractive design and sleek finish mean that it can complement any decor, whether in a modern living room or a retro-inspired setup.

Additional characteristics include a durable build that promises longevity and consistent performance. Insignia's attention to detail and commitment to quality are apparent in the NS-H2002-U, making it an excellent choice for audiophiles and casual users alike. Overall, the Insignia NS-H2002-U stands out as a well-performing speaker system that meets the demands of today’s multimedia consumption, delivering powerful and clear audio in a stylish and practical package.