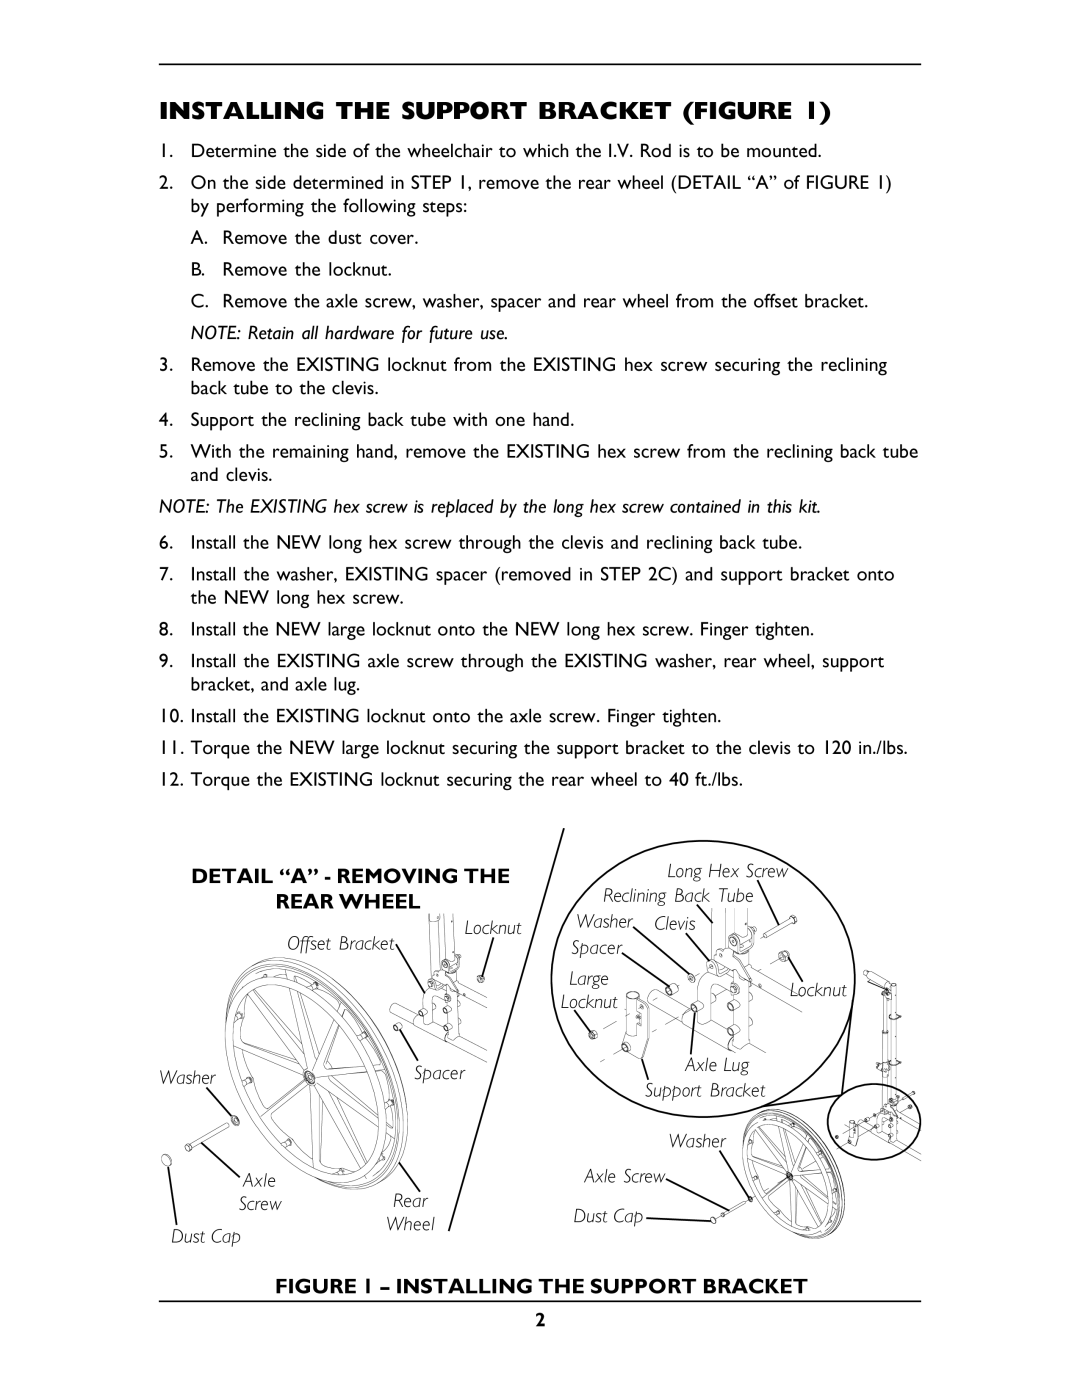
INSTALLING THE SUPPORT BRACKET (FIGURE 1)
1.Determine the side of the wheelchair to which the I.V. Rod is to be mounted.
2.On the side determined in STEP 1, remove the rear wheel (DETAIL “A” of FIGURE 1) by performing the following steps:
A.Remove the dust cover.
B.Remove the locknut.
C.Remove the axle screw, washer, spacer and rear wheel from the offset bracket. NOTE: Retain all hardware for future use.
3.Remove the EXISTING locknut from the EXISTING hex screw securing the reclining back tube to the clevis.
4.Support the reclining back tube with one hand.
5.With the remaining hand, remove the EXISTING hex screw from the reclining back tube and clevis.
NOTE: The EXISTING hex screw is replaced by the long hex screw contained in this kit.
6.Install the NEW long hex screw through the clevis and reclining back tube.
7.Install the washer, EXISTING spacer (removed in STEP 2C) and support bracket onto the NEW long hex screw.
8.Install the NEW large locknut onto the NEW long hex screw. Finger tighten.
9.Install the EXISTING axle screw through the EXISTING washer, rear wheel, support bracket, and axle lug.
10.Install the EXISTING locknut onto the axle screw. Finger tighten.
11.Torque the NEW large locknut securing the support bracket to the clevis to 120 in./lbs.
12.Torque the EXISTING locknut securing the rear wheel to 40 ft./lbs.
DETAIL “A” - REMOVING THE | Long Hex Screw |
| ||
REAR WHEEL |
| Reclining Back Tube |
| |
| Offset Bracket | Locknut | Washer Clevis |
|
|
| Spacer |
| |
|
|
| Large | Locknut |
|
|
| Locknut | |
|
|
|
| |
Washer | Spacer |
| Axle Lug |
|
| Support Bracket |
| ||
|
|
|
| |
|
|
| Washer |
|
Axle | Rear |
| Axle Screw |
|
Screw |
| Dust Cap |
| |
Dust Cap | Wheel |
|
| |
|
|
| ||
|
|
|
| |
FIGURE 1 – INSTALLING THE SUPPORT BRACKET
2
