INSTALLING MOUNTING BRACKETS ONTO BACK CANES (FIGURE 1)
1.Determine diameter tubing of the wheelchair back canes.
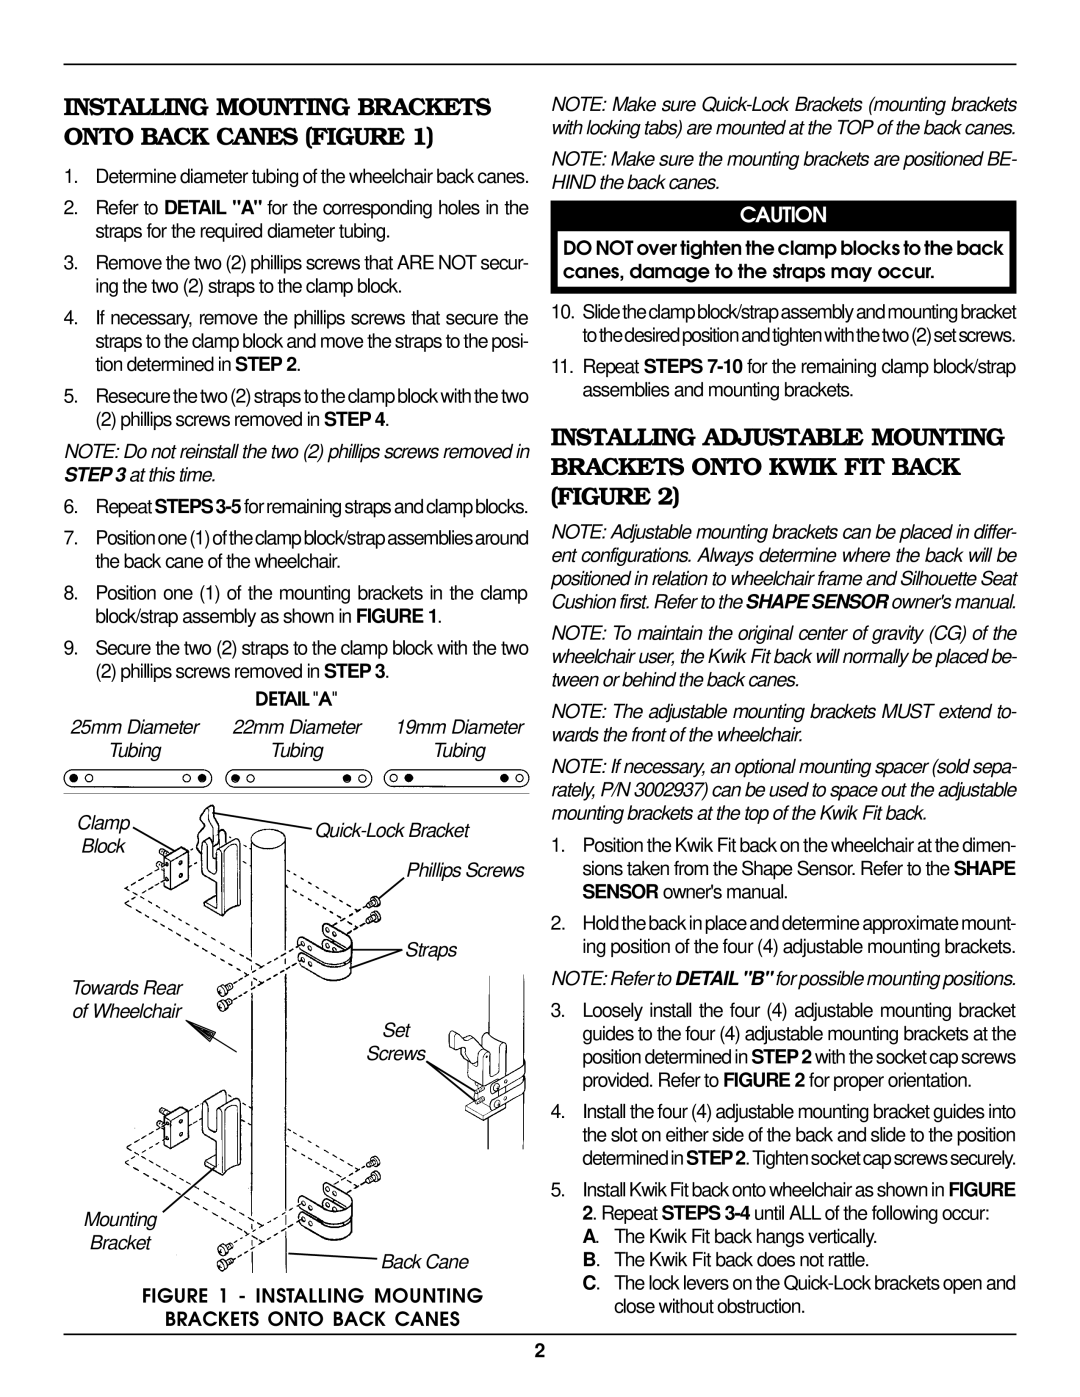
2.Refer to DETAIL "A" for the corresponding holes in the straps for the required diameter tubing.
3.Remove the two (2) phillips screws that ARE NOT secur- ing the two (2) straps to the clamp block.
4.If necessary, remove the phillips screws that secure the straps to the clamp block and move the straps to the posi- tion determined in STEP 2.
5.Resecure the two (2) straps to the clamp block with the two
(2) phillips screws removed in STEP 4.
NOTE: Do not reinstall the two (2) phillips screws removed in STEP 3 at this time.
6.Repeat STEPS
7.Positionone(1)oftheclampblock/strapassembliesaround the back cane of the wheelchair.
8.Position one (1) of the mounting brackets in the clamp block/strap assembly as shown in FIGURE 1.
9.Secure the two (2) straps to the clamp block with the two
(2) phillips screws removed in STEP 3.
| DETAIL "A" |
| |
25mm Diameter | 22mm Diameter | 19mm Diameter | |
Tubing | Tubing | Tubing | |
Clamp | |||
Block | |||
|
| ||
|
| Phillips Screws | |
|
| Straps | |
Towards Rear |
|
| |
of Wheelchair |
| Set | |
|
| ||
|
| Screws | |
Mounting
Bracket
 Back Cane
FIGURE 1 - INSTALLING MOUNTING
BRACKETS ONTO BACK CANES
NOTE: Make sure
NOTE: Make sure the mounting brackets are positioned BE- HIND the back canes.
CAUTION
DO NOT over tighten the clamp blocks to the back canes, damage to the straps may occur.
10.Slidetheclampblock/strapassemblyandmountingbracket tothedesiredpositionandtightenwiththetwo(2)setscrews.
11.Repeat STEPS
INSTALLING ADJUSTABLE MOUNTING BRACKETS ONTO KWIK FIT BACK (FIGURE 2)
NOTE: Adjustable mounting brackets can be placed in differ- ent configurations. Always determine where the back will be positioned in relation to wheelchair frame and Silhouette Seat Cushion first. Refer to the SHAPE SENSOR owner's manual.
NOTE: To maintain the original center of gravity (CG) of the wheelchair user, the Kwik Fit back will normally be placed be- tween or behind the back canes.
NOTE: The adjustable mounting brackets MUST extend to- wards the front of the wheelchair.
NOTE: If necessary, an optional mounting spacer (sold sepa- rately, P/N 3002937) can be used to space out the adjustable mounting brackets at the top of the Kwik Fit back.
1.Position the Kwik Fit back on the wheelchair at the dimen- sions taken from the Shape Sensor. Refer to the SHAPE SENSOR owner's manual.
2.Hold the back in place and determine approximate mount- ing position of the four (4) adjustable mounting brackets.
NOTE: Refer to DETAIL "B" for possible mounting positions.
3.Loosely install the four (4) adjustable mounting bracket guides to the four (4) adjustable mounting brackets at the position determined in STEP 2 with the socket cap screws provided. Refer to FIGURE 2 for proper orientation.
4.Install the four (4) adjustable mounting bracket guides into the slot on either side of the back and slide to the position determinedin STEP 2.Tightensocketcapscrewssecurely.
5.Install Kwik Fit back onto wheelchair as shown in FIGURE
2. Repeat STEPS
B. The Kwik Fit back does not rattle.
C. The lock levers on the
2