time zone). Enter minutes “ahead of” or “behind” UT (universal time). The minimum time difference is 60 minutes.

New York City is 300 minutes “behind”

UT

Los Angeles is 480 minutes “behind” UT

Rome is 60 minutes “ahead of” UT

Beijing is 480 minutes “ahead of” UT

Sydney is 600 minutes “ahead of” UT

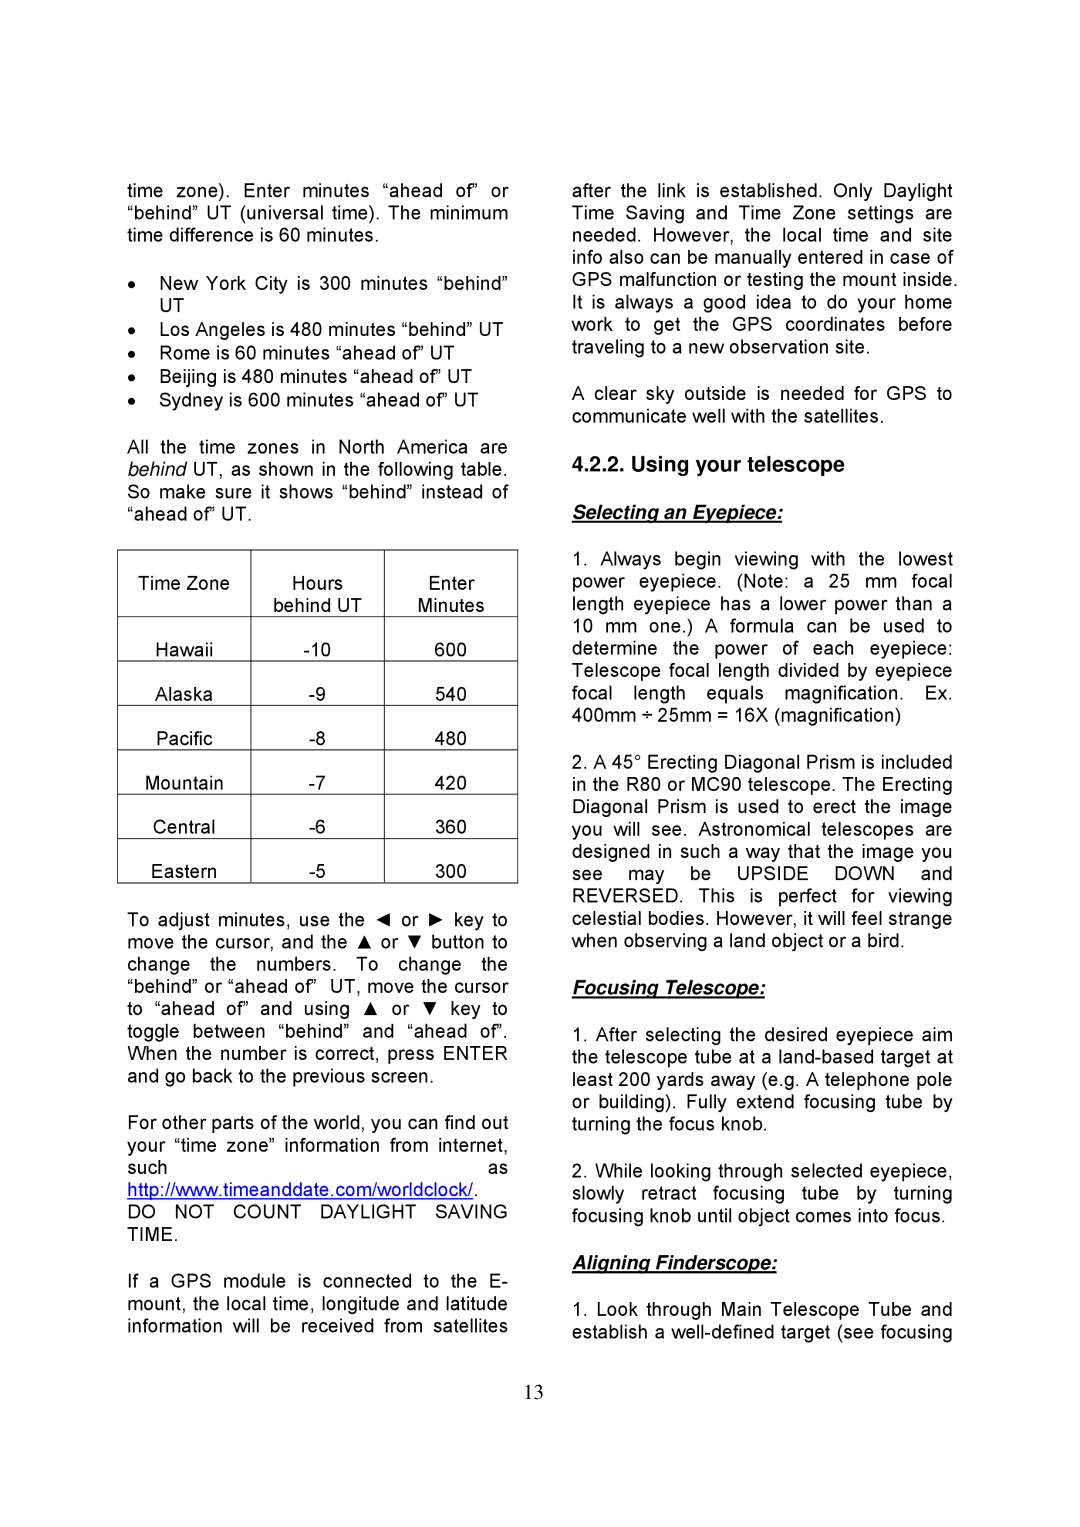
All the time zones in North America are behind UT, as shown in the following table. So make sure it shows “behind” instead of “ahead of” UT.

Time Zone

Hours

Enter


behind UT

Minutes

Hawaii

-10

600

Alaska

-9

540

Pacific

-8

480

Mountain

-7

420

Central

-6

360

Eastern

-5

300

To adjust minutes, use the ◄ or ► key to move the cursor, and the ▲ or ▼ button to change the numbers. To change the “behind” or “ahead of” UT, move the cursor to “ahead of” and using ▲ or ▼ key to toggle between “behind” and “ahead of”. When the number is correct, press ENTER and go back to the previous screen.

For other parts of the world, you can find out your “time zone” information from internet,

suchas http://www.timeanddate.com/worldclock/.

DO NOT COUNT DAYLIGHT SAVING TIME.

If a GPS module is connected to the E- mount, the local time, longitude and latitude information will be received from satellites

13

after the link is established. Only Daylight Time Saving and Time Zone settings are needed. However, the local time and site info also can be manually entered in case of GPS malfunction or testing the mount inside. It is always a good idea to do your home work to get the GPS coordinates before traveling to a new observation site.

A clear sky outside is needed for GPS to communicate well with the satellites.

4.2.2. Using your telescope

Selecting an Eyepiece:

1.Always begin viewing with the lowest power eyepiece. (Note: a 25 mm focal length eyepiece has a lower power than a

10mm one.) A formula can be used to determine the power of each eyepiece: Telescope focal length divided by eyepiece focal length equals magnification. Ex. 400mm ÷ 25mm = 16X (magnification)

2.A 45° Erecting Diagonal Prism is included in the R80 or MC90 telescope. The Erecting Diagonal Prism is used to erect the image you will see. Astronomical telescopes are designed in such a way that the image you see may be UPSIDE DOWN and REVERSED. This is perfect for viewing celestial bodies. However, it will feel strange when observing a land object or a bird.

Focusing Telescope:

1.After selecting the desired eyepiece aim the telescope tube at a land-based target at least 200 yards away (e.g. A telephone pole or building). Fully extend focusing tube by turning the focus knob.

2.While looking through selected eyepiece, slowly retract focusing tube by turning focusing knob until object comes into focus.

Aligning Finderscope:

1.Look through Main Telescope Tube and establish a well-defined target (see focusing

Page 13
Image 13
iOptron 8504, 8503, 8502, 8500 Using your telescope, Selecting an Eyepiece, Focusing Telescope, Aligning Finderscope

8500, 8502, 8504, 8503 specifications

The iOptron 8500 series telescopes, encompassing models 8500, 8502, 8503, and 8504, represent a significant advancement in astronomical observation technology. Each of these telescopes is designed to cater to both amateur astronomers and experienced astrophotographers, ensuring enhanced user experience and performance.

At the heart of the iOptron 8500 series is the innovative GoTo mount technology. This feature allows users to automatically locate and track celestial objects with remarkable precision. By simply entering the desired coordinates or selecting objects from a database, users can spend more time observing rather than searching for objects in the night sky.

Another defining characteristic of the 8500 series is the incorporation of high-quality optics. Each model features advanced multicoated glass for brighter and sharper images. The telescopes also come with a range of focal ratios that enhance performance for various observational needs, such as planetary observation and deep-sky imaging. This enables users to capture stunning images of celestial bodies with clarity and detail.

The 8500, 8502, 8503, and 8504 models also boast user-friendly interfaces and controls. The telescopes are equipped with intuitive hand controllers that allow for easy navigation through numerous astronomical objects and features. Advanced tracking capabilities ensure that the telescopes can maintain their focus on targets, making them ideal for long-exposure astrophotography.

In terms of portability, the iOptron 8500 series is designed to be lightweight without sacrificing sturdiness. This is particularly beneficial for those who travel to dark skies for better viewing conditions. The telescopes also feature quick-release mounts, making it easy to assemble and disassemble for transport.

Powering these telescopes is a reliable battery system that supports extended observation nights. Users can easily connect to external power sources or opt for portable power packs, enhancing the versatility of the telescopes during field use.

The 8500 series is also compatible with various accessories, including cameras and filters, allowing for a customized observing experience. Whether focused on planetary details or capturing the intricate structures of deep-sky objects, the iOptron 8500 series provides the tools necessary for an extraordinary astronomical journey.

In summary, the iOptron 8504, 8502, 8503, and 8500 telescopes deliver a robust combination of advanced technology, user-centered design, and excellent optical performance, making them a valuable addition to any astronomer's toolkit.