SECTION 2: INSTALLATION/OPERATION INSTRUCTIONS

INSTALLATION INSTRUCTIONS & DIAGRAMS for the HT-1 & HT-2

Installation Instructions:

1. Identify the appropriate location for the box.

2.Make sure the electrical supply to the dishmachine has been turned off at the supply circuit breaker.

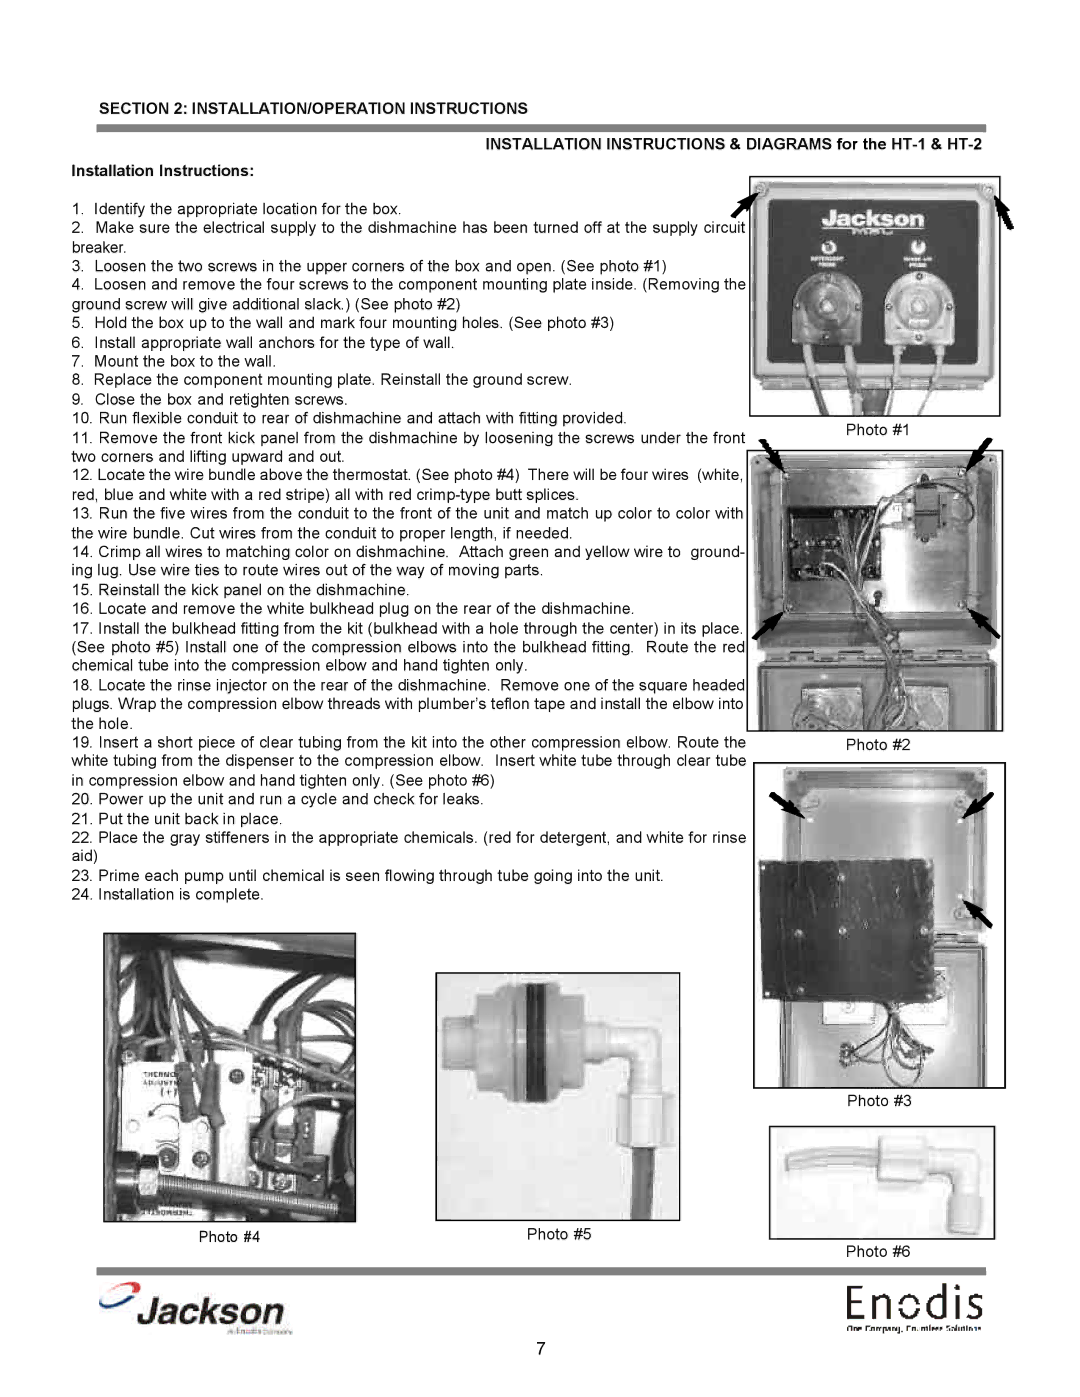
3.Loosen the two screws in the upper corners of the box and open. (See photo #1)

4.Loosen and remove the four screws to the component mounting plate inside. (Removing the ground screw will give additional slack.) (See photo #2)

5.Hold the box up to the wall and mark four mounting holes. (See photo #3)

6.Install appropriate wall anchors for the type of wall.

7.Mount the box to the wall.

8.Replace the component mounting plate. Reinstall the ground screw.

9.Close the box and retighten screws.

10.Run flexible conduit to rear of dishmachine and attach with fitting provided.

11.Remove the front kick panel from the dishmachine by loosening the screws under the front two corners and lifting upward and out.

12.Locate the wire bundle above the thermostat. (See photo #4) There will be four wires (white, red, blue and white with a red stripe) all with red crimp-type butt splices.

13.Run the five wires from the conduit to the front of the unit and match up color to color with the wire bundle. Cut wires from the conduit to proper length, if needed.

14.Crimp all wires to matching color on dishmachine. Attach green and yellow wire to ground- ing lug. Use wire ties to route wires out of the way of moving parts.

15.Reinstall the kick panel on the dishmachine.

16.Locate and remove the white bulkhead plug on the rear of the dishmachine.

17.Install the bulkhead fitting from the kit (bulkhead with a hole through the center) in its place. (See photo #5) Install one of the compression elbows into the bulkhead fitting. Route the red chemical tube into the compression elbow and hand tighten only.

18.Locate the rinse injector on the rear of the dishmachine. Remove one of the square headed plugs. Wrap the compression elbow threads with plumber’s teflon tape and install the elbow into the hole.

19.Insert a short piece of clear tubing from the kit into the other compression elbow. Route the white tubing from the dispenser to the compression elbow. Insert white tube through clear tube in compression elbow and hand tighten only. (See photo #6)

20.Power up the unit and run a cycle and check for leaks.

21.Put the unit back in place.

22.Place the gray stiffeners in the appropriate chemicals. (red for detergent, and white for rinse

aid)

23.Prime each pump until chemical is seen flowing through tube going into the unit.

24.Installation is complete.

Photo #1

Photo #2

Photo #3

Photo #4

Photo #5

Photo #6

7

Page 12
Image 12
Jackson LT-3, LT-1 INSTALLATION/OPERATION Instructions, Installation Instructions & Diagrams for the HT-1 & HT-2

LT-3, LT-1, HT-1, HT-2 specifications

The Jackson HT-2, HT-1, LT-1, and LT-3 are notable models in Jackson’s lineup of electric guitars, each designed to cater to specific playing styles and preferences. These instruments are renowned for their quality, playability, and distinctive sound, making them favorites among musicians across various genres.

The Jackson HT-2 is a versatile model that offers an array of features designed for performance and comfort. It typically features a lightweight body made from high-quality basswood or poplar, which enhances resonance and sustain. The HT-2 is equipped with a fast-playing maple neck and a compound radius fingerboard, allowing for effortless playability, whether playing chords or intricate solos. The guitar’s dual high-output humbucking pickups deliver a powerful tonal palette, ensuring that players can achieve a wide range of sounds, from heavy distortion to clear cleans.

The HT-1 offers a more compact design but does not compromise on sound or performance. It shares many features with the HT-2, including the lightweight body and comfortable neck profile. However, the HT-1 is designed with a focus on beginners and intermediate players, making it accessible while still delivering professional-quality tones. Its single-coil and humbucking pickup configuration provides versatility, allowing players to switch between bright, clean tones and warmer, thicker sounds with ease.

Moving on to the LT-1, this model is tailored for those who prefer a more straightforward approach to their sound. The LT-1 typically features a simplified control layout, making it easy for players to dial in their desired tone without any fuss. This guitar also incorporates a versatile pickup setup, often utilizing single-coil pickups that excel at producing sparkling cleans alongside punchy overdriven tones. The LT-1 is especially popular among blues and rock musicians who appreciate a responsive instrument.

Lastly, the LT-3 builds upon the characteristics of the LT-1 with enhanced features and upgraded components. The LT-3 often includes a more advanced hardware setup and premium pickups designed to offer improved clarity and enhanced tonal richness. With a slightly larger body and neck profile, it caters to players who desire both comfort and a fuller sound. The LT-3 is often favored by gigging musicians for its reliability and the breadth of sounds it can produce, making it suitable for a wide range of musical genres.

In summary, Jackson's HT-2, HT-1, LT-1, and LT-3 are thoughtfully designed guitars, each with unique features and technologies that cater to various player needs. From beginners to seasoned pros, these instruments represent a commitment to quality craftsmanship and innovation in the world of electric guitars.