FM Antenna

AM Antenna


CD PLAYER


L


R

Optical

Coax


AUDIO RECORDER

REC/IN

PLAY/OUT

COMP V2

COMP V1

REGION SELECTOR

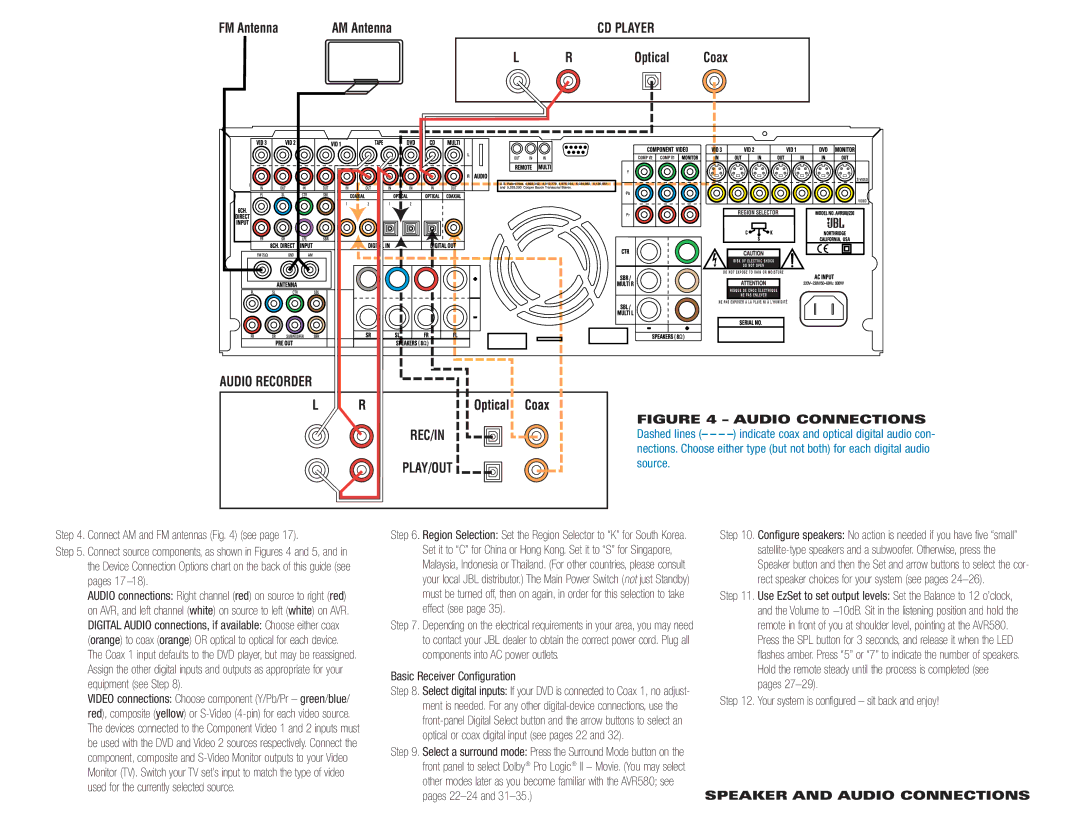
FIGURE 4 – AUDIO CONNECTIONS Dashed lines (– – – –) indicate coax and optical digital audio con- nections. Choose either type (but not both) for each digital audio source.

Step 4. Connect AM and FM antennas (Fig. 4) (see page 17).

Step 5. Connect source components, as shown in Figures 4 and 5, and in the Device Connection Options chart on the back of this guide (see pages 17 –18).

AUDIO connections: Right channel (red) on source to right (red) on AVR, and left channel (white) on source to left (white) on AVR. DIGITAL AUDIO connections, if available: Choose either coax (orange) to coax (orange) OR optical to optical for each device. The Coax 1 input defaults to the DVD player, but may be reassigned. Assign the other digital inputs and outputs as appropriate for your equipment (see Step 8).

VIDEO connections: Choose component (Y/Pb/Pr – green/blue/ red), composite (yellow) or S-Video (4-pin) for each video source. The devices connected to the Component Video 1 and 2 inputs must be used with the DVD and Video 2 sources respectively. Connect the component, composite and S-Video Monitor outputs to your Video Monitor (TV). Switch your TV set’s input to match the type of video used for the currently selected source.

Step 6. Region Selection: Set the Region Selector to “K” for South Korea. Set it to “C” for China or Hong Kong. Set it to “S” for Singapore, Malaysia, Indonesia or Thailand. (For other countries, please consult your local JBL distributor.) The Main Power Switch (not just Standby) must be turned off, then on again, in order for this selection to take effect (see page 35).

Step 7. Depending on the electrical requirements in your area, you may need to contact your JBL dealer to obtain the correct power cord. Plug all components into AC power outlets.

Basic Receiver Configuration

Step 8. Select digital inputs: If your DVD is connected to Coax 1, no adjust- ment is needed. For any other digital-device connections, use the front-panel Digital Select button and the arrow buttons to select an optical or coax digital input (see pages 22 and 32).

Step 9. Select a surround mode: Press the Surround Mode button on the front panel to select Dolby® Pro Logic® II – Movie. (You may select other modes later as you become familiar with the AVR580; see pages 22–24 and 31–35.)

Step 10. Configure speakers: No action is needed if you have five “small” satellite-type speakers and a subwoofer. Otherwise, press the Speaker button and then the Set and arrow buttons to select the cor- rect speaker choices for your system (see pages 24–26).

Step 11. Use EzSet to set output levels: Set the Balance to 12 o’clock, and the Volume to –10dB. Sit in the listening position and hold the remote in front of you at shoulder level, pointing at the AVR580. Press the SPL button for 3 seconds, and release it when the LED flashes amber. Press “5” or “7” to indicate the number of speakers. Hold the remote steady until the process is completed (see pages 27–29).

Step 12. Your system is configured – sit back and enjoy!

SPEAKER AND AUDIO CONNECTIONS

Page 3
Image 3
JBL AVR525 Basic Receiver Configuration, Your system is configured sit back and enjoy, Speaker and Audio Connections

AVR525 specifications

The JBL AVR525 is a highly regarded audio/video receiver that has carved a niche for itself among home theater enthusiasts. Launched in the early 2000s, this model reflects JBL’s commitment to delivering high-quality sound and cutting-edge technology that enhances the overall home entertainment experience.

One of the standout features of the AVR525 is its robust power output. Equipped with a 5.1-channel amplifier configuration, it delivers an impressive 100 watts per channel, ensuring that even the most demanding audio tracks are reproduced with clarity and impact. This power enables the AVR525 to easily drive a variety of speaker configurations, making it suitable for a range of room sizes and audio setups.

The AVR525 incorporates a host of advanced technologies to enhance audio fidelity. Notably, it features Dolby Digital and DTS decoding, which provide a lifelike surround sound experience for both movies and music. This enhances the immersion factor, allowing users to feel like they are part of the action. Furthermore, the receiver supports various audio formats, including PCM, ensuring compatibility with a wide array of media sources.

In addition to impressive audio capabilities, the AVR525 showcases a comprehensive connectivity suite. It comes equipped with multiple composite, S-Video, and component video inputs, alongside digital audio inputs like optical and coaxial connections. This extensive range of inputs allows users to connect multiple devices, such as DVD players, gaming consoles, and set-top boxes, facilitating a versatile home entertainment system.

A distinctive characteristic of the AVR525 is its user-friendly interface. The receiver is designed with a straightforward on-screen menu that simplifies navigation, making it easy for users to adjust settings and customize their listening experience. The inclusion of a remote control adds to the convenience, allowing users to manage their system from the comfort of their couch.

Another notable feature of the AVR525 is its robust bass management system. This allows users to fine-tune their audio setup, ensuring that low-frequency sounds are delivered with precision, enhancing the overall audio experience. Coupled with the option for advanced speaker configurations, such as Bi-Wiring, the AVR525 appeals to audiophiles seeking to optimize their sound systems.

In summary, the JBL AVR525 is a well-rounded audio/video receiver that combines powerful performance with advanced features. With its rich sound reproduction, extensive connectivity options, and user-friendly interface, it remains a solid choice for home theater enthusiasts looking for a reliable and high-quality audio solution.