Electronic Ignition System

Install Burner Heads and Caps

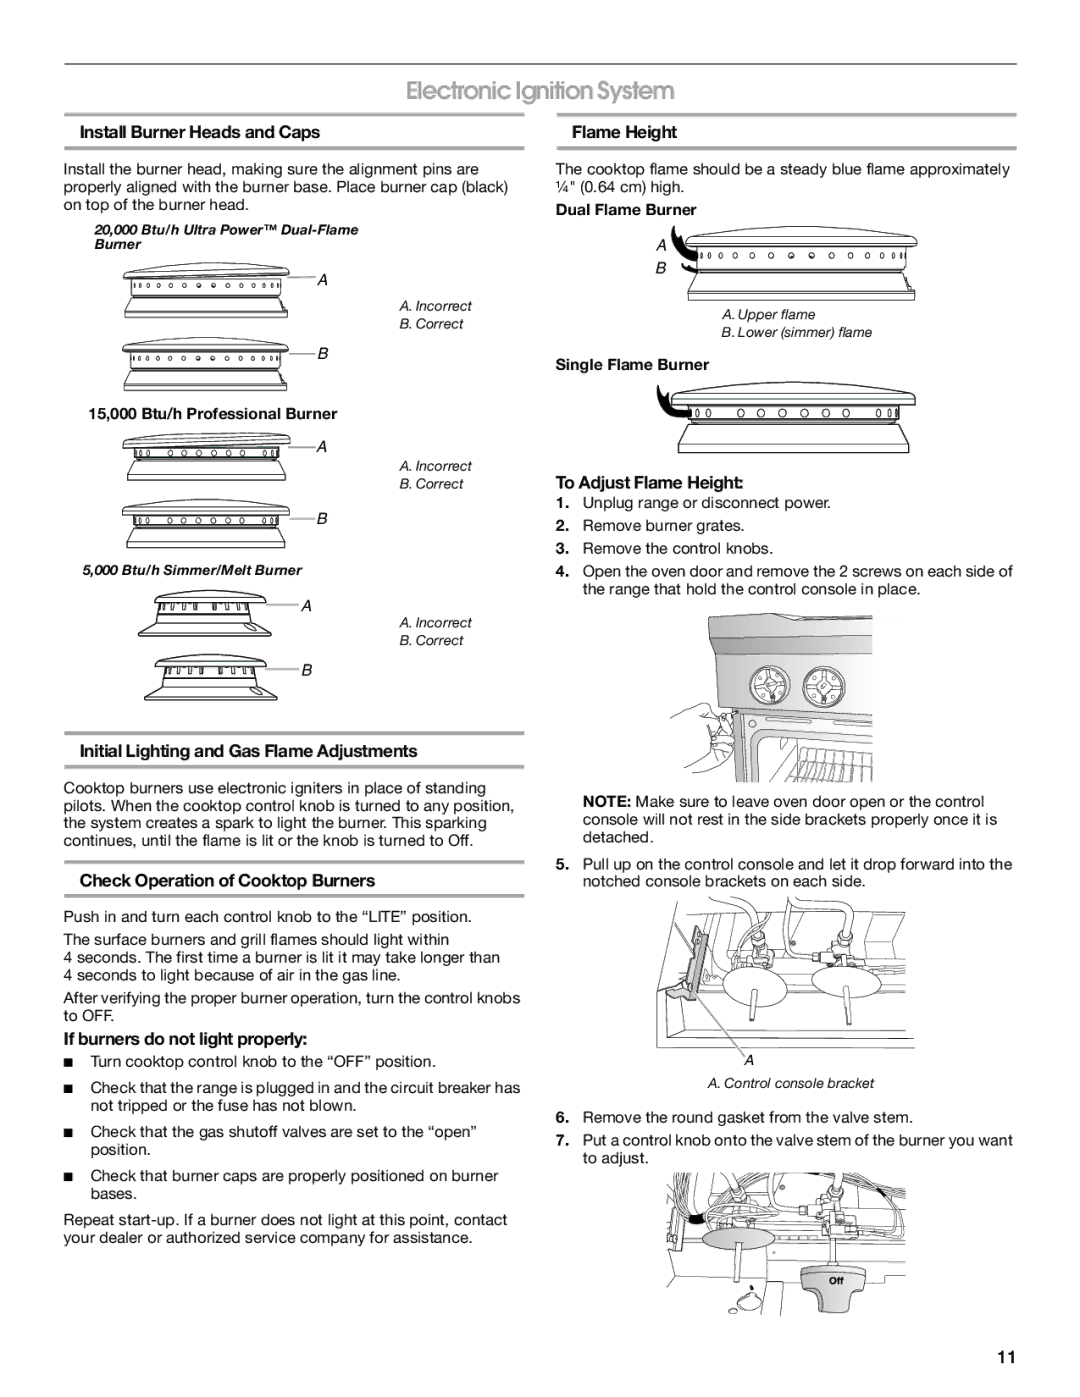
Install the burner head, making sure the alignment pins are properly aligned with the burner base. Place burner cap (black) on top of the burner head.

20,000 Btu/h Ultra Power™ Dual-Flame

Burner

A

A. Incorrect

B. Correct

B

15,000 Btu/h Professional Burner

A

A. Incorrect

B. Correct

B

5,000 Btu/h Simmer/Melt Burner

A

A. Incorrect

B. Correct

B

Flame Height

The cooktop flame should be a steady blue flame approximately ¼" (0.64 cm) high.

Dual Flame Burner

A

B

A. Upper flame

B. Lower (simmer) flame

Single Flame Burner

To Adjust Flame Height:

1.Unplug range or disconnect power.

2.Remove burner grates.

3.Remove the control knobs.

4.Open the oven door and remove the 2 screws on each side of the range that hold the control console in place.

Initial Lighting and Gas Flame Adjustments

Cooktop burners use electronic igniters in place of standing pilots. When the cooktop control knob is turned to any position, the system creates a spark to light the burner. This sparking continues, until the flame is lit or the knob is turned to Off.

Check Operation of Cooktop Burners

Push in and turn each control knob to the “LITE” position.

The surface burners and grill flames should light within

4 seconds. The first time a burner is lit it may take longer than 4 seconds to light because of air in the gas line.

After verifying the proper burner operation, turn the control knobs to OFF.

If burners do not light properly:

Turn cooktop control knob to the “OFF” position.

Check that the range is plugged in and the circuit breaker has not tripped or the fuse has not blown.

Check that the gas shutoff valves are set to the “open” position.

Check that burner caps are properly positioned on burner bases.

Repeat start-up. If a burner does not light at this point, contact your dealer or authorized service company for assistance.

NOTE: Make sure to leave oven door open or the control console will not rest in the side brackets properly once it is detached.

5.Pull up on the control console and let it drop forward into the notched console brackets on each side.

A

A. Control console bracket

6.Remove the round gasket from the valve stem.

7.Put a control knob onto the valve stem of the burner you want to adjust.

11

Page 11
Image 11
Jenn-Air W10323791 installation instructions Electronic Ignition System

W10323791 specifications

The Jenn-Air W10323791 is a premium appliance part designed for select models of Jenn-Air refrigerators, particularly optimized for maintaining efficient cooling and temperature management. As a replacement part, the W10323791 offers exceptional reliability, aligning with the brand's reputation for high-quality kitchen appliances.

One of the main features of the W10323791 is its ability to regulate temperature effectively within the refrigerator. It plays a crucial role in ensuring that food items remain fresh for longer periods by maintaining consistent cooling. This component acts as a thermostat, enabling precise temperature control, which is vital for preserving the quality of perishable goods. With the W10323791, households can rest assured that their refrigeration system is operating at optimal performance, thanks to its durable construction and advanced capabilities.

Another notable characteristic of the W10323791 is its compatibility with various Jenn-Air refrigerator models. This versatility makes it easier for users to find a replacement that fits their specific appliance, ensuring a seamless integration into existing systems. The part is designed for straightforward installation, allowing homeowners to replace it without requiring professional help, thus saving both time and money.

In terms of technology, the W10323791 incorporates advanced materials that enhance its longevity and resistance to wear and tear. The component undergoes rigorous testing to meet the high standards set by Jenn-Air, making it a trusted choice for consumers seeking dependable appliance parts. Moreover, its energy-efficient design contributes to lower utility bills, aligning with today's emphasis on sustainability and cost-effective living.

In summary, the Jenn-Air W10323791 is a key component that underscores the brand's commitment to quality and innovation. With its focus on temperature control, compatibility, and durability, the W10323791 ensures that your Jenn-Air refrigerator operates efficiently, delivering fresh food and preserving culinary delights. Whether you are replacing a worn-out part or enhancing your kitchen's functionality, the W10323791 stands out as an essential part of a modern kitchen. It embodies the integration of advanced technology with user-friendly design, making it an excellent choice for any Jenn-Air refrigerator owner.