CR1620 / CR1620SE
Installation (continued)
Kit Installation
If your vehicle requires the use of an installation kit to mount this radio, follow the instructions included with the installation kit to attach the radio to the mounting plate supplied with the kit.
1.Wire and test the radio as outlined in the Universal Installation instructions.
2.Install the radio/mounting plate assembly to the
3.Attach the support strap to the radio and dashboard as described in the Universal Installation instructions.
4.Replace the dashboard trim panel.
ISO Installation
This unit has threaded holes in the chassis side panels which may be used with the original factory mounting brackets of some vehicles to mount the radio to the dashboard. Please consult with your local car stereo shop for assistance on this type of installation.
1.Remove the existing factory radio from the dashboard or center console mounting. Save all hardware and brackets as they will be used to mount the new radio.
2.Carefully unsnap the plastic frame from the front of the new radio chassis. Remove and discard the frame.
3.Remove the factory mounting brackets and hardware from the existing radio, and attach them to the new radio. Do not exceed M5 x 9 MM maximum screw size. Longer screws may touch and damage components inside the chassis.
4.Wire the new radio to the vehicle as outlined in the Universal Installation instructions.
5.Mount the new radio assembly to the dashboard or center console using the reverse procedure of step 1.
Remove Radio
To remove the radio after installation, remove the trim ring by lifting in the center and pulling it off from either side. Insert the removal keys straight back until they lock, and pull the radio out. If removal keys are inserted at an angle, they will not lock properly to release the unit.
Instalación (continuado)
Equipo de Instalación
Si su vehículo requiere el uso de un equipo de instalación par amontar este radio, siga las instrucciones incluidas con el equipo de instalación para adherir el radio al plato de montaje provisto en el equipo. Conecte el cable y verifique el radio como se determina en las instrucciones de Instalación Universal. Instale el radio o el ensamblaje del plato de montaje al segundo tablero, de acuerdo a las instrucciones en el equipo de instalación. Adjunte la cinta de soporte al radio y al tablero como se describe en las instrucciones de Instalación Universal. Reemplace el panel de ajuste del tablero.
Instalación ISO
Esta unidad tiene agujeros roscados en los paneles laterales de chasis que pueden utilizarse con las ménsulas de montar originales de fábrica que vienen con algunos vehículos para motar el radio al tablero. Por favor, consulte en su tienda local de estéreos de automóviles si necesita asistencia en este tipo de instalación. Quite del tablero el radio existente de fábrica o centre la consola de montaje. Guarde todos los elementos y ménsulas pues serán utilizados para montar el nuevo radio. Con cuidado destrabe el marco plástico del frente del chasis del nuevo radio. Quite y deseche el marco. Quite las ménsulas y elementos de montaje que vienen de fábrica con el radio existente y adhiéralos al nuevo radio. No exceda el tamaño de tornillo de M5 x 9MM. Tornillos más largos pueden tocar y dañar componentes dentro del chasis. Conecte los cables del nuevo radio al vehículo como se especifica en las instrucciones de Instalación Universal. Monte el ensamblaje del nuevo radio al tablero o a la consola central utilizando el procedimiento reverso al paso 1.
Cómo Desmontar el Radio
Inserte la(s) herramienta(s). Hale el radio hacia afuera. Desconecte el arnés del cableado, y quite el radio.
Installation (continué)
Installation de la trousse
Si votre voiture exige l'usage d'une trousse d'installation pour monter la radio, suivez les instructions qui accompagne la trousse pour attacher la radio au plateau de montage fourni avec la trousse. Câblez et testez la radio en suivant les instructions pour l'installation universelle. Installez l'ensemble radio /plateau de montage à la
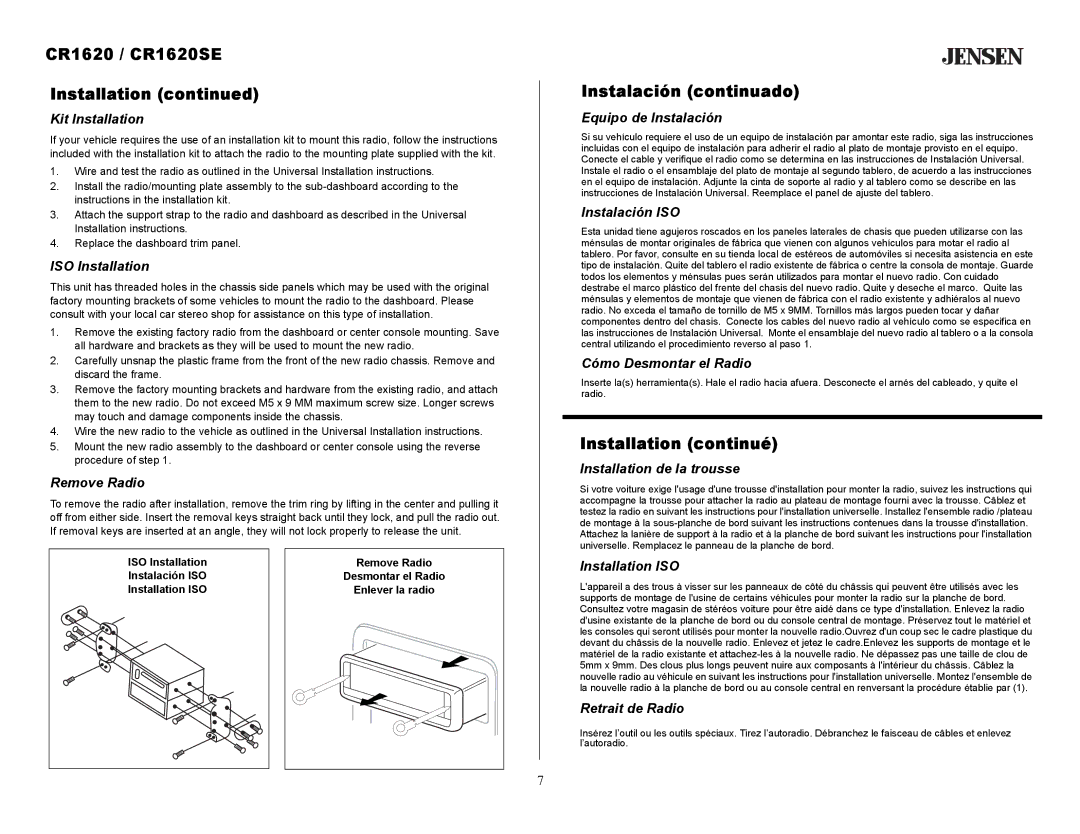
ISO Installation |
Instalación ISO |
Installation ISO |
Remove Radio |
Desmontar el Radio |
Enlever la radio |
Installation ISO
L'appareil a des trous à visser sur les panneaux de côté du châssis qui peuvent être utilisés avec les supports de montage de l'usine de certains véhicules pour monter la radio sur la planche de bord. Consultez votre magasin de stéréos voiture pour être aidé dans ce type d'installation. Enlevez la radio d'usine existante de la planche de bord ou du console central de montage. Préservez tout le matériel et les consoles qui seront utilisés pour monter la nouvelle radio.Ouvrez d'un coup sec le cadre plastique du devant du châssis de la nouvelle radio. Enlevez et jetez le cadre.Enlevez les supports de montage et le matériel de la radio existante et
Retrait de Radio
Insérez l’outil ou les outils spéciaux. Tirez l’autoradio. Débranchez le faisceau de câbles et enlevez l’autoradio.
7