Language Video Audio More Aud
5.1 channel
2 channel Off
PCM
Raw
Off
5.1 channel
2 channel Off

FRONT AND BACK PANELS

SYSTEM SETUP

Front Panel Functions

1

2

3

4

5

6

7

Z300 DVD AMPLIFIER SYSTEM

VOLUME

DVD/CD/CD-R/CD-RW/MP3/HDCD


DOWN

UP

MP3 Setting

Follow these steps to set the outgoing digital audio format of MP3 tracks (Note: The analog format is fixed to 2 channel ):

A.From Audio mode, press SETUP.

B.Select Audio mode, press ENTER.

C.Select MP3, and press ENTER.

D.Set Digital out to:

PCM (default) to output 2 channel digital from the optical/coaxial digital audio outputs; e.g.,to a Minidisc recorder.

Off to disable MP3 digital output.

E.Press SETUP to save and exit.

Language Video Audio More Aud Rating


Analog Out

Digital Out

Ac3

5.1 channel

PCM

MP3/WMA

5.1 channel

PCM

Others

5.1 channel

PCM

Others Setting

Language Video Audio More Aud Rating


6

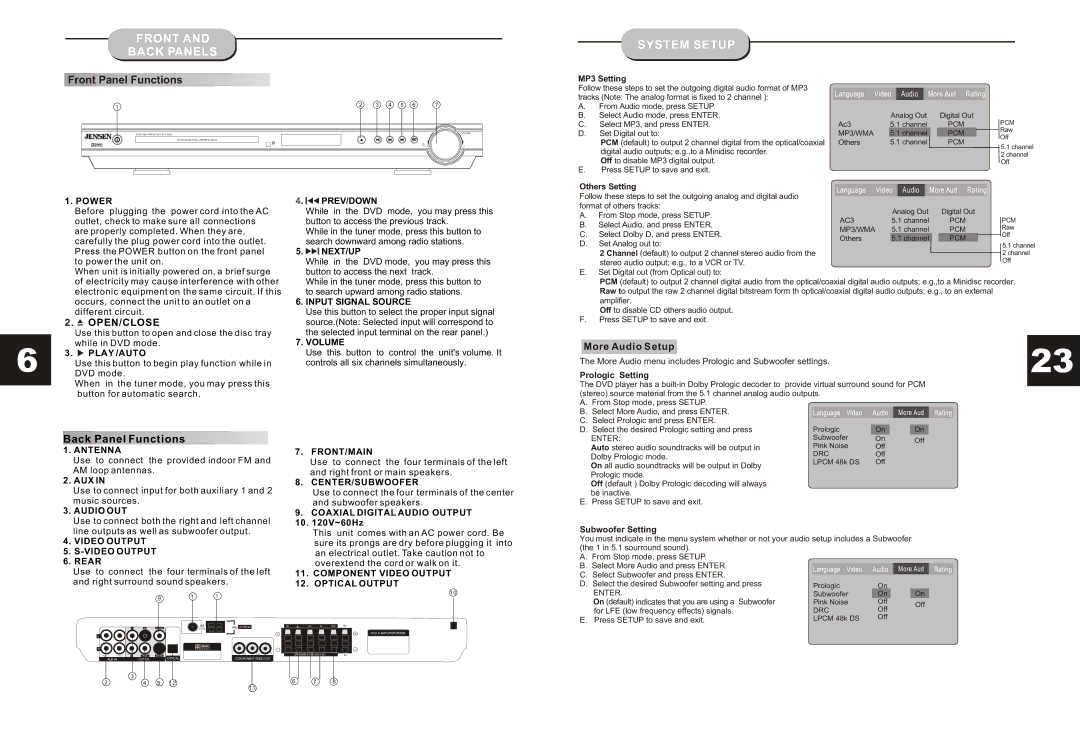
1. POWER

Before plugging the power cord into the AC

outlet, check to make sure all connections are properly completed. When they are,

carefully the plug power cord into the outlet. Press the POWER button on the front panel to power the unit on.

When unit is initially powered on, a brief surge

of electricity may cause interference with other electronic equipment on the same circuit. If this occurs, connect the unit to an outlet on a different circuit.

2. OPEN/CLOSE

Use this button to open and close the disc tray

while in DVD mode.

3. PLAY /AUTO

Use this button to begin play function while in DVD mode.

When in the tuner mode, you may press this button for automatic search.

4. PREV/DOWN

While in the DVD mode, you may press this button to access the previous track.

While in the tuner mode, press this button to search downward among radio stations.

5. NEXT/UP

While in the DVD mode, you may press this button to access the next track.

While in the tuner mode, press this button to to search upward among radio stations.

6.INPUT SIGNAL SOURCE

Use this button to select the proper input signal source.(Note: Selected input will correspond to

the selected input terminal on the rear panel.)

7.VOLUME

Use this button to control the unit's volume. It controls all six channels simultaneously.

Follow these steps to set the outgoing analog and digital audio format of others tracks:

A.

From Stop mode, press SETUP.

Analog Out

Digital Out


5.1 channel

PCM


PCM

B.

AC3


Select Audio, and press ENTER.

5.1 channel

PCM


Raw


MP3/WMA


C. Select Dolby D, and press ENTER.

5.1 channel

PCM


Off


Others


D.Set Analog out to:

2 Channel (default) to output 2 channel stereo audio from the stereo audio output; e.g., to a VCR or TV.

E.Set Digital out (from Optical out) to:

PCM (default) to output 2 channel digital audio from the optical/coaxial digital audio outputs; e.g.,to a Minidisc recorder. Raw to output the raw 2 channel digital bitstream form th optical/coaxial digital audio outputs; e.g., to an external

amplifier.

Off to disable CD others audio output.

F.Press SETUP to save and exit.

More Audio Setup

The More Audio menu includes Prologic and Subwoofer settings.

Prologic Setting

The DVD player has a built-in Dolby Prologic decoder to provide virtual surround sound for PCM

(stereo) source material from the 5.1 channel analog audio outputs.


A. From Stop mode, press SETUP.


B. Select More Audio, and press ENTER.

Language Video

Audio

More Aud Rating

C. Select Prologic and press ENTER.


D. Select the desired Prologic setting and press

Prologic

On

On

23

Back Panel Functions

ENTER:

Subwoofer

On

Off


Pink Noise

Off


1. ANTENNA

Use to connect the provided indoor FM and

AM loop antennas.

2. AUX IN

Use to connect input for both auxiliary 1 and 2

music sources.

3. AUDIO OUT

Use to connect both the right and left channel

7. FRONT/MAIN

Use to connect the four terminals of the left and right front or main speakers.

8. CENTER/SUBWOOFER

Use to connect the four terminals of the center and subwoofer speakers.

9.COAXIAL DIGITAL AUDIO OUTPUT

10.120V~60Hz

Auto stereo audio soundtracks will be output in

DRC

Off

Dolby Prologic mode.

On all audio soundtracks will be output in Dolby

LPCM 48k DS

Off


Prologic mode.

Off (default ) Dolby Prologic decoding will always be inactive.

E. Press SETUP to save and exit.


line outputs as well as subwoofer output.

4.

VIDEO OUTPUT

5.

S-VIDEO OUTPUT

6.

REAR

Use to connect the four terminals of the left and right surround sound speakers.

This unit comes with an AC power cord. Be sure its prongs are dry before plugging it into

an electrical outlet. Take caution not to overextend the cord or walk on it.

11. COMPONENT VIDEO OUTPUT

12. OPTICAL OUTPUT

1 0

Subwoofer Setting

You must indicate in the menu system whether or not your audio setup includes a Subwoofer (the 1 in 5.1 sourround sound).

A. From Stop mode, press SETUP.


B. Select More Audio and press ENTER.


C. Select Subwoofer and press ENTER.


D. Select the desired Subwoofer setting and press

Prologic

On

ENTER.

Subwoofer

On

Rating

On


9

1

1

L


COAXIAL


FM

SW


(75 Ω)

L


R


AUX 1 AUX 2 R

VIDEO

S-VIDEO

OPTICAL


AUX IN

OUTPUT


3


2

4

5

12


AM ANTENNA

Cr Cb Y

COMPONENT VIDEO OUT

11

SR

SL

FR

FL

CEN

SW


DVD & AMPLIFIER SYSTEM

SPEAKERS IMPEDANCE 6Ω

8Ω

6 7 8

On (default) indicates that you are using a Subwoofer

Pink Noise

Off

for LFE (low frequency effects) signals.

DRC

Off

E. Press SETUP to save and exit.

LPCM 48k DS

Off

Off

Page 7
Image 7
Jensen JHT140 manual Front and Back Panels System Setup

JHT140, JHT140 specifications

The Jensen JHT140 is a standout model in Jensen’s lineup of high-performance speakers, designed to deliver a rich auditory experience. As a versatile option, the JHT140 is perfect for various setups, suitable for home theaters, music systems, and more. Its sleek design and advanced technology make it an impressive choice for audio enthusiasts seeking both aesthetics and sound quality.

One of the main features of the Jensen JHT140 is its advanced driver configuration. The speaker is equipped with a high-efficiency 14-inch woofer that provides deep, resonant bass tones while maintaining clarity across different frequency ranges. This woofer is complemented by a finely-tuned tweeter that handles the higher frequencies, ensuring that every note is crisp and clear. The combination of these drivers results in a well-rounded sound profile, making the JHT140 suitable for listening to music, watching movies, or gaming.

The JHT140 also incorporates cutting-edge technology in its construction. The speaker cabinet is designed with acoustics in mind, featuring a reinforced structure that minimizes distortion and resonance. This cabinet design not only contributes to an improved sound quality but also enhances the overall longevity of the product. The use of high-quality materials ensures that the speaker can withstand extended use without compromising its auditory performance.

Another notable characteristic of the Jensen JHT140 is its versatility. The speaker includes various connectivity options, allowing users to easily integrate it into existing audio setups. It features standard input options such as RCA and speaker wire connections, making it compatible with a wide range of audio equipment. This flexibility is a significant advantage for consumers looking to upgrade their sound system without overhauling their entire setup.

In addition, the JHT140 is designed for user-friendly operation. Its controls are easily accessible, allowing adjustments in settings to further tailor the listening experience. The speaker also boasts a sleek, modern aesthetic, making it a visually appealing addition to any environment.

In conclusion, the Jensen JHT140 combines powerful audio performance with advanced technology and a stylish design. Its high-efficiency drivers, solid cabinet construction, versatile connectivity, and user-friendly features make it an excellent choice for anyone looking to enhance their sound experience. Whether for a home theater or a personal sound system, the JHT140 undoubtedly stands out as a compelling option in the audio market.