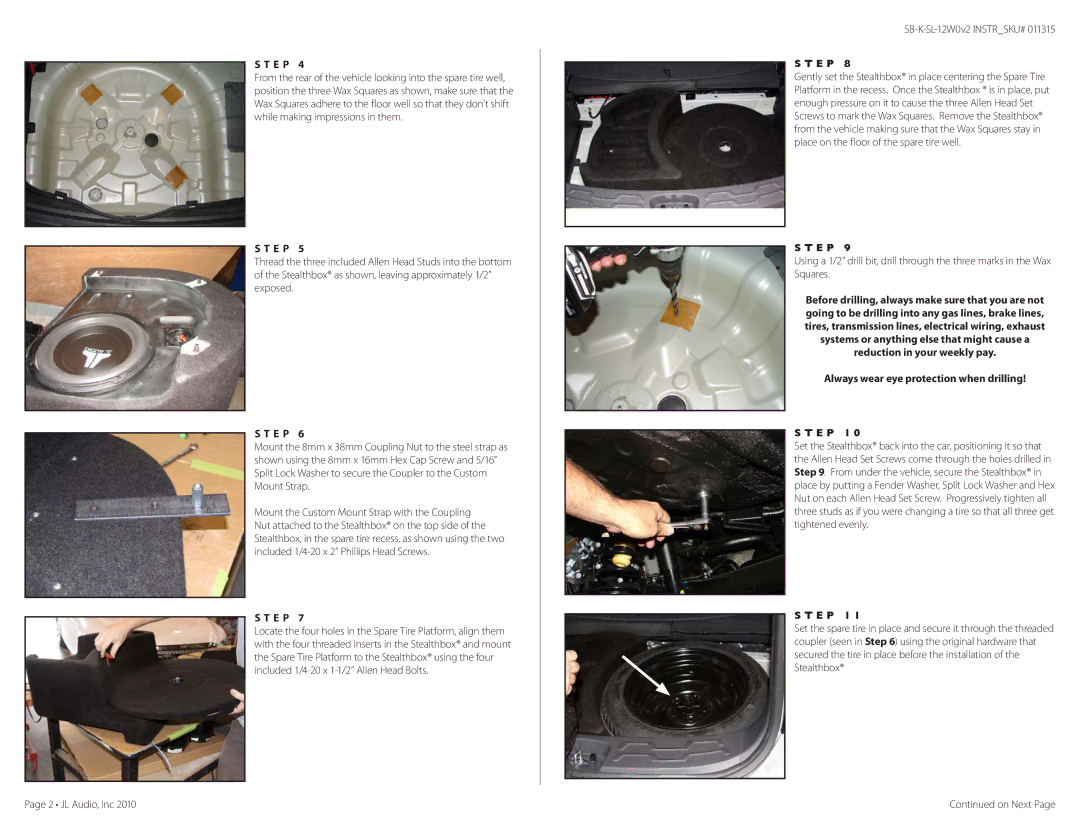
S T E P 4
From the rear of the vehicle looking into the spare tire well, position the three Wax Squares as shown, make sure that the Wax Squares adhere to the floor well so that they don’t shift while making impressions in them.
S T E P 5
Thread the three included Allen Head Studs into the bottom of the Stealthbox® as shown, leaving approximately 1/2” exposed.
S T E P 6
Mount the 8mm x 38mm Coupling Nut to the steel strap as shown using the 8mm x 16mm Hex Cap Screw and 5/16” Split Lock Washer to secure the Coupler to the Custom Mount Strap.
Mount the Custom Mount Strap with the Coupling Nut attached to the Stealthbox® on the top side of the Stealthbox, in the spare tire recess, as shown using the two included
S t e p 7
Locate the four holes in the Spare Tire Platform, align them with the four threaded inserts in the Stealthbox® and mount the Spare Tire Platform to the Stealthbox® using the four included
SB-K-SL-12W0v2 INSTR_SKU# 011315
S T E P 8
Gently set the Stealthbox® in place centering the Spare Tire Platform in the recess. Once the Stealthbox ® is in place, put enough pressure on it to cause the three Allen Head Set Screws to mark the Wax Squares. Remove the Stealthbox® from the vehicle making sure that the Wax Squares stay in place on the floor of the spare tire well.
S T E P 9
Using a 1/2” drill bit, drill through the three marks in the Wax Squares.
Before drilling, always make sure that you are not going to be drilling into any gas lines, brake lines, tires, transmission lines, electrical wiring, exhaust systems or anything else that might cause a reduction in your weekly pay.
Always wear eye protection when drilling!
S T E P 1 0
Set the Stealthbox® back into the car, positioning it so that the Allen Head Set Screws come through the holes drilled in Step 9. From under the vehicle, secure the Stealthbox® in place by putting a Fender Washer, Split Lock Washer and Hex Nut on each Allen Head Set Screw. Progressively tighten all three studs as if you were changing a tire so that all three get tightened evenly.
S T E P 1 1
Set the spare tire in place and secure it through the threaded coupler (seen in Step 6) using the original hardware that secured the tire in place before the installation of the Stealthbox®
Page 2 • JL Audio, Inc 2010 | Continued on Next Page |
